Monday, 28 September 2020

Rice Papers & Rust - by Nikki K

Morning everyone,

Today I thought I would share a tag I have made with Andy's new Rice Papers, and fab Strata Paste.

I started with the Vintage pack of papers, and took the wood effect paper and glued to an mdf tag with matt medium.  On top of that I took a piece with a vintage lable on, and wet the edges to tear the paper easily.  This was glued on top of the first.

I gave the tag a wash of very watered down Raw Umber paint, to blend the colours of the rice papers better, and then added a little quinacridone gold in a wash.  It just toned it all down.

With a palette knife, I added Strata Paste roughly around the edges of the tag, more in some places than others.  This was then given a wash of  Raw Umber, and some Quinacridone Gold in places. 


The mdf butterfly and scroll were first painted in neat Raw Umber, then I used the new Stonewash Stamp to give the background some detail.  Over that I painted Quinacridone Gold to add the rust effect.  The top layer of the butterfly was also given the rust treatment.

A piece of wire was threaded through the Tag, and curled round a paintbrush on each side to finish.

Have fun crafting, 

Nikki
xx

Products Used:
Artists Acrylics, Raw Umber, Quinacridone Gold.

Tuesday, 22 September 2020

Faith Notebook by Suz Humphreys


Very happy how this turned out. 😁

Using Andy's new 'Faith' stamp, inked with Archival ink, stamped into paper clay, and coloured with Andy's acrylic paints. A wash of Raw Umber, then a mixture of Primary Blue and Primary Yellow to paint the eye. I used a black micron pen to bring out the eye detail and colour the pupil, then a white Sakura gel pen for the whites and highlights on the eye. I glued the clay image onto a notebook (using quick grab glue) after painting the cover with Midnight chalk paint and finally, for that bit bling, I added some copper Gilding Polish.

All of the products used in this project will be available on Andy's tv shows on Create and Craft TV on Monday 28th September, currently scheduled for midday, and I'll be joining him live via Zoom!
But if you'd like to see his full range of products with Creative Expressions, click HERE.

Thanks for looking
Suz
xxx


Monday, 14 September 2020

Trésors de la Méditerranée, by Natassa Blazaki

Hello my lovelies. Hope you are all doing well and keeping safe.

This is Natassa and today I’m on Andy’s blog to share with you a home décor project inspired by the Mediterranean Tile Art. Recently, I received Andy’s new products, which are all gorgeous as always, but what made my heart pound were that set of Tiles Rice Papers, released by Creative Expressions. It was love at first sight!

Haven’t been in Spain or Portugal, where these amazing pieces of art ornate the exteriors and interiors of whole buildings. However, some years ago I visited la Costiera Amalfitana in Italy, where they also have a wonderful ceramic culture that dates back many centuries. Although not exactly the same, there are many similarities between the ceramic artworks of those three countries. Living in a Mediterranean country myself and having the sea as a big part of my culture, it was only natural to draw my inspiration from it. I created this couple of decorative panels, having in mind that they can beautifully ornate the outdoor walls of a Mediterranean beach house.

So, lets dig into the process. As a base I used two pieces of OSB boards, leftovers from another project. They measure 16 ¼ x 7 ¼ inches and first thing I did, was to give them a good coat of white chalk paint.

Let the paint dry well and then used the Mandala stencil and dubbed some paint with a soft sponge. I used a mixture of Artist Pigments Paynes Grey, Cobalt Teal and a tiny drop of Primary Magenta. I used matte decoupage glue to apply the rice papers. No need to cut the papers with scissors. Instead,you get much smoother result if you take a damp detail brush and draw a line where you want to cut the paper. The water softens the rice paper and cuts beautifully.

While the rice paper was still wet, I slightly scratched it  with my fingernails, just to make it a bit distressed. With the same mixture of paint as before, I painted my airdry moulds. Let them dry and then dry brushed them with gold paint, to make their details pop up. 

I glued the moulds on the panels with Quick Grab Glue. Then, I created a dirty wash with Paynes Grey and Transparent Yellow Iron Oxide and applied it on the whole surface. I let it dry naturally.

To decorate the shells, I coated them with Versamark ink, sprinkled with Mixed Media Embossing Powder Satin Sunset and heat set. 

Tip: turn on your heat gun and let it heat really well, about 20 seconds, before directing it on the embossing powder. Works much better.

I chose the Ammonite Rubber Stamp for the background, but the substrate was so uneven that I couldn’t get a nice impression. So, I took some tissue paper and stamped on it with blue archival ink. Then cut it to smaller pieces and glued it on the surface with decoupage glue. I also used E6000 glue for the shells.

I really hope you enjoy this project as much as I did and I'd love to read your comments. Find a full list of supplies at the end of the post.

Here are some close ups


Hugs to all 

😃

Natassa


Materials

Andy Skinner Creative Expressions

Paynes Grey, Transparent Yellow Iron Oxide, Cobalt Teal Hue, Primary Magenta


Rubber Stamps - "Ammonite"

Stencils - "Mandala"


Other materials

OSB boards
2' flat brush
1/2' flat brush
Round brush
Soft sponge
Ranger Archival Ink
Versamark Ink
White chalk paint
Gold acrylic paint
Light air dry clay
Silicon moulds
E6000 glue
Natural sea shells


Wednesday, 9 September 2020

HOPE RISING ENVELOPE

 Hello everyone!

I'm happy to be back with a new creation from Andy's latest release at Creative Expressions as well as some stamps from his last release.

This plain manila envelope (6 1/2" x 3 1/2") is transformed into what I titled "Hope Rising". Intended to be a positive message of a warrior ange, in all of his majestic glory, rising from the evils of the city below elevating into the beautiful and hopeful heavens above. 


This new collection of Andy's stamps at Creative Expressions gave me the inspiration for this envelope. I love how they seem to have been made for each other.  The back side of the envelope is also finished to compliment the front.  You will see those new stamps later in this tutorial.  I love them together as well!


I am really into making my own books, folios, or things to include in pockets or fold outs of those books. Perfect as a gift envelope or to tuck keepsakes in journals or home made books, this artistic envelope using various mixed media techniques is sure to please. 

Here is a list of supplies you will need to create this project.

Miscellaneous Supplies

  • Black Permanent Ink Pad and Acrylic Block
  • Manila Envelope 6 1/2" x 3 1/2"
  • White Tissue Paper
  • Stipple or Stencil Brush
  • Matte Medium
  • Water Brush
  • Metallic Gold Acrylic Paint
  • Metallic Silver Acrylic Paint
  • Flesh Tone Acrylic Paint
  • Quinacridone Magenta Acrylic Paint
  • Black Cheesecloth (for the tag tie)
  • Heat Tool
  • Paint brushes
  • White Cardstock or Specialty Stamping Paper
  • Scissors


Let's get started with the instructions:


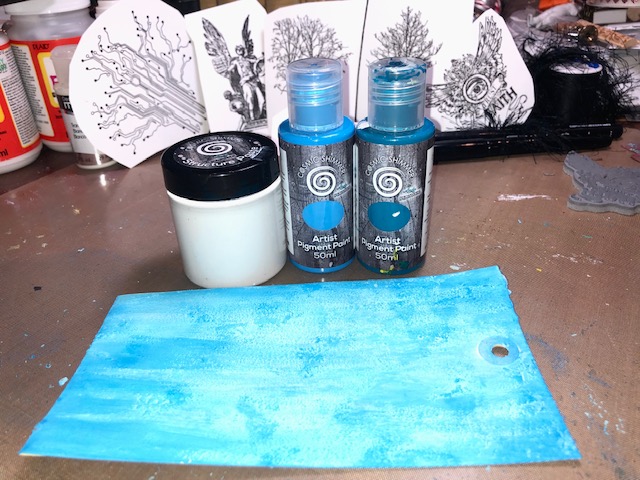
1.  Begin by coloring a plain manila envelope or whatever you choose to use for the base by randomly brushing a light coat of Structure Paste over the area.  This will provide texture for the paint to grab to as well as creative a tactile background.  Heat set.  When dry, add a tiny bit of water to Cobalt Teal Artist Pigment Paint and randomly brush a light coat over the Structure Paste.  Heat set.  Next, add a bit of depth by randomly brushing a light coat of Primary Blue Artist Pigment Paint onto the surface and blend with the Cobalt Teal Paint.  Heat set. I also added darker shades of Blue Prussian Artist Pigment Paint to add more depth and contrast. Heat Set.


2.  Since this is going to be a "sky", I wanted to add clouds.  Using a stencil brush, I dabbed Structure Paste in cloud like patterns randomly on the blended blue background.  After dabbing the paste, I gently made quick little brush strokes to blend it out a little onto the blue.  Then I dabbed more of the Structure Paste in areas I wanted to give more texture to. Heat set.


Here is picture of the background at this point.


3.  On the backside of the envelope, I used Matte Medium and a brush to adhere an old dictionary page to cover the surface of the envelope and the inside and outside of the flap. Heat set.  Next I added a light random basecoat of Cobalt Teal Artist Pigment Paint followed by brushing a little water mixed with Blue Prussian Artist Pigment Paint around the exterior of the envelope.  I also painted a bit of the darker paint across the top of the envelope, spritzed it with water and allowed it to run down the envelope before heat setting.


4.  Using Permanent Black Ink, stamp the Angel image onto a piece of inexpensive white tissue paper and heat set.  Tear out the image rather than cutting it because the torn edges will meld better into the background when applied using Matte Medium and a brush.


5. Stamp the Skyline Stamp onto a piece of cardstock or Special Stamping Paper using Permanent Black Ink.  Heat set.  Using a water brush, add shading to the skyline using Grey Artist Pigment Paint and Cobalt Teal Artist Pigment Paint for the sky behind the buildings.  Heat set. Cut out the skyline stamp close to the ink images.


6. Using Matte Medium and a brush, adhere the Angel stamp in place onto the lower center of the envelope. First brush Matte Medium onto the surface of the envelope where the stamp will go.  Then carefully lay the stamp on tissue paper in place.  Smooth out with your fingers and then gently brush over the image using Matte Medium to glue in place and also to seal it.  Heat set.  Notice the texture of the Structure Paste in the background?


7.  Using Black Permanent Ink, stamp the Circuitree Stamp onto the lower section of the envelope first.  Then turn the envelope around, overlap the base of the stamp and stamp it again on the other end of the envelope. Heat set.  Then add a bit of Black or Grey paint to your finger and wipe the edges of both sides of the envelope to "frame" the images. Heat set.


8. Stamp the Faith stamp onto a piece of cardstock or Specialty Stamping Paper using Black Permanent Ink.  Then using a water brush, carefully paint in the areas of the stamp using Metallic Gold, Metallic Silver Acrylic Paint and Cobalt Teal Artist Pigment Paint.  Heat set and cut out the design.


9. Glue the Faith stamp in place in the center of the Circuitree stamps. This is the backside of the mixed media envelope. I love these two stamps together! Circuitree makes a great background stamp; whether it is stamped more than once in opposite directions, partially stamped, or just one image used on a project.


10.  Colorize the Angel rising from the city.  I did this using the Water Brush and various acrylic paints.  I used Metallic Gold to create the glow behind the Angel.  I used Metallic Silver on the angel's armored chest plate, the lyre and the wings. I used Quinacridone Magenta Acrylic Paint on his loin cloth and head piece and Flesh Tone Acrylic Paint on his skin. Heat set.  There are also touches of Metallic Gold on the buildings and the ground before the buildings reflecting the immense glow coming from the angel. 


11.  I stamped HOPE from Andy's First Class stamp, onto a piece of white tissue paper just as I had done with the angel. Using the same technique, I glued it in place above the angel and highlighted areas of the design with a water brush and Gold Metallic Acrylic Paint. Using a stiffer paint brush, add Lava Paste over random areas of the clouds to puff them up and add even more texture and depth to them. Heat set to make them puff up.


12.  I used Andy's Mysterious Girl stamp on the end flap of the envelope. This was stamped using Black Permanent Ink and then heat set. It makes a statement all by itself. 

Thank you so much for stopping by and following along with this tutorial.  I love Andy's newest releases.  This is just a few of them!  Stay tuned for more brilliant project ideas from my fellow teammates as we explore our creativity and Andy's new releases thanks to Creative Expressions!

About the Artist:

Wednesday, 2 September 2020

Sugar Skull Jewellery - by Nikki K

 Morning everyone, 

It's been a while since I posted, but wanted to share these fun necklaces with you using Andy's fab Sugar Skull stamp, which is a great size for cards and art, but also for jewellery, it makes a large necklace easily.  It's also great for coming Halloween, to make your own decorations!

I used some of Andy's Rice Papers, and stamped the skull out in different places.  This is fun as you can use any of the rice papers and get a fab different pattern on each skull.

The next bit is tricky, you need to leave the skulls on the paper, and wind some wire, probably 18 to 20 guage (it's slightly more pliable), around the skull.  I cut a long piece, then start at the bottom of the skull, and work my way up both sides.  Keep it flat on the paper, and glue with strong glue as you go.  You will need to hold this for longer than you think, and get sticky fingers.. lol.  Don't hold it down with anything other than your fingers as the paper has a chance of sticking and ripping.

When you get to the top, bend one piece of wire straight (90%) and make a large loop (like making an earring).  I would cut the wire a bit shorter for this step, but not so short that it can't be hidden.  Take the other end of the wire, and wrap around the loop to hold and secure.  Only when this has completely dried, did I cut out close to the wire on the outside.

Once you have this done, cover the whole of the front of the pendant with glue (pva) is fine.  Do this 2 or 3 times, making sure there are no gaps between the edges of the wire and the paper.  You are making a bezel to hold resin.  If you don't have resin, you could use melted UTEE, or another 3d Glaze.

When completely dry from the glue, you can add your resin or glaze, according to manufacturer's instructions.

You don't need to coat the back of the necklace, it has a rough texture but is sealed from the layers of glue anyway.  I like it this way as it shows it is handmade.


Hope you like them, 

Have fun making. xx

Nikki K.

xx

Products Used:
Andy Skinner Creative Expressions Sugar Skull Stamp
Andy Skinner Creative Expressions Rice Papers,
Andy Skinner Quick Grab Glue.

Other items: Versafine, Resin, jewellery wire & findings.