Showing posts with label Decopatch. Show all posts

Wednesday, 21 March 2012

Om mani padme hum…huh?

Hi everone,
Sorry for the lack of posts recently, been very busy with the Timeworn workshop and other commitments.
I have been working on a final piece for the workshop and some of the delegates have also started there final works.. exciting!!
Anyway I thought I would share my progress to give you an idea of what we are up to.
I have actually started on two pieces but not sure if I will get the second finished in time, I may save that for the next workshop in June.

Here is the idea with which I started.

Click on Pictures for a Larger View
buddah Medium1

The frame is from Decopatch and the other bits including the Buddha have been picked up from charity shops etc. The paper is hand printed in India as is going to be used somewhere on the project.

I started by painting Buddha himself with Decoart Traditions and techniques from the workshop,  he will be the focal point and I can tie everything in with him.

buddy
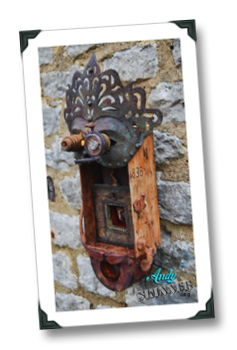
Next was to paint the frame, I wanted a really old worn and decayed rust look and this technique kind off evolved as I did it and was really happy with the result!
Untitled-1
I have added some wings to Buddha…no idea why and not sure if they will stay but it seemed like a good idea at the time lol..I am now constructing a plinth for him to sit on from an old box lid and some Tando Creative chipboard.

buddy-sml
The bits in white still need to be attached and painted, there is still so much to do and add to this, but I will keep you updated with its progress.

Have a good day,
Andy

Monday, 19 December 2011

The Challenge Revealed

Hi all,

I was recently set a challenge by a friend to produce a piece of altered art/assemblage using 5 items and themes of his choice.
This idea came about after a few glasses of wine which I deeply regretted in the morning upon remembering the theme he came up with..
Tribal, shrine, entrapped, scrap metal, rust, distressed and all of this along with a hint of steampunk!!

What's even worse are the five items he chose for me..get these,  a decopatch tissue box, a wooden bear money box, a small decopatch frame, a trinket box and finally just to add insult to injury….. a decopatch princess mask!!!….. yeah…. thanks for that mate!!

page

I was however allowed to add any bits I had lying around to the piece and of course, Decoart acrylic paint.

This was a tough challenge because there were other things I wanted to use but without further ado, here it is!


Can you tell I am being very influenced by de Mengs work at the moment?! :)

Old trophy handles where mounted on the sides of the tissue box.


The tribal part of the theme was added by making this head from epoxy putty, mounting it in the small box and adding the frame over the top.


The money box was fitted with a light and a watch face fitted over the hole….I'm afraid the teddy bear had to go!
I then stamped the butterfly girl from my Altered Easter stamps onto some acetate and mounted that inside the box… this is the entrapment part of the themes.


The steampunk element came from the glasses mounted on the mask, these were made from old binocular parts and a pocket watch.
A light was then fitted behind the lens.


Lights out!

Have a great day,

Andy

Thursday, 14 April 2011

East Of India

These East of India tags from Calico crafts have been on my desk for a couple of weeks now and I finally got a chance to do something with them.
These super strong luggage labels come in Black, natural and white. They are ready punched and strung with twisted paper twine.

image

The first picture was made using a natural tag and the second one of the black ones.

Andy Skinner tagsAndy Skinner China Tag

Stamps from my Stitch in time set were used for the first tag.
I first stamped the sewing pattern with VersaMark and embossed with clear embossing powder.
Next I blended fired brick and faded jeans Distress inks around the edges.
Faded jeans was then used to stamp the cotton real and Brushed corduroy for the tailors rule.
A Stitch in time was then stamped with Archival black and the tag was finished of with an old button and the cool tailors scissor’s from Calico’s Steampunk range of pendants.

Stamps from my nature set were used on the second tag along with some decoupage paper and Perfect Pearls.

Here is a quick tag I made using Decopatch paper on 300 gsm cardstock with some of Lindsay Masons new stamps.

Andy Skinner tags
Andy

Thursday, 18 November 2010

Ultraviolet Polymer Clay Skins

Polymer clay skins are fun to do and can cover a variety of media.
The Decopatch starfish below is made from Papier Mache, it was then covered with a polymer clay skin which I made from millefiori and glow in the dark Fimo. The effects are very cool!


DAYTIME!

fimo skin
NIGHTIME!
DSC_0814
Here is another starfish.

DSC_0819
Andy

Wednesday, 20 October 2010

Part 2. Sally Can’t Wait

I spent a few hours with Sally today and realised that this project is going to take more time than I originally thought, I do have three months but am going to have to spend more than a couple of hours a week on it.
So far I have used eleven products from the Decoart range, five from Personal Impressions and two from Decopatch, it is truly going to be a complete mixed media project!


Here is a close up of some of the detail using 3d writers, inks, glass paint and acrylics to form a henna tattoo style section within the patchwork.


I’m so busy at the moment so sorry for the lack of posting but things should be back to normal by the end of the week, fingers crossed!
Andy

Tuesday, 12 October 2010

Part 1. Introducing Sally

Meet Sally, she is the new extra large Decopatch Salamander and measures a total of 103cm that's 40.6 inches.
She has been given to me to use as a mixed media project decorated using Decoart products combined with stamps and inks etc. Sally will be on display at the Craft Hobby & Stitch International Trade Show at the NEC Birmingham in February 2011.


I am going to work a few hours a week on this project and will post pictures of Sally’s progress along the way….I may even give her a blog of her own or maybe a page on this blog.
I started today by applying two coats of Decoart Gesso


Its hard to see in this picture but I have divided the body up into stripes so that a different technique can be used in each. I have stamped into the gesso in a few of the sections along the body.


I want sally to be bright and colourful so I am playing around with a few test colours but not very happy with them yet.


Ok it’s time to put Sally to bed and go home to eat!

Andy