Showing posts with label Stampendous. Show all posts

Tuesday, 29 May 2018

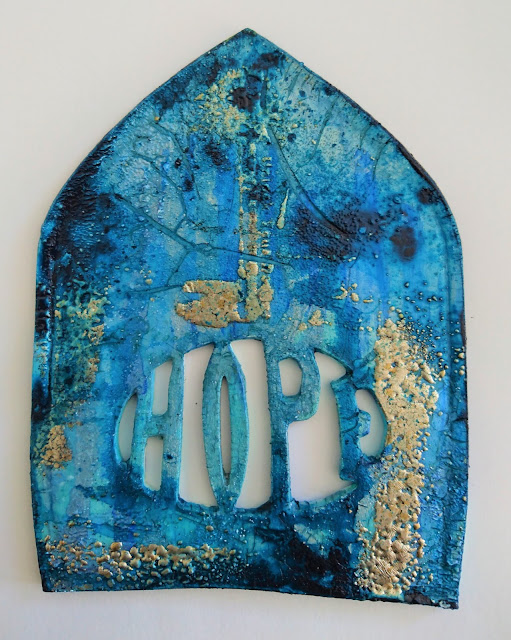
Hope Is The Key - using Bubbalux Craft Board

So happy Andy gave me a pack of Bubbalux Craft Board to play with – it's very cool stuff! 
It takes paint really well and even die cuts using Sizzix Bigz dies, (take the plastic sheet off of first and best to use a sturdy machine, this is strong stuff). Plus it bends when heated – that could be useful! 
I cut a piece from one of the A4 sheets using my Tim Holtz scissors, just large enough to fit over the Sizzix Bigz Arch Die - you MUST peel off the film before doing this as it makes it easier for using scissors and die cutting. After cutting the arch I then ran it through again with the Bigz Hope word die. 

My first layer was a wash of Cobalt Teal Hue Media Fluid Acrylic Paint and even though this was a VERY watery wash, the board took it no problem. I then threw a load more paints on (see product list below).
A layer of Crackle Glaze (leave to dry thoroughly) then a coat of Patina Antiquing Cream. 
More layers of paint, I stamped and embossed the Winged Key using Stampendous Aged Silver with a Versamark clear ink pad  - which I also swiped randomly in other areas, to add more Stampendous embossing powders. Bearing in mind all the layers of paints and glaze, heat embossing this board still worked really well.  The board did start to bend (giving me ideas for another project!) but I just flattened it out with an acrylic stamping block while still hot. The arch was left slightly wonky, but I love it!
Embellies were teensy cogs and clock hand, an old zip, a button threaded and pre painted. I embossed the cogs with Stampendous Aged Silver too.

 The stamped key didn't show up too much (see pic of arch above) so I stamped it again onto card, cut it out, coloured with the paints and glued it on.

I added all the bits, a phrase I typed and printed out, a bit of detail with a white pen and black card added to the back to make the words pop.
Thanks so much for looking. A bit more detail on my blog, click HERE. And below are all the product details. 
Thanks
Suz xxx
PRODUCT DETAILS:
Stamps used, Andy Skinner Illusionary Artist Tech Trauma  text stamp:
and Andy Skinner Stampendous Steampunk Set Winged Key
DecoArt Media mediums and Fluid Acrylics:
Titanium White, Cobalt Teal Hue, Metallic Silver, Phthalo Turquoise, Phthalo Blue, Phthalo Turquoise, Phthalo Turqouise Hue, Patina Green Antiquing Cream, Crackle Glaze.


Friday, 4 May 2018

A walk On the Dark Side Of Life


Stamps Used:

Morning all, Mark here an I have a couple of quick and easy tags to share today where I have mainly been playing with some of Andy's stamps.
I have used a couple of Mdf tags and applied some patterned papers I had made using my Gel Plate and Decoart Media Fluids along with some of Andy's stencils.
For the skull tag I used a back ground paper where I have used Andy's Fossil stencil, It put me in mind of some tie dye fabric and with the skull it felt very Grateful Dead and psychedelic. 
The Devil tag was layered stamping, the bird skull was stamped with an orange archival ink and the devil himself was colored in with a red Copic marker.
   The bird skull was a charm I picked up at a craft fair and was aged using some Decoart Antiquing cream.


Thanks for stopping by.x Head back soon to see something new from the DT x


Sunday, 18 March 2018

Tech Trauma Wall Art

For this project I combined Andy's gorgeous Tech Trauma stamps with Stampendous
Embossing powders on a brayered background and made myself a little bit of wall art!
Below is a pic of the framed piece, another close up where I've tried to show the bling,
and a brief description of how it came together! 
 The finished artwork I've popped into an Ikea box frame.
I made my own mount as theirs was too small, full details and a few more pics here!
It's a bit moody but still sparkles!!! 
 First brayer a nice thick layer of DecoArt White Gesso - love this gesso as it is a fabulously
thick consistency so that gives all the layers to come a great, textured base. After the Gesso
I layered up all the paints listed below, going back in with more layers
until I was happy with the coverage and colours.
Once all the paint was dry I then did some random background stamping with my
'feature stamp' which I did upside down.
I can get away with it being that way up because this is such a textured piece;
the detailed writing part of the stamp kinda gets lost in the background and is not defined enough for you to see the text is upside down, (though the writing shows beautifully on less lumpy surfaces).
 I triple embossed with 3 types of powders from the Stampendous Encrusted Jewel set.
On the final layer I have my inked stamp ready and quickly press it into the melted
powders really firmly while they are still molten.
I hadn't let the paper fully dry when I heated the embossing powder, so
it buckled a bit. but once all the embossing powders were fully cooled
I just stuck it under some heavy books and it was fine!
That's it! Thanks for looking. Suz x


Products used:
Illusionary Artist Tech Trauma Stamp Set IAAS1004 by Andy Skinner
DecoArt Media paints:
White Gesso, and fluid acrylics: Primary Cyan, Prussian Blue Hue, Intrference Blue, Carbon Black and Titanium White
Stampendous Enamels from the Frantage Encrusted Jewel Blue Kit (colours used were Shabby Blue, Royal Blue and Silver Halo)
Other products used: Versamark and Archival ink pads, a mini brayer, card for the base and pearlised card for the mount
http://www.andyskinnercrafts.com/store/c10/Illusionary_Artists_Stamps.html

https://decoart.com/


https://www.stampendous.com/

Friday, 16 February 2018

Ammonit Box using the new Andy Skinner Fossil stamp set and Stampendous Enamels

Hi all

Another teaser for you; a project made using Andy's fantastic new stamp range. The good news is it is being released THIS WEEKEND and when they are finally available you can get them here!

 Here is the finished project and below is a brief outline of how I created it.
I painted the box lid and base. Triple embossed the lid using Stampendous Enamels, and stamped into the lid while the enamels were still molten.
Once cooled, I used DecoArt white antiquing cream, paints and metallic lustres to give depth to the ammonite. I love it - very touchable! Hope you like it too. For a detailed step by step, have a look at my blog.
Thanks
Suz
x


Products used:
DecoArt: Paynes Grey and Titan Buff Media Fluid Acrylics
Extreme Sheen Antique Bronze Metallic
White Antiquing Cream
Metallic Lustres in Black Shimmer and Iced Espresso

Stampendous Products:
Andy Skinner Fossils Stamps (being released at the Stitches ICHA this weekend. Find them here after launch!
Frantage Embossing Enamels in Aged Copper, Aged Gold and Aged Scarlet

Other products used:

Archival and Versamark ink pads and a small cardboard box

Wednesday, 8 November 2017

ATC simple Background technique


Hello and thanks for stopping by, Mark here with a little tutorial for making quick and easy backgrounds using the Decoart Media Fluids.
I have been a big fan of Atc's for years now as they appeal to my inner child who collected all manner of stickers and trading cards. Not only are they fun to make and trade they are also a perfect way to try out new techniques without working full scale.
For this post I have used Atc blanks in mdf and grey board ( I prefer working on the thicker substrates as they hold up so much better than the traditional thick stamping card stock and when finished just feel more substantial and special some how.

Start by painting the Atc with a couple of coats of Tinting Base to give a nice white base to work from.


Apply a couple of drops of Media fluid to a craft sheet and squidge ( technical term ) the Atc face down into the paint, Wiggle it around a little and carefully pull the Atc away from the craft sheet, this will create a nice textured pattern to the surface of the paint.


Repeat with more colours.


You can mop up the excess paint with additional Atc's so nothing goes to waste.


Using the tinting base or some of the Titan buff added to different colours will help lighten the darker colours and turn the translucent colours opaque.


sliding the Atc or tag around in the paint will help blend the colours together. when building up the different layers its some times necessary to let each coat dry first to avoid muddying the colours to much.
Also keep in mind if stamping with black ink the background needs to be kept on the lighter side other wise the image you stamp may not show up very well.


Keep adding layers of colour until you are happy with the results. To keep the colours on the brighter side use slightly less paint and dry between layers


To get a more muted finish try applying the different colours whilst the previous stage is still a little wet and by mixing in a little bit of the tinting base to tone down or lighten the colours.


This back ground was done by adding several colours to the craft sheet at the same time with a little squidging ( technical term ) and wiggling in the pant.
Stamp choice can be important and I have found with some of the stronger backgrounds stamps with a lot of fine detail and open space can get lost a little, finding a stamp that has a lot of inked rubber works well.


Stamp the image with a fresh or juicy archival ink pad.
I have used lots of Andy's stamps that are available from Stampendous for My Atc's and tag and once stamped they have been finished with a Gloss Varnish as I really wanted the colours to pop.
I finish the outside edge of the Atc's with a black Copic and some of the edges have been distressed with Archival Ink.


I finished the Heart Atc off by nailing several panel pins into it.


As always a huge thank you for stopping by. xxx.