Showing posts with label atc's. Show all posts

Sunday, 15 March 2020

Reversible ATC mini book

Today's project is all about having a bit of fun, playing with products and trying new things.
I created a reversible ATC Mini Book. Hope you like it.
Suz
 Using old curtain lining, Intense Pigment Inks, stamps and transfers along with Andy's paint range, embossing powders and some vintage book pages I made this fun, super easy mini book.

Here is one of the two covers. This one is made with the curtain lining, coloured with intense stains, then, stamping, transfers and paints added. So yes you can use the fab transfers on lots of fabrics too!
This second cover is a mixture of paints, stamps, transfers and vintage book pages.
I decorated one side of the concertina insert with paints and transfers....
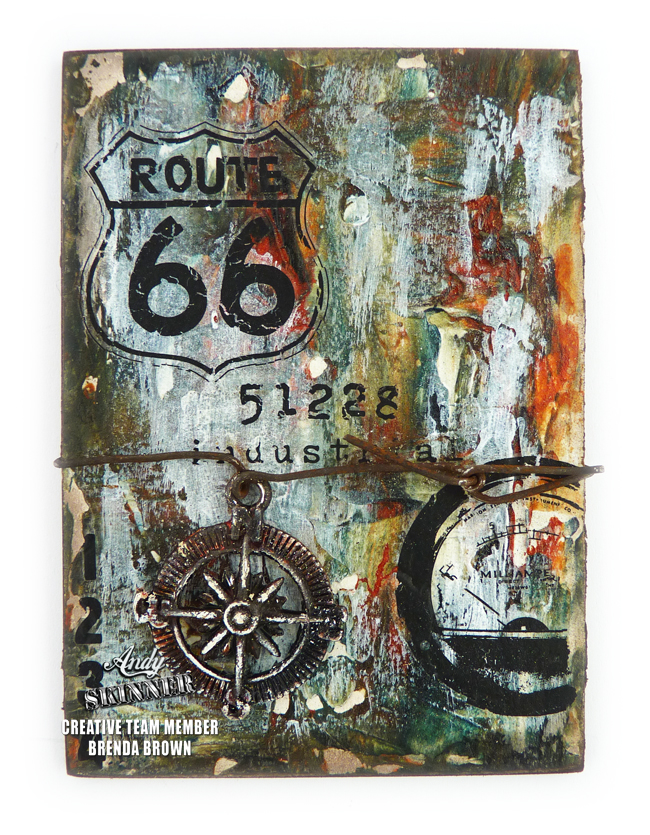
The other side is paints, stamping, embossing, mark making and text. This was so much fun.
If you'd like a detailed step by step, have a look at the tutorial on my blog HERE.
Thanks Suz
x
Products used:
Pigment paints: primary red, blue, yellow, raw umber, quinacridone gold and warm white chalk paing
Stamps: Eye Spy/ Skull of Spades/ Memories of India/ Create
Embossing powders:
SupaNova
Satin Sunset
Granite
Transfers from two sets: Ephemera Emporium & French Fancy
Super Matt Varnish to seal both sides of the concertina insert


Sunday, 23 February 2020

Andy's London workshop

Hi Everyone.
I took myself off to Andy's London workshop yesterday and had a fantastic time creating an ATC box and 5 ATCs using lots of his products including the new pastes. I thought I would show you how I finished the ATCs off at home with more of Andy's and some of my own supplies.


Andy demonstrates his products through Creative Expressions on YouTube and I have given you the link to them with each of the samples below.

Structure Paste
This is a beautiful smooth textured paste great for using with stencils but Andy shows you other fabulous ways to use it which included the background on this sample.
https://www.youtube.com/watch?v=M2OiABlheB8


Strata Paste 
https://www.youtube.com/watch?v=pAYl2vDdTp4
This will give you some incredible textures and on this ATC you can see how well his transfers work even with the bumpy textured surface.


Resist Paste and Rice Papers
https://www.youtube.com/watch?v=dCzXNHYYN0c
Andy's video shows how you how to see the resist paste with two layers of paint but we used it over his rice papers and it worked beautifully.


Lava paste
https://www.youtube.com/watch?v=o0bsUUA-zVw
As you will see on the video Andy demonstrate great ways to use this product which has another amazing texture. At the workshop we used it with a palette knife and a brayer.


I am already looking forward to the next workshop as Andy thinks he will use the London venue again. You have perhaps already seen photos on FaceBook. It was a great room with plenty of space, Di from Tando brought along a pop up shop with lots of gorgeous goodies and lunch provided for extra if you wanted it, just soup and bread but perfect for the day.

Have fun playing with the new pastes and don't forget to take a look at the videos for lots of ideas.

Thanks for stopping by.
hugs Brenda
Bumblebees and Butterflies


Products


You will find all of Andy's products with Creative Expressions HERE
Structure Paste
Strate Paste
Resist Paste
Lava Paste
Rice Papers
Transfers
Stamps
Paints


Wednesday, 8 November 2017

ATC simple Background technique


Hello and thanks for stopping by, Mark here with a little tutorial for making quick and easy backgrounds using the Decoart Media Fluids.
I have been a big fan of Atc's for years now as they appeal to my inner child who collected all manner of stickers and trading cards. Not only are they fun to make and trade they are also a perfect way to try out new techniques without working full scale.
For this post I have used Atc blanks in mdf and grey board ( I prefer working on the thicker substrates as they hold up so much better than the traditional thick stamping card stock and when finished just feel more substantial and special some how.

Start by painting the Atc with a couple of coats of Tinting Base to give a nice white base to work from.


Apply a couple of drops of Media fluid to a craft sheet and squidge ( technical term ) the Atc face down into the paint, Wiggle it around a little and carefully pull the Atc away from the craft sheet, this will create a nice textured pattern to the surface of the paint.


Repeat with more colours.


You can mop up the excess paint with additional Atc's so nothing goes to waste.


Using the tinting base or some of the Titan buff added to different colours will help lighten the darker colours and turn the translucent colours opaque.


sliding the Atc or tag around in the paint will help blend the colours together. when building up the different layers its some times necessary to let each coat dry first to avoid muddying the colours to much.
Also keep in mind if stamping with black ink the background needs to be kept on the lighter side other wise the image you stamp may not show up very well.


Keep adding layers of colour until you are happy with the results. To keep the colours on the brighter side use slightly less paint and dry between layers


To get a more muted finish try applying the different colours whilst the previous stage is still a little wet and by mixing in a little bit of the tinting base to tone down or lighten the colours.


This back ground was done by adding several colours to the craft sheet at the same time with a little squidging ( technical term ) and wiggling in the pant.
Stamp choice can be important and I have found with some of the stronger backgrounds stamps with a lot of fine detail and open space can get lost a little, finding a stamp that has a lot of inked rubber works well.


Stamp the image with a fresh or juicy archival ink pad.
I have used lots of Andy's stamps that are available from Stampendous for My Atc's and tag and once stamped they have been finished with a Gloss Varnish as I really wanted the colours to pop.
I finish the outside edge of the Atc's with a black Copic and some of the edges have been distressed with Archival Ink.


I finished the Heart Atc off by nailing several panel pins into it.


As always a huge thank you for stopping by. xxx.