Showing posts with label Artist Pigment Paints. Show all posts

Friday, 25 March 2022

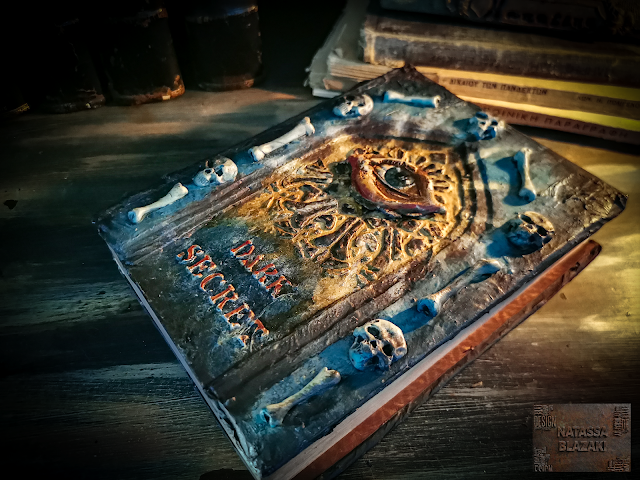
Dark Secret - Altered Book Cover for March Challenge

 Hi guys and welcome back to Andy's Blog

It's been a looong time, but I'm so happy to be here again, to share with you my take on the Altered Book Cover challenge for March. 

You still have a couple of days to play along, since the challenge closes on Sunday. For more details, click on the link https://www.facebook.com/photo/?fbid=10161385546559008&set=gm.4992078744209215

πŸ’€πŸ’€πŸ’€Join us on Facebook Group The Darker SideπŸ’€πŸ’€πŸ’€

So, I decided to alter the cover of a book, that I had in my library forever. It's a story collection by Stephen King, called "The Bazaar of Bad Dreams". That was dark enough to inspire me :)))

I was so thrilled to start creating again, so I thought of making a process video, to show you some ideas on how to create dimension and texture on your projects. In the video, you'll see that I use very simple and easy-to-find materials, that we all have in our houses.

What is more, I wanted to share with you some tips on how to use stamps and stencils,  in a not so common way.


I really hope you enjoy this. Below, you can enjoy some photos and find a full list of materials.                    


Paints - Cosmic Shimmer by Andy Skinner

Artist Pigment Paint

Paynes Grey, Prussian Blue, Cobalt Teal Hue, Transparent Yellow Iron Oxide, Quinacridone Gold, Raw Umber


Chalk Paint
- Midnight, Warm White

Tools and Supplies

Old brushes for glue and varnish
Fan brushes
Flat brushes for painting
Spatula

Polymer clay (any clay is fine, you can also use airdry clay)

E6000 glue
Decoupage glue


Matte varnish - Cosmic Shimmer "Super Matt Varnish" by Andy Skinner
Structure Paste (Cosmic Shimmer by Andy Skinner)

Stencil - Creative Expressions "Mandala" by Andy Skinner
Stamp - Creative Expressions "Eye Spy" by Andy Skinner


Available in every home 😁
White tissue paper
Cardboard (pizza box)
Paper tube (from cling film)
Paper tape
Natural jute twine cord

Tuesday, 9 February 2021

Grungy Tag- Fiona Randall

Morning all I'm here with a grungy Tag 

and my favorite Moth stamp from one of Andy's previous releases. 

Layers of paint were dripped and drabbed  on a Tando Tag and heat dried in between until I got the look I was Happy With. Next Up some stamping using Andy's Vintage background stamp with black archival ink and the edges of the tag inked too. Structure paste was applied with a stippling brush to one of Andy's cogs from his Industrial Elements set. Once dry two coats of Andy's Artist Pigment Paint in Paynes Grey was applied to give a dark Tarnished Metal Effect. A bookplate and a Gasket Ring from Andy's Industrial Elements set were given different Effects with resist stamping and normal ink stamping with the vintage and pebble Beach stamps befor a wash of Quinacrodone Gold Artist Pigment Paint applied. All elements were then layered up onto the tag base with off cuts of grey board to give depth and dimension. Finally the Gypsie Queen moth was stamped and coloured with washes of Prussian Blue for the wings and Raw Umber for the Body. This was the attached to the layered cogs as shown.
Thanks for stopping by today
Stay Safe
Fiona xx

Products Used


Monday, 26 October 2020

The Witch Behind the Mask


Morning all and happy week, this is Natassa Blazaki, with a new project for Spooktober. That challenge inspired me so much!

The Witch Behind the Mask

So, it’s the last week of October and the theme now is “The Witching Hour”. As I was google searching for witches and witchcrafts to get some inspiration, I saw a poster from Disney’s
Snow White that shows the face of magic mirror and the reflection of the Witch’s face. I got the idea of creating this canvas with a mask, that behind it hides the wicked witch.

Of course it had to be rough, with lots of texture and rust. Rust goes with everything!

I used shades of yellow, orange and purple, which is a classic color palette for the Halloween.

To create that rough, uneven texture on the canvas, I used a lot of Structure Paste, which I thickly applied with a pallet knife in a stippling motion. To color the background I used a combination of Artist Pigments and Matt Chalk Paints.


To create the “hood” around the mask, I used a piece of denim, cut from an old pair of jeans. I glued the mask on the canvas and then I cut the fabric in smaller manageable pieces and built the “hood”. I glued the fabric with gel medium.


Then, I decided that my composition needed an industrial touch, so I used some of the gears from Andy’s greyboard cutouts by Tando Creative.


The tricky part was to do the stamping on that surface. I just couldn’t get a nice crisp impression until it hit me! I took a piece of rice paper from Andy’s “Abstraction” collection, and stamped on it. Then, I cut it to size and glued it on the canvas with matte medium. This way, the stamp was beautifully embedded on the rough surface and had a gorgeous cloudy faux encaustic look.


I also used lots of Mixed Media Transfers on the canvas the mask and the fabric. To make them look distressed, I sanded them with a piece of 240 grit sandpaper.


I truly hope you enjoy the project and get some inspiration.

Remember to play along at Creative Expressions Spooktober Challenge and use the #cespooktober tag, so we can find your projects.

You all have a great week

Natassa

πŸ‘»πŸŽƒπŸ’€


Mustard, Chestnut

Primary Blue, Primary Magenta, Primary Yellow, 
Raw Umber, Quinacridone Gold, 
Transparent Yellow Iron Oxide


Skull of Spades, Pray, Circle of Thorns

Abstraction

Other Supplies

Ranger Archival Ink 

Matte Medium

1/2" , 1", and 2" Flat brushes

Pallet knife

240 grit sandpaper

deep edge canvas

white blank face mask

fabric

Monday, 20 April 2020

Miniature Retro Mirrors, by Natassa Blazaki


Hello my dears and welcome back to Andy’s Blog. Hope you got the chance to have some nice time with family during Easter. I also hope you’re all well and safe. Hang on there and craft craft craft 😊

Today I’m back with a cute project, that I had for a long time in my mind and particularly, since I first saw Andy’s Mixed Media Transfers “Retrology”.

So, I decided to try and replicate those retro advertising mirrors, I’m sure you’ve all seen them in diners or pubs, hanging on the walls.

I absolutely loved those transfers and I used all the designs to make a bunch of miniature mirrors. Then, I took a large piece of grey board, to make a wall panel for them.
Below, you can see a photo step by step for the mirrors and the background. 
Click on the images to enlarge and read the captions.

Miniature Retro Mirrors

Wall Background

Here are some close ups and you'll find a list of materials at the end of this post.
I really hope you enjoy this one and get some inspiration on how to use Andy Skinner's Mixed Media Transfers.


You all stay healthy and creative😘


Chestnut, Mustard Seed, Ocean Breeze
Olive Grove, London Brick

Monday, 30 March 2020

Alchemy Vials - 3 Ways to Alter your Glass Containers, by Natassa Blazaki


Hello lovely people!

Hope you’re staying healthy and safe. We’re going through very difficult times, but what makes me happy is that we’re all being supportive to one another.

So, here I am today, on Andy’s blog, with a vintage style project, that I really hope you enjoy and give it a try. You can also visit my IGTV and watch the video tutorial I prepared for you.

Alchemy Vials
I worked with Andy Skinners Matt Chalk Paints and in some occasions, I mixed in some Artist Pigment Paints. I’m telling you they work perfectly together.

For the first technique, I started by sanding the vial with a 180 grit sandpaper. Then, I applied a coat of dark color – Matt Chalk Paint Chestnut - as a base. I heat set and then, with an old brush, I applied Quick Grab Glue, spreading it in all directions. Didn’t care to have an even coverage. While the glue was still wet, I covered with Matt Chalk Paint Mustard Seed. The moment I started heat setting the paint, it began to crackle so beautifully. 
I continued again with a dark color, this time Artist Pigment Paint Raw Umber mixed with Chalk Paint Chestnut. I dabbed at the bottom and the neck of the vial, to make it look more distressed. Also added my all time favorite Quinacridone Gold to complete the aging effect. For the label, I stamped on a piece of scrapbooking paper with a stamp from a previous collection by Andy Skinner, Shabby Chic. 
You can stop here or make a “dirty wash” to apply on the whole bottle. I chose to add some distress oxide ink, which I applied all over the vial and then spritzed with water to activate the ink. When I heat set it, the vial got a gorgeous dusty chalky look.
For the second technique, I started by dabbing Quick Grab Glue on the vial with a soft sponge. I wasn’t looking for a rough texture here, but rather wanted to create a frosted glass effect. 
With the same sponge and while the glue was still wet, I dabbed some Chestnut mixed with Mustard Seed and a maybe a drop or two of Quin Gold. That’s what I call Alchemy hehe. Didn’t care to mix the paints well, just picked them up from my working surface and let them mix directly on the vial. I heat set the paint and dry brushed Mustard Seed on the edges to define the vial's shape. I stamped the Plague Doctor on a piece of scrap paper and glued it as a label on the vial.
For the third technique, I chose a skull shaped miniature bottle. This technique works best on special shape or relief bottles. I started by painting with Artist Pigment Paint – Paynes Greyin all the recessed areas. I applied two coats, because Paynes Grey is semitransparent. 
I heat set the paint and went on with a coat of Matt Chalk Paint - Chestnut.  Heat set again and went back with Paynes Grey, which I randomly brushed on the skull. Then, I picked a warm white acrylic paint and dabbed with a soft sponge, paying attention not to get the paint in the recessed areas, I had previously painted with Paynes Grey. As a finishing touch, I lit up a couple of candles and let some melted wax drip on the bottle. You can apply a final coat of Super Matt Varnish to make the bottle look really old.

All three techniques can be applied on any kind of glass container and
I ‘m sure you’ve got quite a few stashed away. 
Now it’s a great opportunity to bring them out and decorate them. 
Go on and have some fun!

Hugs from Greece
Natassa