Tuesday, 30 July 2019

Creatures of the Deep

Hi all
I've had so much fun making this hanging piece.
I used three Tando Creative rectangular greyboard shapes. Each painted, crackled, 'lava'd' then stamped or decorated with the gorgeous transfers.
 Painted seaweed, shading and highlights to give depth to the images....
 Textures added with the Lava Paste (which I coloured before heat setting) and pieces of bandage and hessian
Little red dots on all the eyes for a bit of colour and interest. And I love how the tiny cracks worked with the antiquing cream in the background.
Thanks for looking, I hope you like it.

For all the little details of how I made this and assembled it, have a look at the step by step on my blog: www.craftyhumphreys.blogspot.co.uk
Thanks
Suz
xxx
And here are all the products I used:


Saturday, 27 July 2019

A Play With Lava Paste & Embossing Powders By Dee Adams


Hi everyone Dee here! sorry I have not been around for a while it is due to ill health. I have had a very enjoyable time testing out Andy's new products from #Cosmic Shimmer Lava paste and embossing powders along with Andy's #Creative Expressions Stencils. Andy Tagtastic 1 Kit from #Tando creative.


I used a tag from the tagtastic set and put texture paste through the cogged up stencil from #Creative Expression. Next I sprinkled embossing powder Funky Cold Patina on the texture paste & heat set with heat tool. 


I painted the entire tag with white tinting based knocked it back over the embossed area's with a baby wipe. Next I used Bistre and infusions to run down the tag with a water spray until I was happy.


I used the name plate and 2 cogs from the Tagtastic kit and gave them a coat of Lava paste i then sprinkled it with funky cold patina and heat set it. The Fig 746 stamp was given the same 
treatment as the cogs.


I hope you enjoyed me play with these fabulous products.


I hope to be back again soon. 
Cheers Dee x


Friday, 26 July 2019

More Than Meets The Eye, by Natassa Blazaki


Hello my friends!

I’m back today with a project inspired by well-known elements of London. 

The idea first hit me, when I was trying to figure out, how to use the pieces that are included in Tando Creative Eldaro Kit. So, I took the larger of the wings and decided to make a structure that would look like the London Eye. From that point on, the project was composed so effortlessly.


I took the tag from the same kit to use it a s a base. Then I cut a bigger one, from 3mm thick greyboard and created little windows. I put the bigger tag on top of the smaller and my phone booth was ready! I added a door plate and a large cog from the Industrial Elements Kit. I shaped the subway sign with a large washer and a book plate from the same set.
For the background, I cut a panel that measured 8.5”x15”. 
Then, I printed the industryas, the old_print1 and the wfblighty_-_trans_background from Andy Skinner’s site. I also printed a subway map from the internet.


I applied a couple of coats of white chalky finish paint and by using the matte medium method, I transferred the clock and the map on the panel. Then, I cut pieces from the other pages and did some collage on top of the transferred images. In addition, I did some stenciling here and there. 


When I was happy with the composition, I used a mixture of matte gel, fluid Transparent White and Transparent Yellow Iron Oxide and created a coat on the surface that looked like melted wax. After that coat was completely dry, I added some mixed media transfers from the Poe Diversity sheet by Creative Expressions.


In the video below, you can see how I treated the greyboard elements. Mostly I wanted to achieve a grungy, rusted and distressed look on all the pieces. And, of course, all these techniques are inspired by Mr. Andy Skinner!


In the center of the London Eye, I used an acrylic pebble on which I glued a printed eye. I wrote the quote, by using letters from Andy Skinner’s new stencil by Creative Expressions, called Redemption.


I really hope you like this.
Happy weekend to all!


You can find Natassa Blazaki - Art Recipes and More in:


8x8 Stencil Made To Measure
Steampunk Stamp Set


Industrial Elements Kits
 Eldaro Kit


Lava Paste
Mixed Media Transfers Poe Diversity
Embossing Powder Granite
Stencil 7"x7" Redemption
Quick Grab Glue


Chalky Finish Carbon, Everlasting

Traditions Quinacridone Gold, Transparent Yellow Iron Oxide, Warm White

Media Fluids PhthaloTurquoise, Paynes Grey, Transparent Yellow Iron Oxide, Transparent White

Americana Acrylics Primary Red, Burgundy

Matte Metallics Aged Bronze

Weathered Wood

Americana Decor Crackle Medium, Wax Cream Golden Brown
Media Ultra Matte Varnish


Other supplies

Soft Matte Gel
Matte Medium
E6000 glue
Flat brushes
Fan brushes

Archival Ink Black


Wednesday, 24 July 2019

THE EYES ARE THE WINDOWS OF THE SOUL

Greetings all!

This month's project is a bit introspective.  I believe that our art is a reflection of what is going on inside of us.  Sometimes it evolves unconsciously as we create.  That is what happened on this canvas.  


My inspiration for this piece is the gorgeous eye that a dear friend of mine creates. I will get more into that on my blog, if you're interested in more about them.  But this piece was created completely around that mysterious, all seeing eye.

Sometimes we just need to let our art flow...it's amazing what you may discover when you don't plan out a piece; just let that inner creative voice take over. 

I began with a 5" x 7" burlap canvas.  It doesn't need to be burlap but it does add to the texture. This canvas is all about texture and depth.  The more layers, the more of each is achieved. 


Using a palette knife, I randomly scraped DecoArt Media Black Gesso over the surface then heat set it. The next layer was done through a brick stencil.  Using DecoArt Media Black Modeling Paste and a palette knife, I scraped the paste over the stencil to create a stone wall effect for the background.  I heat set the first layer, lined the stencil back up over the first layer and repeated.  I did this three times to really get some dimension of the wall.  On the last layer, I added a topping of DecoArt Media Black Modeling Paste and DecoArt Media Texture Sand Paste mixed together.  This gave a gritty, stone like quality to the wall.  Then heat set to dry. (Also be sure to wash the stencil to clean it). 


I love windows; particularly gothic or ornate ones.  So this stencil was the perfect choice for this canvas.  (I removed the center section of the window for this piece). Using a piece for heavy cardstock, I scraped a mixture of DecoArt Media Crackle Paste and Texture Sand Paste through the stencil with a palette knife.  I let this dry on it's own because of the Crackle Paste.  I got a tiny bit of crackle ... but I didn't want a lot. Once that was dry, I painted more of this mixture around the outside edges of the window so that I could make it thicker.  I added slits using an exacto knife around the outside edge that I was adding to create a nice "stone finish" to the outside edge of the window.  Then I let it air dry.  


While that was drying, I created a larger outside for the window by 1/4" using scrap chipboard and a ruler to measure all the way around the original window.  I cut it out three times and removed the center of the window. I glued all the chipboard windows together for thickness and again, to create the illusion of a beautiful, thick stone ornate window.


When it was dry, I added a metal lions head to the top of the window and then added a light coat of DecoArt media White Gesso mixed with DecoArt Media Texture Sand Paste to really pop all of the detail on the window and give it a beautiful white cast stone effect.


To give the background more detail, I first dry brushed DecoArt Fluid Acrylics Titanium White over the surface of the wall and added bits of detail in the mortar.  Next I dry brushed randomly on the wall using first DecoArt Media Fluid Acrylics Yellow Oxide followed by touches of DecoArt Media Fluid Acrylics Quinacridone Gold.  I repeated the layers until I got the look I wanted.


The tree or bush next to the window was created using a piece of jute.  I separated the strands of jute and ran a bead of FabriTac Glue (working in small sections) where I wanted the branches to go.  Then I glued each piece of jute in place.  Once dry, I used a small brush to make it look more like the bark of a tree.  I love the texture and the elevation of the branches.  First I used DecoArt Media Fluid Acrylics Titan Buff followed by Burnt Umber then Yellow Oxide. I continued to layer those colors and finally added a touch of DecoArt Media Fluid Acrylics Transparent Yellow Iron Oxide to sort of melt the tree branches into the canvas.


Using the FabriTac Glue again, I added little foliage and flower patches of Flower Soft on the branches of the tree and eventually the window once I added it to the canvas.  I intentional left a few of the branches longer so that they could hang over the fence and the window.  The fence was a rusted metallic little fence.  I dry brushed some DecoArt Media Fluid Acrylics Titan Buff on it to soften the color.  I love the results!


And finally...the inspiration for this entire piece ... that fabulous eye!  I fashioned a socket for the eye using Sculpey Black Clay.  It is an oven clay that has to bake for 15 minutes at 275 degrees.  I was not sure the eye would take well to the oven but it did ... perfectly!  After I fashioned the socket to snuggly surround the eye, I used a craft pick to create the illusion of scales around the eye then off to the oven!


I dry brushed all around the eye and the background that would show from the window using DecoArt Media Fluid Acrylics Titanium White over the black background.  I absolutely LOVE how the eye turned out.


The final step was gluing everything in place.  The sentiment was computer generated and added to the fence once it was glued in place. 

On my blog, I will go into more detail as to the underlying meaning of this canvas that emerged as I was working on it.  As I said, sometimes our art lets us express ourselves in a way we didn't even realize we needed to.  Don't be afraid to just sit down without planning out a piece.  Just begin and let your creative nature take you where it wants to go.


Here are the products used to create this canvas:


Miscellaneous Supplies

  • Sculpey Black Clay
  • 5 x 7 canvas (in this case, a burlap canvas but it doesn't need to be)
  • Piece of iron or metal fencing
  • Scrap Chipboard
  • Ruler and Pencil
  • Palette Knife
  • Metal lions head or some adornment for the top of the gothic window
  • Gothic window stencil
  • Eye (Carol Findon's eye was used here)
  • Jute 
  • Flower Soft (for foliage and flowers on the "tree")
  • Skeleton head and hand (inside window)
  • Scrap of either cheesecloth or sheer fabric for curtain
  • FabriTac Glue
  • Paint brushes (varying sizes)
  • Exacto Knife or Craft Knife


About the Artist: Candy Colwell


Sunday, 21 July 2019

"Life is a journey"- clay mixed media wood panel by Maria Kantzali


"Life is a journey"

Hello my lovely friends.
I am so excited
This is my first clay mixed media project 
for Andy's Skinner creative team.

I always gather and keep pieces of destroyed wood in case they will be used in any of my future projects.


So first I made the clay boat.I rolled out a thin layer of air dry clay ,placed a sketch of a boat ,traced it with a pencil and then cut it with a knife.I put 2 more extra layers of clay to give 3d effect.I let it to dry and then I painted one coat of Decoart Media white Gesso.After I dry it ,I paint with Decoart Traditions acrylic Burt umber ,dry it and  then paint with different colours of Americana acrylics-the parts of the boat.I let the colours to dry and after that with the sand sponge I distressed the edges.


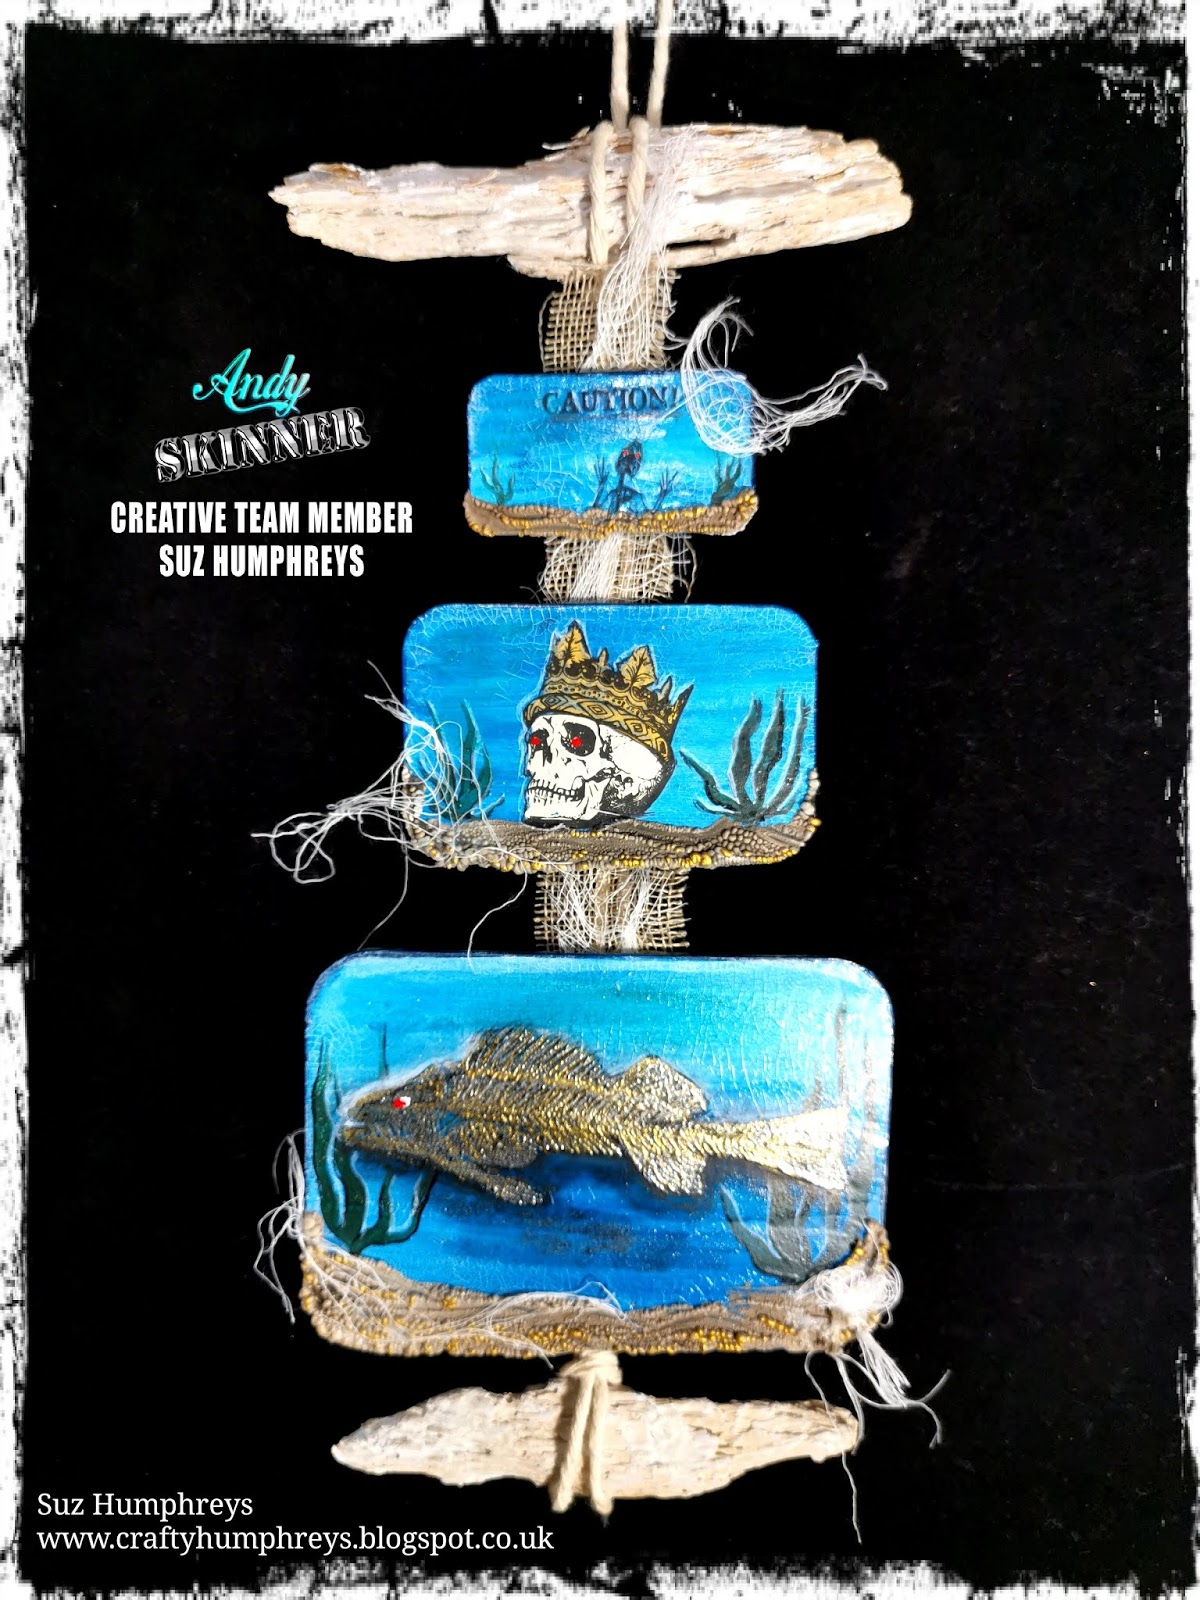
"The background of the wood panel "(41cm X 16cm)
I paint one coat of Decoart Traditions acrylic colour raw umber.i dry it and I put wax and  Americana weathered wood crackle medium on several parts.i let dry normally.After that I paint with two Americana acrylic colours -sea glass and sea breeze.I let dry it without using heatgun.I put out the wax and I distressed the edges with sand sponge.


 I used Andy's Skinner stencils from Decoart to make a logo to the background and some effect on the small wood.(used modelling paste,black ,white and paint from Decoart media)
I used also Andy's Skinner stamps from Decoart to stamp the bottom part of the boat and the stencils on the piece of wood.At last I "played"with washes to do an old effect and make shadows on the background.


I made the rusty effect to the wooden and metallic elements with the compination of Decoart Traditions acrylics -raw umber, transparent yellow iron oxide, turquoise and quinacridone gold.The nails were old so I didn't do anything at all(lucky 😄)


I really enjoyed the theme and the time I spent creating this project.
I wish that you are gonna love my project too.

                    Focus to the present.. dream your future
Thanks for reading
Maria Kantzali


List of supplies

Wooden panel mdf
Das air dry clay
Decoart Americana weathered wood crackle medium
Decoart media modelling paste white
Decoart media modelling paste negro
Decoart media texture sand paste
Decoart media White gesso
Decoart Americana premium acrylics Cobalt turquoise hue

Decoart Traditions acrylics
Titanium white, transparent yellow iron oxide,quinacridone gold, light grey value 8 , Burnt umber,raw umber

Americana acrylics
Sea glass,sea breeze,toffee

Decoart media fluid acrylics
Prussian blue hue,paynes grey

       Andy's Skinner stencils And stamps from Decoart
                         Metallic and wooden elements
                                Old nails and rusty wire
Archival ink jet black
Transparent glue for woods


My social media
Fb profile Maria Kantzali
FB page Clay's fairytales
Instagram : m.kantzali

Wednesday, 17 July 2019

Carnival Tag by Nikki K


Morning all,

Today I have a quick and simple tag to share with you, using Andy's new Lava Paste, Embossing Powder and Mixed Media Transfers.  I absolutely love all of these products, and they are super easy to use.


I started by painting a tag with a cream chalk paint, and then a light covering of Dioxazine Purple, making it darker in places to look 'dragged' down the tag.  I took a background stamp, and stamped over with embossing ink, and embossed with clear embossing powder to keep the colour of the tag but give texture.

I added some of Andy's fab transfers in places on the tag, not using all of the transfer but taking it over the edges.  It stood out a bit as my background was quite glossy, and the transfers have a more matte background, so I added some purple ink across the top of the tag to blend the transfers in.  You can still see them perfectly through it.

I had a wooden skull from Halloween last year, so decided to use it, and applied a layer of Lava Paste and heated.  It gave fantastic texture!  To make it stand out even more, I pushed the skull into my embossing ink pad, and embossed with Super Nova embossing powder.
The edge of the tag got the same treatment.  I also added a wash of Dioxazine Purple to the skull so it sank into the crevices of the texture.


Andy's transfers work equally well straight onto Cardstock, so I used the word Carnival, and cut out and inked with a little purple ink, and mounted on the tag.  A dark purple ribbon was added to finish.


Hope it gives you some inspiration. x

Best Wishes,

Nikki K
xxx


If you would like to know
more about my work
You can find me at:

Products Used:

Lava Paste
Embossing Powder - Super Nova
Mixed Media Transfers - Poe Diversity/Alchemy Plus

DecoArt Media - Dioxazine Purple.
Americana Decor - Lace Chalk Paint.

Stampendous - Andy Skinner Texture Stamp.

Other Supplies:
Versamark Embossing Ink.
Versafine Imperial Purple Ink.