Showing posts with label Andy Skinner Stampendous Stamps Sets. Show all posts

Friday, 26 April 2019

Egyptian Scarab by Natassa Blazaki


Hiya all!
This is Natassa Blazaki from Art Recipes and More, happy dancing today as it’s my debut in this amazing and super talented Creative Team.

A dream come true for me, because I finally get to work for one of the most brilliant teachers in Mixed Media, Mr. Andy Skinner! He’s the reason I’m constantly obsessed with achieving maximum texture and grunge effects in all my projects!
One more thing you need to know about me is that I’m fascinated by ancient cultures and myths, especially Greek and Egyptian ones. You’ll notice that in several occasions I create projects that are my interpretations of well-known ancient symbols and objects. 

Exactly the case in the project I’m presenting you today. Originally, I was inspired by an assemblage that Andy made a while back in February, using a computer mouse and some Costa coffee stirrers. https://www.facebook.com/countryloveceramics/posts/10158066159824008). So, I decided to use a broken mouse too. I broke it a bit more and then transformed it into an ancient Egyptian Scarab.
Really hope you like it.


As a base I used an oval canvas, I bought from a craft and school supplies store near my house, nothing fancy. 
For the feathers, I created a base I cut from cardstock. First, I painted it with DecoArt Matte Metallics Aged Bronze and when it was dry, I run the piece through an embossing plate to create some texture. Then I stamped on it with black Archival ink and stamps from Andy Skinner’s Stampendous Steampunk set.


I covered the whole piece with Media Antiquing creams in Patina Green and English Red Oxide. Dried well and wiped off with a damp cloth. Then, I sealed with Media Ultra Matte Varnish and dry brushed with DecoArt Traditions True Gold. I fussy cut all around the edges of the cardstock, to make them look like wings. Also cut another smaller set of wings and placed on top of the first piece to give some dimension. 


Because the antiquing cream colors were a bit dull when dry, I enhanced the Patina color by painting on top of it with Media Shimmer Mister Turquoise, and the Red Oxide color by rubbing some red Archival ink on top with a small sponge. Also used some Traditions Warm White, to paint one more row of feathers between the red and the blue ones.
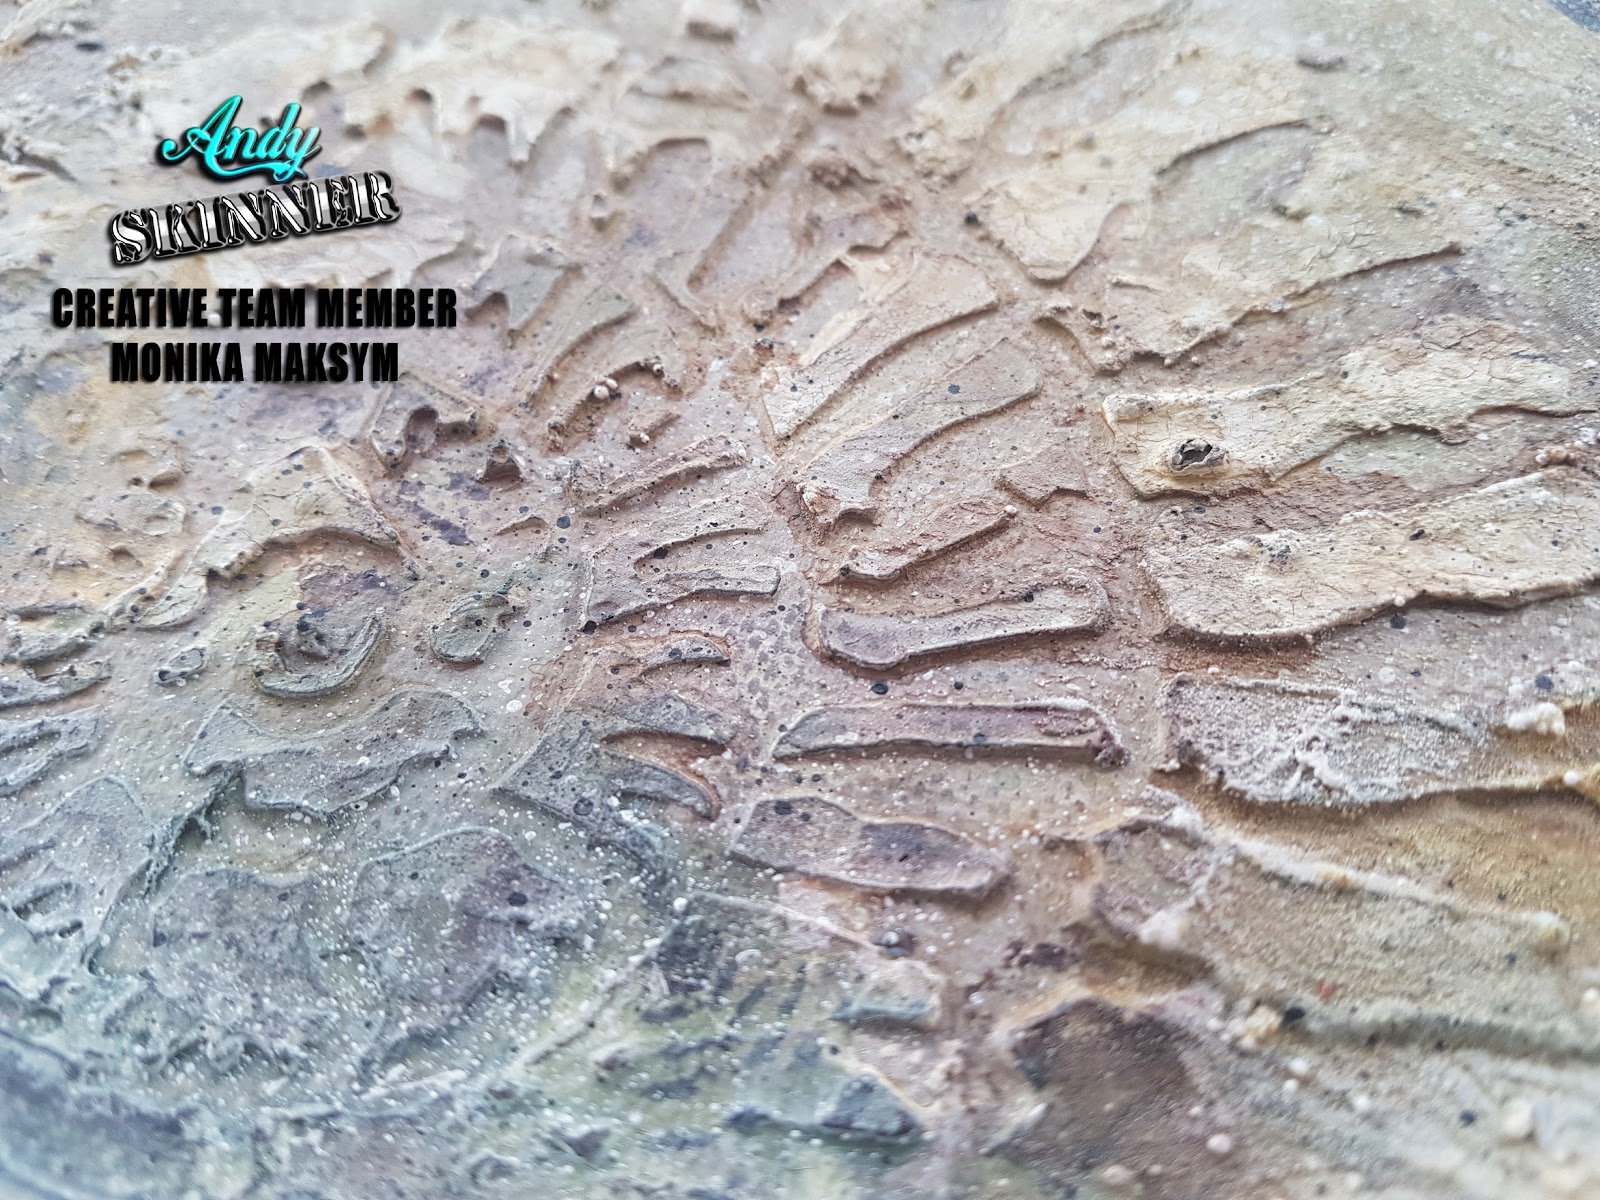

On the canvas, I created some texture with Media White Modeling Paste and Andy Skinner’s 15 x 15 stencil Whirlpool. I used a combination of Traditions Warm White, Raw Umber and Media Fluid Transparent Yellow Iron Oxide, to make the surface look like lime stone. Because the assemblage was very colorful, I needed a subtle background to balance it.


I pressed one of the stamps on a piece of polymer clay and used it as an embellishment on top of the mouse. To create some more texture, I applied Media White Modeling Paste all over the mouse with a palette knife. I painted the mouse with a mixture of Media Shimmer Mister Turquoise and Media Fluid Acrylic Titanium White. Then I “aged” the bright blue color by applying a thin coat of Media Fluid Acrylic Transparent Yellow Iron Oxide. Some final touches with Tradition True Gold, mixed with Matte Metallics Aged Bronze and done!


.


I’m sure this is going to be an adventurous and amazingly creative period for me. Thank you so much for having me in your team!


Until next time
Happy & Creative days to all!


You can find Natassa Blazaki - Art Recipes and More in:


Andy Skinner
Stampendous Stamp Set Steampunk
15 x 15 stencil Whirlpool

DecoArt
Matte Metallics Aged Bronze
Traditions Warm White
Traditions Raw Umber
Traditions True Gold
Traditions Transparent Yellow Iron Oxide
Media Antiquing Cream Patina Green
Media Antiquing Cream English Red Oxide
Media Shimmer Mister Turquoise
Media Fluid Acrylic Titanium White
Media Fluid Acrylic Transparent Yellow Iron Oxide
Media Ultra Matte Varnish
Media Modeling Paste White

Other supplies
Black Archival Ink 
Red Archival Ink 
Embossing folder 
E6000 glue
Chipboard elements
A piece of A4 cardstock 200gsm
Oval canvas 30x20 cm
Polymer clay
Flat brush 1”
Flat brush ¼”
Fan brush
Palette knife
Small piece of sea sponge

Tuesday, 20 February 2018

Dance in the Pale Moonlight by Katy Leitch


I've been mixing and matching Andy's stamps new and old for this week's tag project, combining the Stampendous skeleton image with those fabulous gravestones from the new Illusionary Artists Gothic Grunge set.

Here's a quick guide to how I made it:
1 Gesso the tag white. Punch a circle from paper to use as mask for the moon. Stick it down with temporary adhesive.

2 Paint the tag with greys, blues and purples, lightening the tone as you blend from bottom to top. When the paint is dry, remove the mask.

3 Add some pattern to the moon (I stamped this with a homemade carved stamp but you easily paint some detail in there). Add a wash of Paynes Grey so the moon is a little less stark white. Add a halo of light around it by blending Transluscent White paint around the other edge with your finger - you can blend out the edge with a baby wipe to make it really soft.

4 On a separate piece of card, stamp the skeleton. Fussy cut and wash with Paynes Grey.

5 On another piece of card, dab black, Sap Green and grey paints using pieces of sponge (I use cheap kitchen sponge). Cover the whole card but make sure areas of all colours remian visible. Stamp the gravestones onto this card and cut them out.

6 Assemble all as shown, using heavy gel on some of the gravestones to lift them slightly. The sentiment is from Word Up and stamped onto a Tim Holtz banner die cut.

Hope you like my spooky tag!
See you soon,
Katy

Products used:
Illusionary Artists Stamps: Gothic Grunge, Word Up (available here)
Stampendous Andy Skinner Stamp Set: Birds and Bones
DecoArt Media: Fluid Acrylics
DecoArt Media: Heavy Gel Medium, White Gesso
Tando Creative Tall Tag

Tuesday, 23 January 2018

Rusty vintage telephone by Phoebe Tonosaki

Hello all, this is Phoebe here to share an altered art project with you.

I found a vintage style telephone with a tiny drawer in the new year holiday and I immediately knew that this will be what I work for the first project for Andy.


I painted the whole surface with gesso, clear gesso (for the phone handle) and crackle paint. I waited a whole day for the crackle to dry naturally.


 then I covered the crackle parts with Antiquing cream Carbon Black/Raw Umber. After it had dried, I removed them slightly with a baby wipe. The phone handle itself was covered in brown wooden and the base color looks perfect with the crackles highlighted by the Antiquing cream.


I stamped using Andy's new released Spook Stamp Set by Illusionary Artists and punched it to glue on the phone handle, to indicate the coming call is from the character.

I also used several packs of Andy' stamp from Stampdenous with Staz On opaque white on the surface of the phone.


You can zoom in to the above photo and see the rusty crackles I have made.
after using the Antiquing cream as stated above, I painted with Fluid Acrylics Pyrrole Red/Raw Sienna/Carbon Black. I used layers and layers of every color and also combined the three colors with different ratio. The key is to paint them a little by little with thin coats and keep doing it until you are satisfied.

After that, on the few points I want to emphasize, I added sand ( can be any sand) to the Fluid Acrylics. Remember to use an old brush that is almost ready to throw away because painting with sand will badly damage your brush. You can also use a palette knife to put them onto the surface. 


I sincerely hope you like my rusty telephone with a phone book.
Special shout out to Ms Rosemary fm DecoArt.

Products used :
DecoArt Media Gesso
DecoArt Media Crackle Paint
DecoArt Media Crackle Glaze
DecoArt Media Antiquing cream Carbon Black/Raw Umber
DecoArt Media Fluid Acrylics Pyrrole Red/Raw Sienna/Carbon Black


Stampendous - Cling Mounted Rubber Stamps - Textures 
Stampendous - Cling Mounted Rubber Stamps - Fossils 
Stampendous - Cling Mounted Rubber Stamps - Unexplained
Stampendous - Cling Mounted Rubber Stamps - Handle With Care

Phoebe Tonosaki
Facebook - https://www.facebook.com/pt.masen
Blog - http://tonosakiphoebe.blogspot.jp/
Youtube - https://www.youtube.com/c/tonosakiphoebe
Instagram - https://www.instagram.com/phoebetonosaki/

Thursday, 18 January 2018

Fossil canvas panel by Monika Maksym

Hi all!
Monika here with my very first post for the Andy Skinner Creative Team. I am very excited to share my projects with you!

For my debut I've decided to make a canvas panel.


Firstly the whole surface was primed with gesso. Stencil, modelling paste, stamps and a little bit of sand helped me create stone and fossil effects.


Once dried, whole panel was painted with chalky finish paints and layered with a few washes of fluid acrylic paints to achieve aged look.


Then I've stamped and heat embossed some of the images to add even more texture and interest to my piece. 


To finish it off I've darkened edges of my  panel and  slightly splattered it with black paint.

Thanks for stopping by! I hope you like it
Monika


Products used:


Check out Andy's new Stamps collection:

http://www.andyskinnercrafts.com/store/c10/Illusionary_Artists_Stamps.html


Andy Skinner Fossils Cling Rubber Stamp Set 
 

Andy Skinner Stencil -Fossil
A Skinner Stencil - FOSSIL


Mixed Media Acrylics - raw umber, yellow oxide, burnt sienna, english red oxide, carbon black, primary yellow, dark grey value 3
Chalky Finish Paints- enchanted, whisper
Decoart Media Gesso
Decoart Media Modelling Paste 


Website: www.ilovecreations.co.uk
Facebook page:  Love Creations
Instagram: Love Creations

Wednesday, 15 November 2017

PLAYING WITH A DECOART WATERCOLOR TECHNIQUE-AUTUMNAL ART JOURNAL PAGES

Happy Fall Y'all!

I'm back with a new Autumnal Art Journal Spread using images from a magazine, the fabulous DecoArt Media Line products, Andy Skinner's amazing stamps and lovely little grey board accent pieces from Tando Creative.  Working magazine images into your own original art work is not only challenging, it's also a lot of fun.


You can find some of the most beautiful pictures that can be used in your art pieces out of magazines and calendars!  Be sure to tear out and save those lovely treasures because you never know when you'll wish you had them.  I found an entire "Country" magazine full of gorgeous autumn pictures.  Those plus the colorful falling leaves in our area were my inspiration for these pages.

Here are the supplies you will need for this style of art journal pages:


  • DecoArt Media White Gesso
  • DecoArt Media Matte Medium
  • DecoArt Media Fluid Acrylics Cadmium Orange Hue
  • DecoArt Media Fluid Acrylics Diarylide Yellow
  • DecoArt Media Fluid Acrylics Titan Buff
  • DecoArt Media Fluid Acrylics Primary Yellow
  • DecoArt Media Fluid Acrylics Burnt Umber
  • DecoArt Media Fluid Acrylics Paynes Grey
  • DecoArt Media Fluid Acrylics Viridian 
  • DecoArt Media Fluid Acrylics Yellow Green Light
  • DecoArt Media Fluid Acrylics Metallic Gold
  • DecoArt Media Crackle Glaze
  • DecoArt Liquid Glass
  • Andy Skinner Nature Stamp Set
  • Book Plates
  • Mini People
Miscellaneous Supplies
  • Paint brushes
  • Book for art journal spread
  • Magazine or calendar images
  • Acrylic block for stamping
  • Permanent Brown and Black Ink
  • Sponge or something to dab paint onto surface
  • Computer generated verse
  • Permanent Black Ink Pen
  • Autumn leaves
  • Heat tool
  • 1/4" Double Sided Adhesive Tape
Time to get into creative mode!


Begin by painting DecoArt Media White Gesso over the surface of your art journal pages.  These pages happen to be in a paper children's book that I have been altering into an art journal.  Heat set or let air dry. You can go heavy or light on the gesso; depending on the opaqueness of the background you desire.


Cut our your magazine images and secure them to the pages using DecoArt Media Matte Medium.  Matte Medium works as a transparent glue and sealer.  Apply the Matte Medium to the page surface lay the image in place.  Brayer or smooth out the air bubbles then brush over the image with Matte Medium to seal it.  This way, when you add paint to or around the images, they are protected and excess paint can easily be wiped away.


Here are the pages at this point.  They look strange but now the magic begins to happen as you bring everything together using DecoArt Media paints.


Choose colors that will blend and compliment the magazine images. Water down the paints to produce almost a watercolor effect. Brush the paint on and wipe away any excess.  Heat set.  Continue this process until you achieve the look you want.  The first layer was done using DecoArt Media Fluid Acrylics Cadmium Orange Hue.


Next I brushed on the almost watercolor effect to the background using DecoArt Media Fluid Acrylics Diarylide Yellow.  Also use a small brush and touch the leaves with the watery acrylic colors to further enhance them. You can do this since you've sealed the paper with DecoArt Matte Medium.


Here are the pages at this stage.  I also added some green on the pages using DecoArt Media Fluid Acrylics Viridian and Yellow Green Light in the leaves of the trees and along the ground on the left page to create balance.


Andy Skinner's Nature Stamp Set is amazing! At least for me, it's THE PERFECT set to add all sorts of detail to these pages.  From it's rustic wooden fence to the geese flying south, the stamped images really add so much to these pages!  

I began with this fence piece.  I inked the stamp first with a dark brown permanent ink and then tapped the stamp with permament black ink.  I used an acrylic block to ensure a good image.  I stamped to the left and overlapped that fence pole every time I stamped the fence image across the art journal spread.


Just look at the depth something that simple adds to this piece!!  LOVE IT!


Now to add more autumnal folliage to the background.  I stamped this beautiful tree using a dark brown permanent ink.


Next, use a small brush, water down the acrylic paints again and then lightly blot and brush colors that are complimentary to the leaves on the magazine image.  I also love how some of the original text from the children's book is showing through! 


Time to finish the background to compliment the ground on the opposite page.  Using DecoArt's Media Fluid Acrylics Titan Buff, Primary Yellow and Burnt Umber, I blotted color onto the surface using a sponge and then a small almost dry brush to create the streaks.  


Using yet another of Andy's beautiful stamps from this set, I stamped the old barn into the background then lightly painted over it. Again, with an almost watercolor paint, they translucency of the paints gives a bit of color but allows all of the detail from the stamp to show through.  


Here are the pages at this point.  Notice the geese flying south for the winter?  They were also added using permanent black ink and yes, they are also in this Andy Skinner stamp set!  The tree, the barn, the fence and the geese ... all used on these pages and I love what they add to the scene!


A large bookplate from Tando was painted with DecoArt Media Fluid Acrylics Metallic Gold followed by a healthy coating of DecoArt Media Crackle Glaze.  Let the Crackle Glaze and ALL DecoArt Media Crackle products air dry to achieve the truly beautiful crackle effect!


I rubbed over the crackled book plate with DecoArt Media Fluid Acrylics Paynes Grey and wiped away the excess.  I painted the two mini people using the Paynes Grey and glued them in place using DecoArt Liquid Glass.

Next, I glued some real leaves from my yard randomly around the perimeter of the pages using DecoArt Media Matte Medium.  First to glue them in place and then I brushed over them to seal them. 


As I was watching the autumn leaves gently floating to the ground one day, it struck me how similiar we are to the leaves.  In a philosophical moment for this art journal spread, I created this poem, computer generated the verse to fit the page, printed it out, cut it apart and glued it in place using double sided tape.  I highlighted the edges of the leaves and the poem using a permanent black ink pen.


Here is a closeup of the left page.


Here is a closeup of the right page.  I also added a black swipe of DecoArt Media Fluid Acrylics Paynes Grey around the perimeter of the art journal pages to "frame" them and draw everything together.


Thanks so much for stopping by and checking out these pages.  I hope that you've learned something new about a product or a technique. Even if you're not a fabulous sketch artist, you can incorporate beautiful images into your art journal pages using magazine images!  It's so easy to blend them into your pages and make them work perfectly!

May you all have a blessed holiday season!


About the Artist:  Candy Colwell
Blog: http://candycreates.blogspot.com
Facebook:  https://www.facebook.com/candy.colwell.9
Twitter:  https://twitter.com/rindacelly
Instrgram:  https://www.instagram.com/candy.colwell/