Showing posts with label Creative Team. Show all posts

Wednesday, 10 October 2018

Industrial Steampunk Tag- Fiona Randall

Morning all, today I thought I'd share my latest project an Industrial Steampunk tag,
Using Tagtastic 2, So Call Me Already and Industrial Clock face/ Not to mention utilising
Andy's Illusionary Artists Stamp Sets Tech Trauma and Word Up and Numbers.

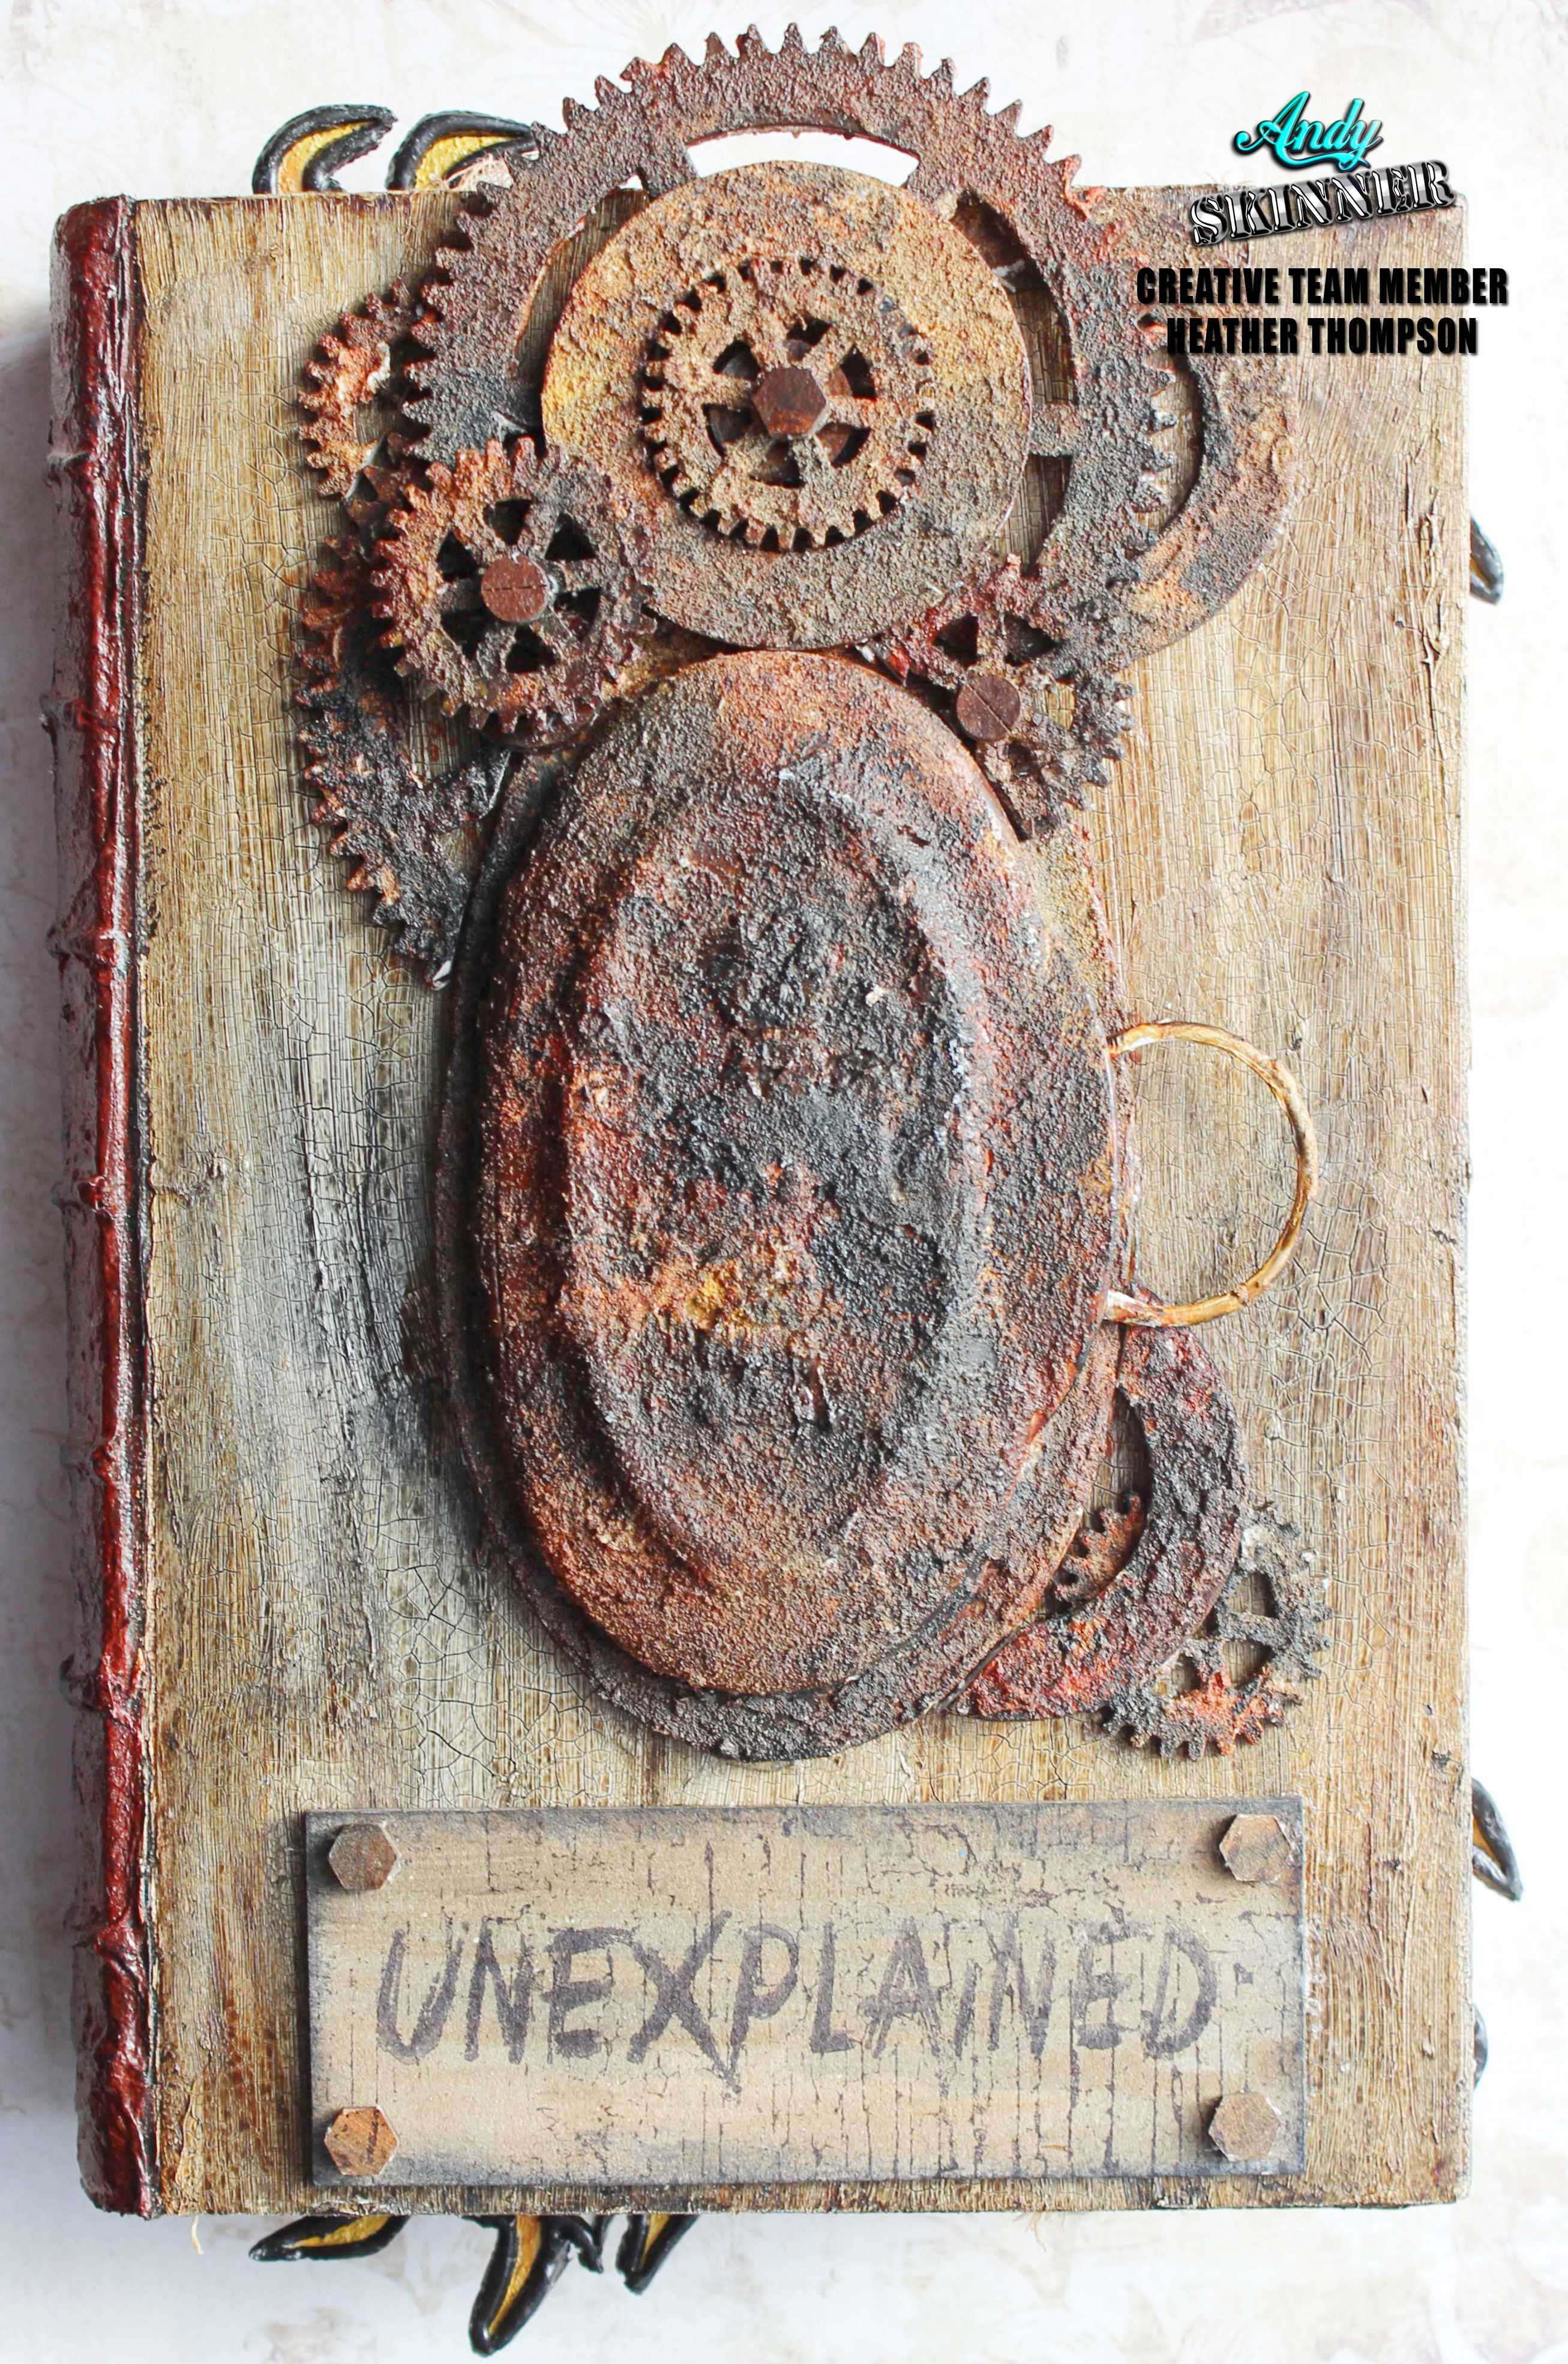
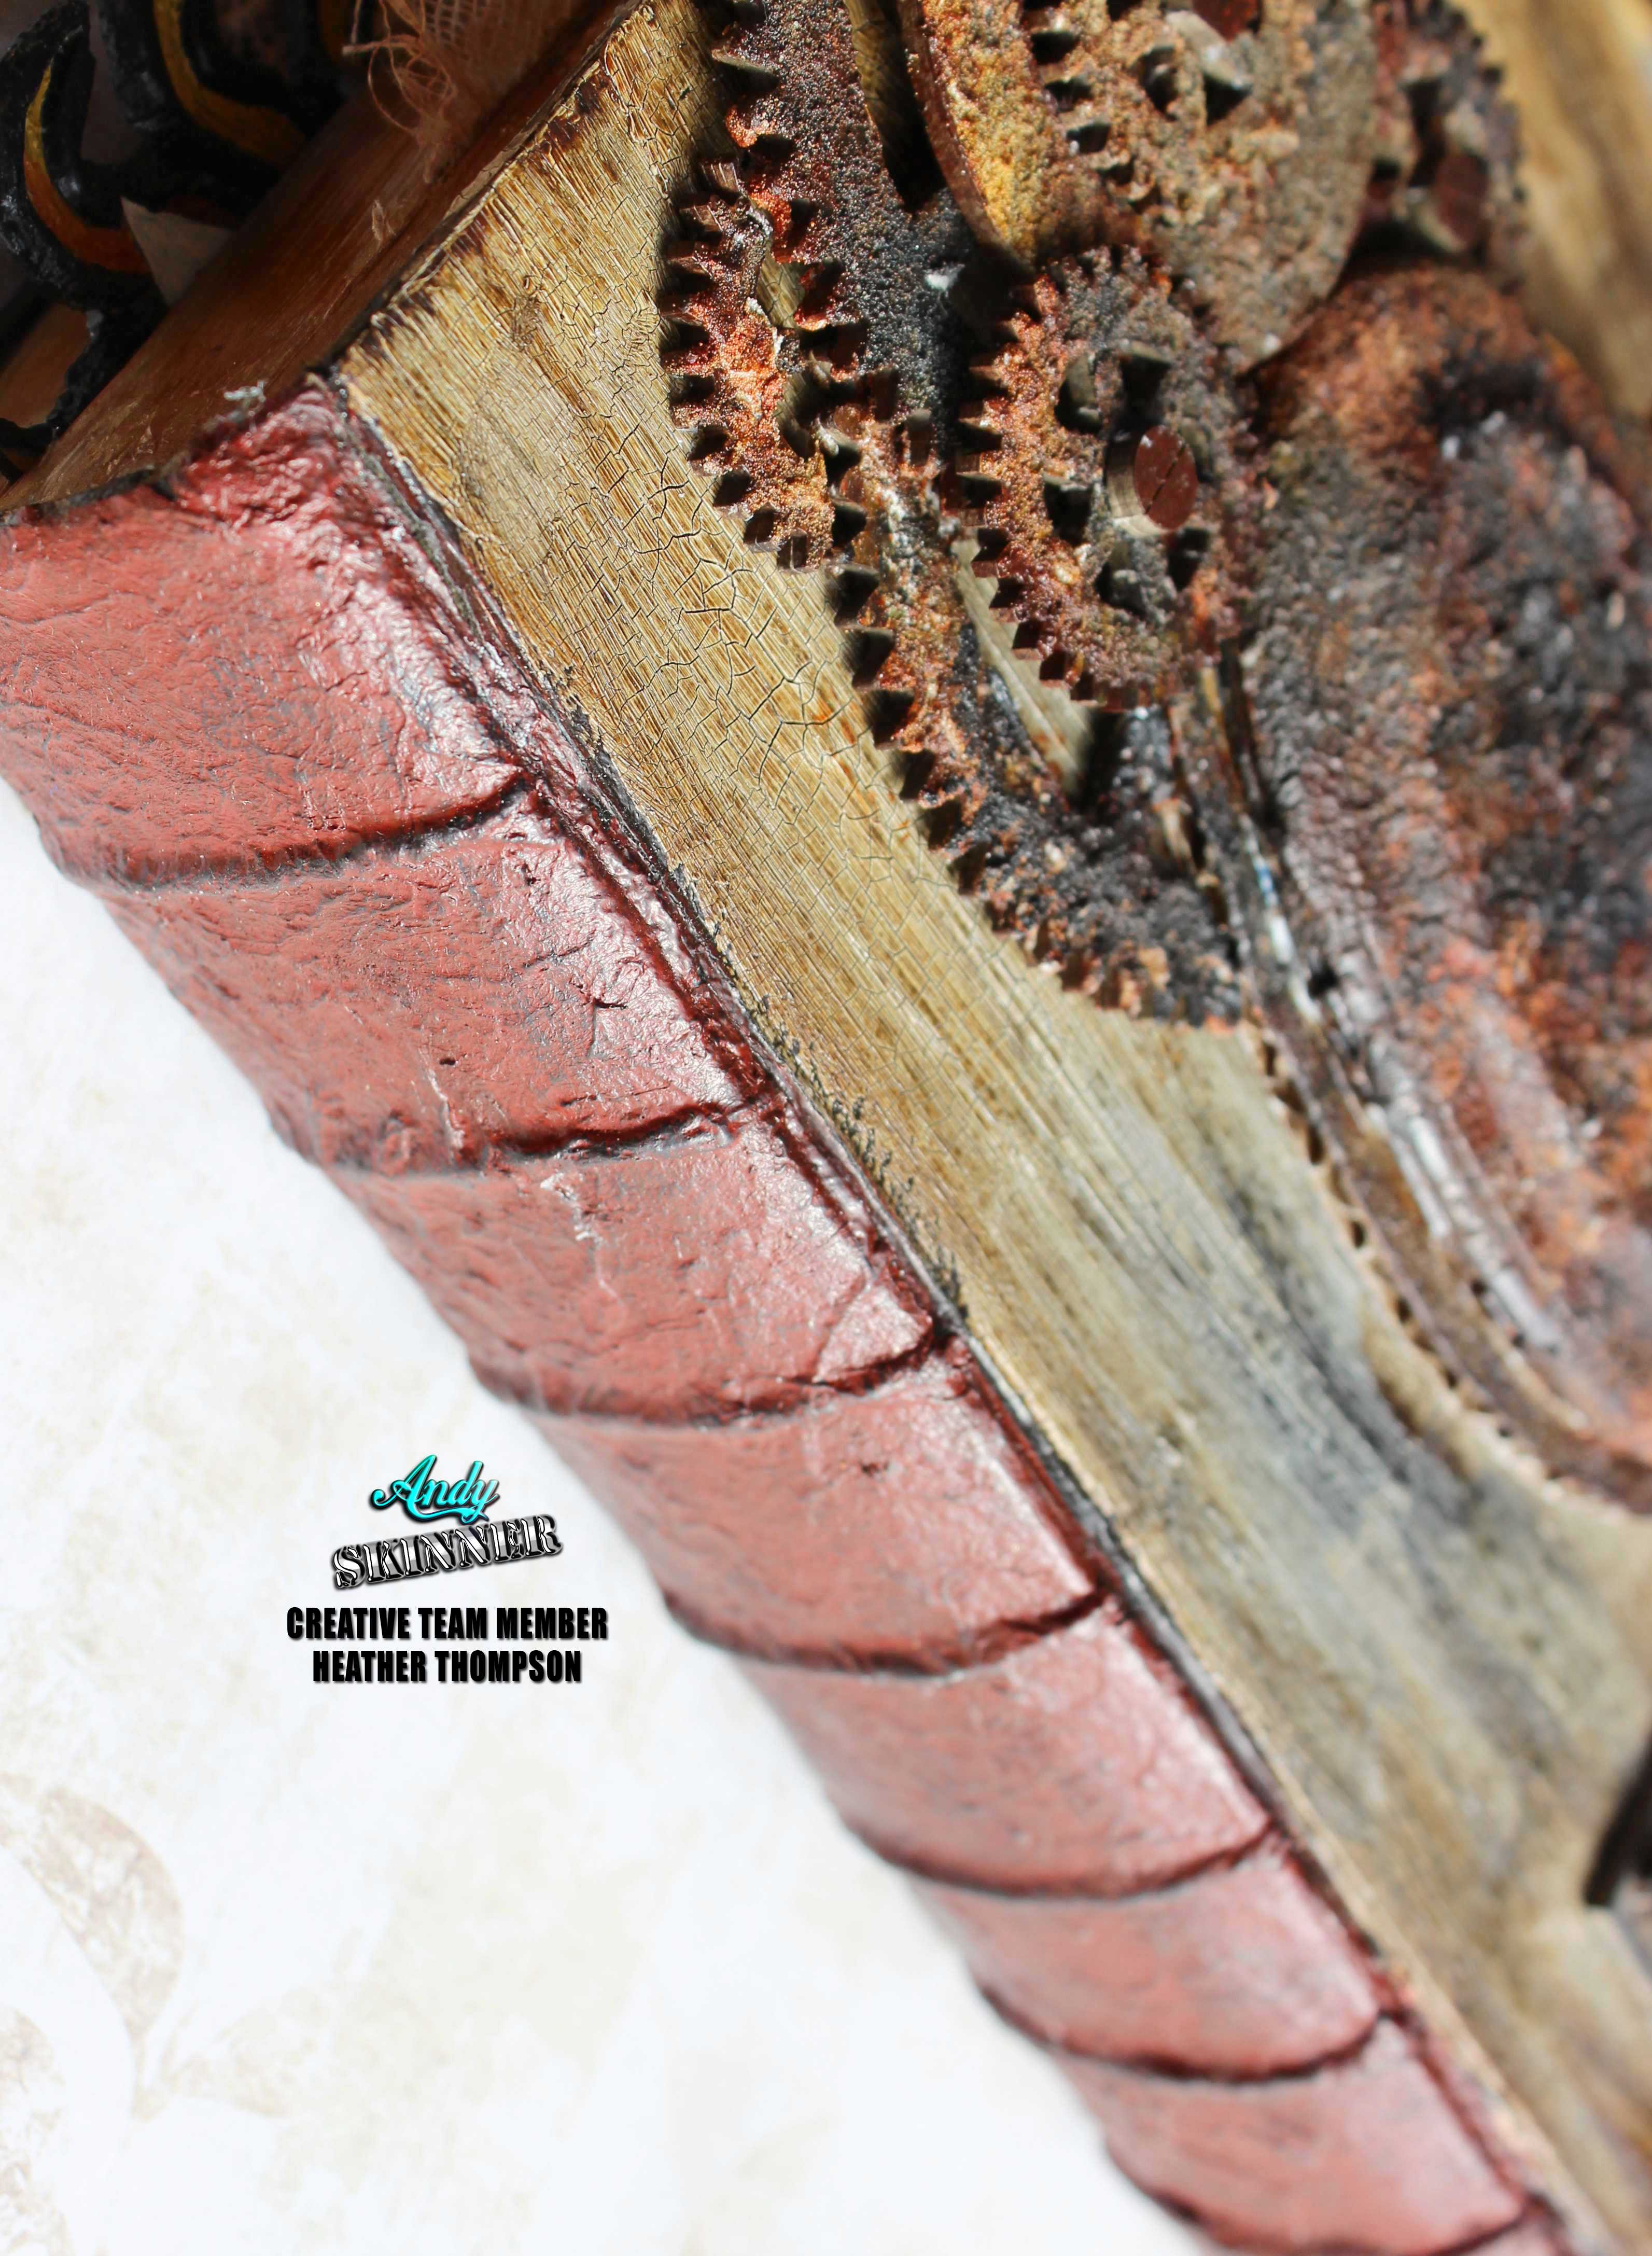
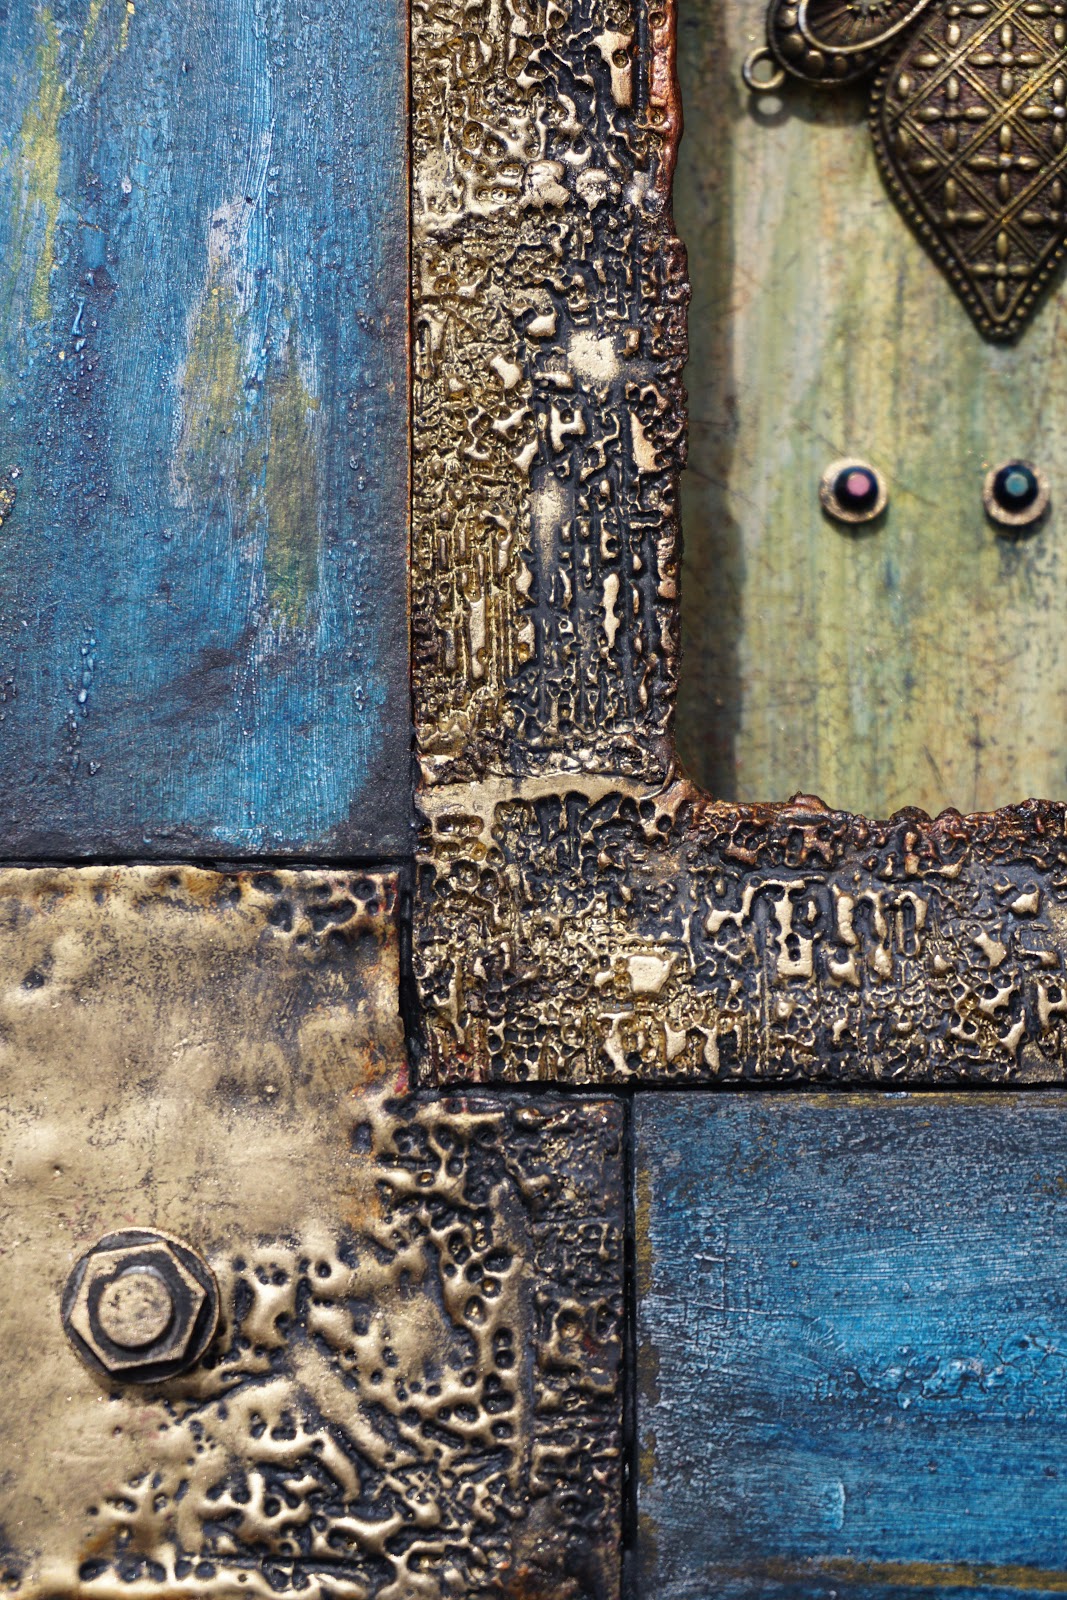
I started by giving the tag a base coat of  DecoArt Media Tinting base followed by a coat of DecoArt Media Fluid Acrylic in Titan Buff. I then added washes of Burnt Umber and Burnt Sienna. Then Cobalt Turquoise Hue mixed with a little Veridian in a spray bottle was sprayed over the tag. This gives lovely bluish/ Green tones. The tag was then stamped using Andy's Tech Trauma stamps with black archival ink. To finish the edges were then swiped with Potting Soil Archival ink.

The Industrial clock face was given one of Andy's Rust treatments and set aside.

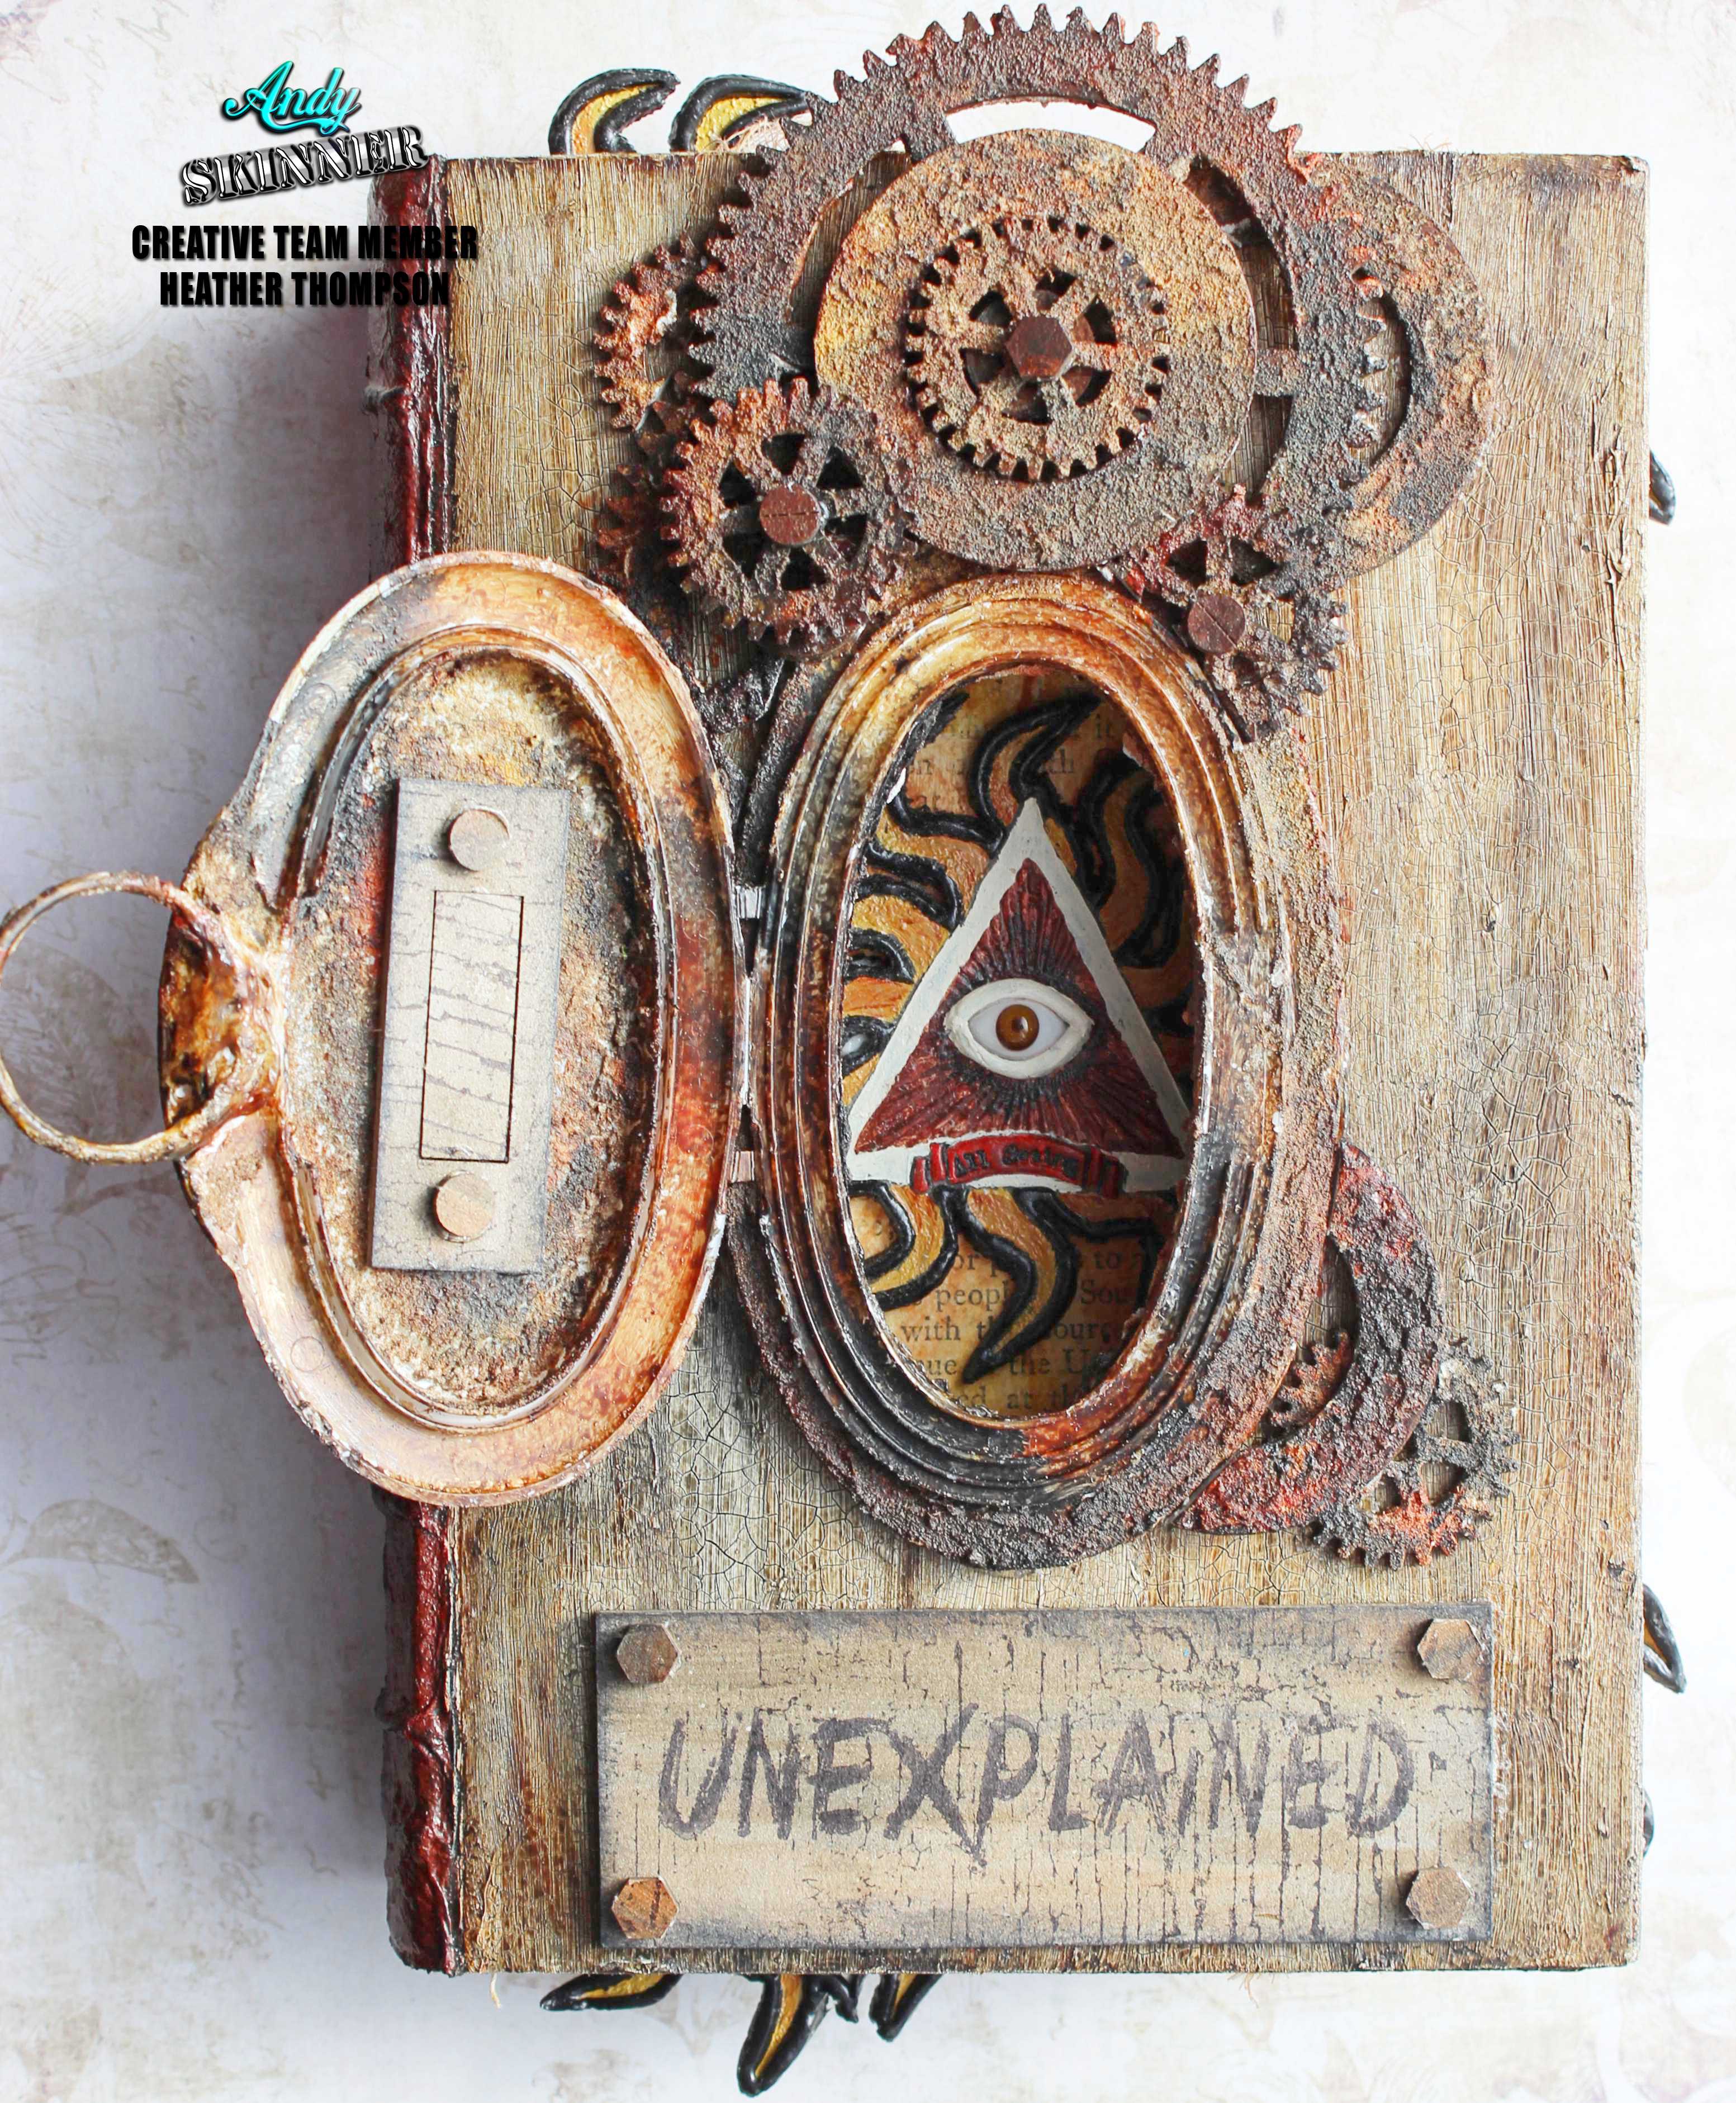
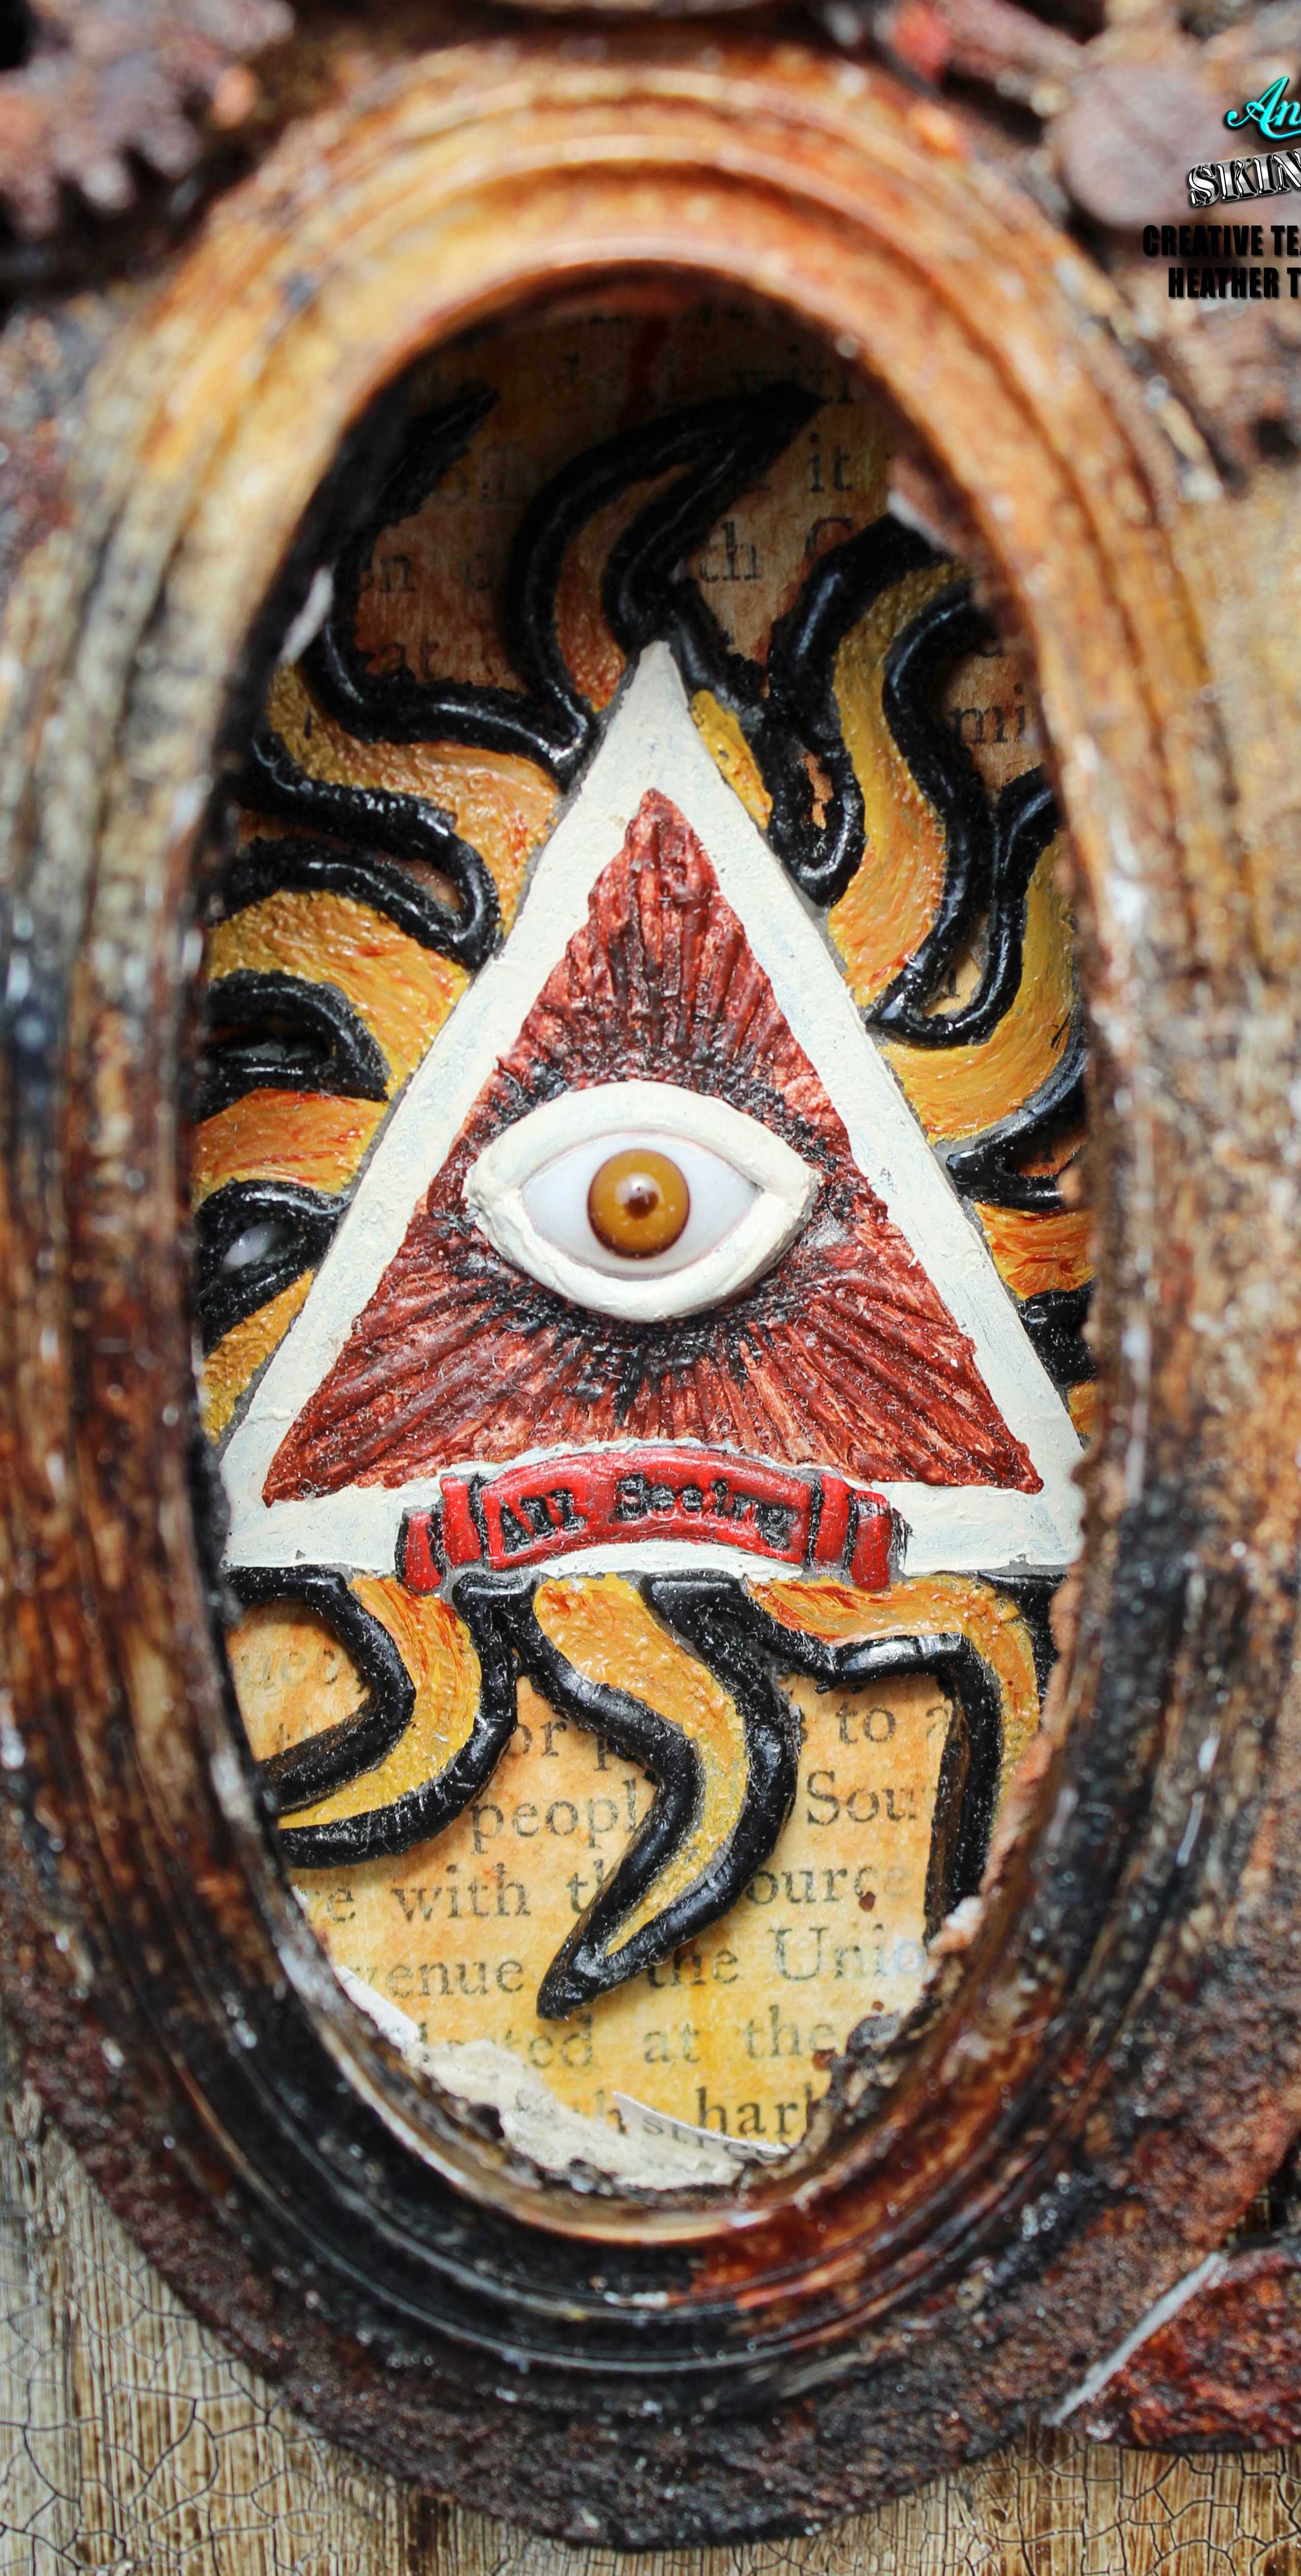
Next up the phone dial was given a base coat of  DecoArt Chalky finish in Relic. Then a Patina effect was added by mixing DecoArt Media Fluid Acrylics Phthalo Green Blue and Phthalo Blue to get a lovely Turquiose shade. This was then added to a mini mister bottle and a little water added then sprizted over the Phone dial and whilst still wet dabbed with a sea sponge in places to give a worn mottled effect.

The number card for the phone dial was given a dirty wash treatment and stamped with Andy's Illusionary Artists Word Up and Numbers stamp set. All pieces of the phone dial were then assembled and attached to the tag base along with the industrial clock face which had been cut in half to attach to the side of the tag.

Here's a close up of the Detail.


Thanks for stopping By Today.
Fiona.

PRODUCTS USED.


Titan Buff
Paynes Grey
Quinacrodone Gold
Raw Umber
Phtalo Blue
Phthalo Green Blue.
DecoArt Media Tinting Base.
DecoArt Media Ultra Matte Varnish.
DecoArt Chalky Finish- Relic


Friday, 17 August 2018

Portal to The Unexplained Altered Book

I loved messing around with altered art. I want to share a interesting and creative Altered book. To access the unexplained the variety of cogs and gears must be manipulated to open the portal. Unlike other books this book opens differently. Protal Front Cover.jpg 
 From afar, I wanted the viewer to see the differently elements protruding, almost trying to escape from the gateway from beyond, to draw them closer. Once closer, I wanted to focus on the portal itself. My goal was to make the viewer want to venture into the distance, into the unknown realm within the book. Portal Close-up


Portal Binding 

To open "The Unexplained", the various cogs and gears must be manipulated to unlock the portal, which then allows the user to dive into the unknown.  With peaked interest and curiosity, the viewer is now emerged completely within "The Unexplained".   

Portal Open Portal 


 It is unexplained, the primal drive we have to go further and further into the unknown. The risk we take to explore further in to the depths of our art and our passions.

  Open-Portal.jpg 


 Once inside, the viewer is still curious by protrusions of the unexplained emerging from within the book. Drawing us further and further into the deep depths of the unknown.

  Portal inside

It spikes our interest and we dive deeper with in our imagination and with the art in front of us.

  Portal inside 3


Have a great creative Day
black and white head shot
Supplies:
AS LOGO
decoartlogo
DecoArt Media:  Texture Sand Paste, Matte Medium, Crackle Paint, Decou-page Matte.
Fluid Acrylics: Quinacridone Gold, Quinacridone Burnt Orange, Yellow Iron Oxide, Diarylide Yellow, Carbon Black, Paynes Grey, Burnt Umber, Pyrrole Red,
tandologo
Stampendous-Logo
Andy Skinner Curiosity Stamp ASCRS04, Andy Skinner Unexplained StampASCRS09, Industrial Industrial Stamp ASCRS03

Wednesday, 31 January 2018

'Dead Stylish' Tag

Hi all,
A quick post to show a fun tag I've created using some of Andy's new stamps from the Illusionary Artists 'Spook' set. 


I used DecoArt Media Fluid Acrylics on the stamped images, and several Metallics on the background and part of the crown and strap. 


The background is a Tando Creative greyboard tag. This I split into 4 layers (details on my blog) to make the tag a bit thinner, then I embossed it with Andy's Starburst stencil before decorating. Products used are in the pic below.  

 I used a pyrography tool to singe the edges and add the dimples.

Little tip here, the Spook stamp set also gives you a FULL alphabet to play with (it's the Ouija stamp!) and that's what I've stamped, embossed with Stampendous Black Pearl Lustre embossing powder, coloured with paint washes and cut out to create the words. Having snipped out the letters I glued them onto a background I had painted with the red. Then the shrink plastic sign and wire were added to finish it off. More details on my blog. Thanks for looking! Suz x

Picture of products used - though forgive the stencil being in the wrong packet - it's called Sunburst not Tornado!

Click HERE to visit the store


DecoArt products used:
Media Fluid Acrylics: Cobalt Teal, Titan Buff, Pyrol Red Quinacrydone Gold, Paynes Grey
Dazzling Metallics and Extreme Sheen: Copper, Splendid Gold, Zink, Tin, Iced Espresso


Andy's products used:
Spook Stamp Set and Sunburst Stencil


Tando Products used:
Greyboard Tag

From my general supplies I also used Archival and Versamark ink pads, jewellery wire, shrink plastic, cosmic shimmer glue a hole punch and the pyrography tool.

Monday, 15 January 2018

Tagtastic 2 Kit - Valentine Heart

Hi Everyone, it's Brenda here from Bumblebees and Butterflies and I'm really excited to be publishing my first project here on Andy's blog as part of his new Creative Team. Some of you will know that I love Andy's grungy style and have learned masses from him both from his on-line workshops and real life workshops, his teaching has helped me develop my own style over the years I have known him.
I'm calling this look pretty grunge because it incorporates a bit of Andy's style and a lot of mine, to me there's a sort of feel of masculinity about it but plenty of femininity too. So with Valentine's Day coming up I thought I would throw in a heart and some fabric and use some of the red and pink colours in both the DecoArt media acrylics and the chalky finish paints to create background layers and focal elements in what might also be called a shabby style.

The Tando Creative chipboard elements here are from one of Andy's new kits coming out that will be released on the 18th February at the Stitches trade show in Birmingham. I have been lucky enough to have a pre-release play and apart from the fabric, ribbon and arrow everything else is from the kit. If you saw Dee's fabulous post last Friday she used the same set but different elements so you will see it is really versatile. I added some other bits from my supplies like this arrow which shows how you can mix and match with your own collection of embellishments.


Cheesecloth is my favourite go-to item when playing in the shabby style and it fitted in perfectly with the elements and style.


The heart has lots of layers of paints, stenciling and stamping before a coat of clear crackle glaze and don't you just love the cracks that appeared after I rubbed in some white antiquing cream?


Do keep your eye on both this blog for lots of inspiring projects yet to come and also on Andy's Face Book page for more projects and to keep up with all the news.


If you would like to see the process steps of how I put this together then they are all over on my blog.

Have a fabulous week.

hugs Brenda xxx

Check out Andy's new Stamps below!

http://www.andyskinnercrafts.com/store/c10/Illusionary_Artists_Stamps.html


Tagtastic 2 kit - Released 18th February 2018
Stencil - Dot Stream

Stamp sets - Industrial, Shabby Chic, Handle With Care

Mixed Media Acrylics - pyrrole red, quinacridone magenta, titanium white, raw umber
Chalky Finish Paints - romance, relic, everlasting
Medium - white crackle paste, clear crackle glaze

Brenda Brown
Personal blog - http://www.bumblebeesandbutterflies.com/
Facebook Page - https://www.facebook.com/Bumblebutterfly
Pinterest Page - https://www.pinterest.co.uk/bumblebutterfly/

Tuesday, 2 May 2017

Dee's take on Andy's Tando Frame


Kicking off the blog posts for my new Creative Team is Dee Adams with a wonderful take on my Tando box frame that's typical of her grungy, textured work.

Hi everyone so pleased to be here and kicking off this new creative Team! I have to pinch myself to believe that I am here on this amazingly talented team. I thought I would go over the top with my first piece and introduce you to what I am mostly known for - my embossing and a new/old way
for you to look at your stamps. I used quite a few techniques for this piece, including some ageing ones that I learnt from Andy.

Firstly I worked out that I would emboss the corner pieces along with the centre piece details below.

On the remaining 4 panels I gessoed them then gave them a coat of Gold fluid acrylic.

I followed this with Weathered Wood and hair gel (resist) to a few areas so that the gold would show through here and there. I then added a coat of Crackle Paint to the dry Weathered Wood. This creates Andy's 'mega crackle' effect.

Once it was dry and cracked, I added washes Prussian Blue then used DecoArt Black Antiquing Cream over the top to age the panels.I think the antiquing creams are among my favourite medium as 
just love the effects that you can achieve with these. Knock back the black with a with damp cloth.

For the embossed areas:

1. Swipe your substrate/card with embossing ink then pour Stampendous Chunky Metallic Seasonings powders over the area.

2. Tip the remaining embossing powder back into its pot and heat set your embossing powder with your hot air gun until melted.

3. Follow the above steps with Stampedous Chunky Clear or ultra thick embossing powder.

4. Follow the above steps again with Stampendous Chunky Gold this will be your final layer of embossing powder.

5. Ink up the Andy Skinner scratch stamp from the Toxic set with a Versafine ink pad.

6. For this step you need to heat the embossing powder until it is molten.Working quickly, press your inked stamp into the molten embossing powder and allow to cool prior to peeling your stamp off. You will now have the imprint of the stamp in your embossing powder.

Do this for all 4 corners. For the frame I took the same steps but use the crackle stamp from
Andy's Industrial stamp set.

 
I coated the corners and centre piece with black Antiquing Cream and set aside to dry. I glued together the bolts and painted them with raw umber and black media fluid acrylics, and added a quick touch of Metallic Lustre to finish of. I knocked back the black Antiquing Cream with a damp cloth until I was happy with it.

The piece inside the niche started off as magenta then gradually I layered it up with transparent yellow Iron Oxide and Everlasting Chalky Finish paint, a very watery wash of Prussian Blue Hue followed by watery Transparent Yellow Iron Oxide.

Finally the scratch stamp was used with with Archival Potting Soil, followed with black.

The inside edge of the frame was given a couple of coats of Quinacridone Gold. The centre piece was a charity shop find which I gave a coat of gold paint.


Three little bolts have gems glued on and were attached under the main metal embellishment.

I hope you have all enjoyed my post today and I look forward to hearing what you think.

Dee x

Products used:
Tando Creative: Ministry of Mixology Andy Skinner Frame
Stampendous: Andy Skinner Stamps Industrial and Toxic; Stampendous embossing powders - Chunky Metallic Seasonings, Chunky Clear Deep Impression Embossing Enamel, Chunky Gold.
DecoArt Media: Black/White Gesso; Ultra Matte Varnish; Crackle Paint; Antiquing Cream - Black; Media Fluid Acrylics - Prussian Blue Hue, Quinacridone Gold, Transparent Yellow Iron Oxide, Raw Umber, Gold, Carbon Black, Quinacridone Magenta. 
DecoArt Chalky Finish: Everlasting
DecoArt Weathered Wood
Inkpads: Versafine Onyx Black, Versamark, Archival Potting Soil and Black


About Dee:
"Hi everyone my name is Dee, and I am a mixed media artist who enjoys working with all kinds of media. Texture is my passion along with embossing. I am very fortunate to be on the design teams for some amazing companies and challenge blogs which gives me the opportunity to play with some fabulous products."

My personal blog: www.deeadamsart.blogspot.co.uk