


Kicking off the blog posts for my new Creative Team is Dee Adams with a wonderful take on my Tando box frame that's typical of her grungy, textured work.
Hi everyone so pleased to be here and kicking off this new creative Team! I have to pinch myself to believe that I am here on this amazingly talented team. I thought I would go over the top with my first piece and introduce you to what I am mostly known for - my embossing and a new/old way
for you to look at your stamps. I used quite a few techniques for this piece, including some ageing ones that I learnt from Andy.

Firstly I worked out that I would emboss the corner pieces along with the centre piece details below.

On the remaining 4 panels I gessoed them then gave them a coat of Gold fluid acrylic.

I followed this with Weathered Wood and hair gel (resist) to a few areas so that the gold would show through here and there. I then added a coat of Crackle Paint to the dry Weathered Wood. This creates Andy's 'mega crackle' effect.

Once it was dry and cracked, I added washes Prussian Blue then used DecoArt Black Antiquing Cream over the top to age the panels.I think the antiquing creams are among my favourite medium as
just love the effects that you can achieve with these. Knock back the black with a with damp cloth.

For the embossed areas:
1. Swipe your substrate/card with embossing ink then pour Stampendous Chunky Metallic Seasonings powders over the area.
2. Tip the remaining embossing powder back into its pot and heat set your embossing powder with your hot air gun until melted.
3. Follow the above steps with Stampedous Chunky Clear or ultra thick embossing powder.
4. Follow the above steps again with Stampendous Chunky Gold this will be your final layer of embossing powder.
5. Ink up the Andy Skinner scratch stamp from the Toxic set with a Versafine ink pad.
6. For this step you need to heat the embossing powder until it is molten.Working quickly, press your inked stamp into the molten embossing powder and allow to cool prior to peeling your stamp off. You will now have the imprint of the stamp in your embossing powder.
Do this for all 4 corners. For the frame I took the same steps but use the crackle stamp from
Andy's Industrial stamp set.
Do this for all 4 corners. For the frame I took the same steps but use the crackle stamp from
Andy's Industrial stamp set.
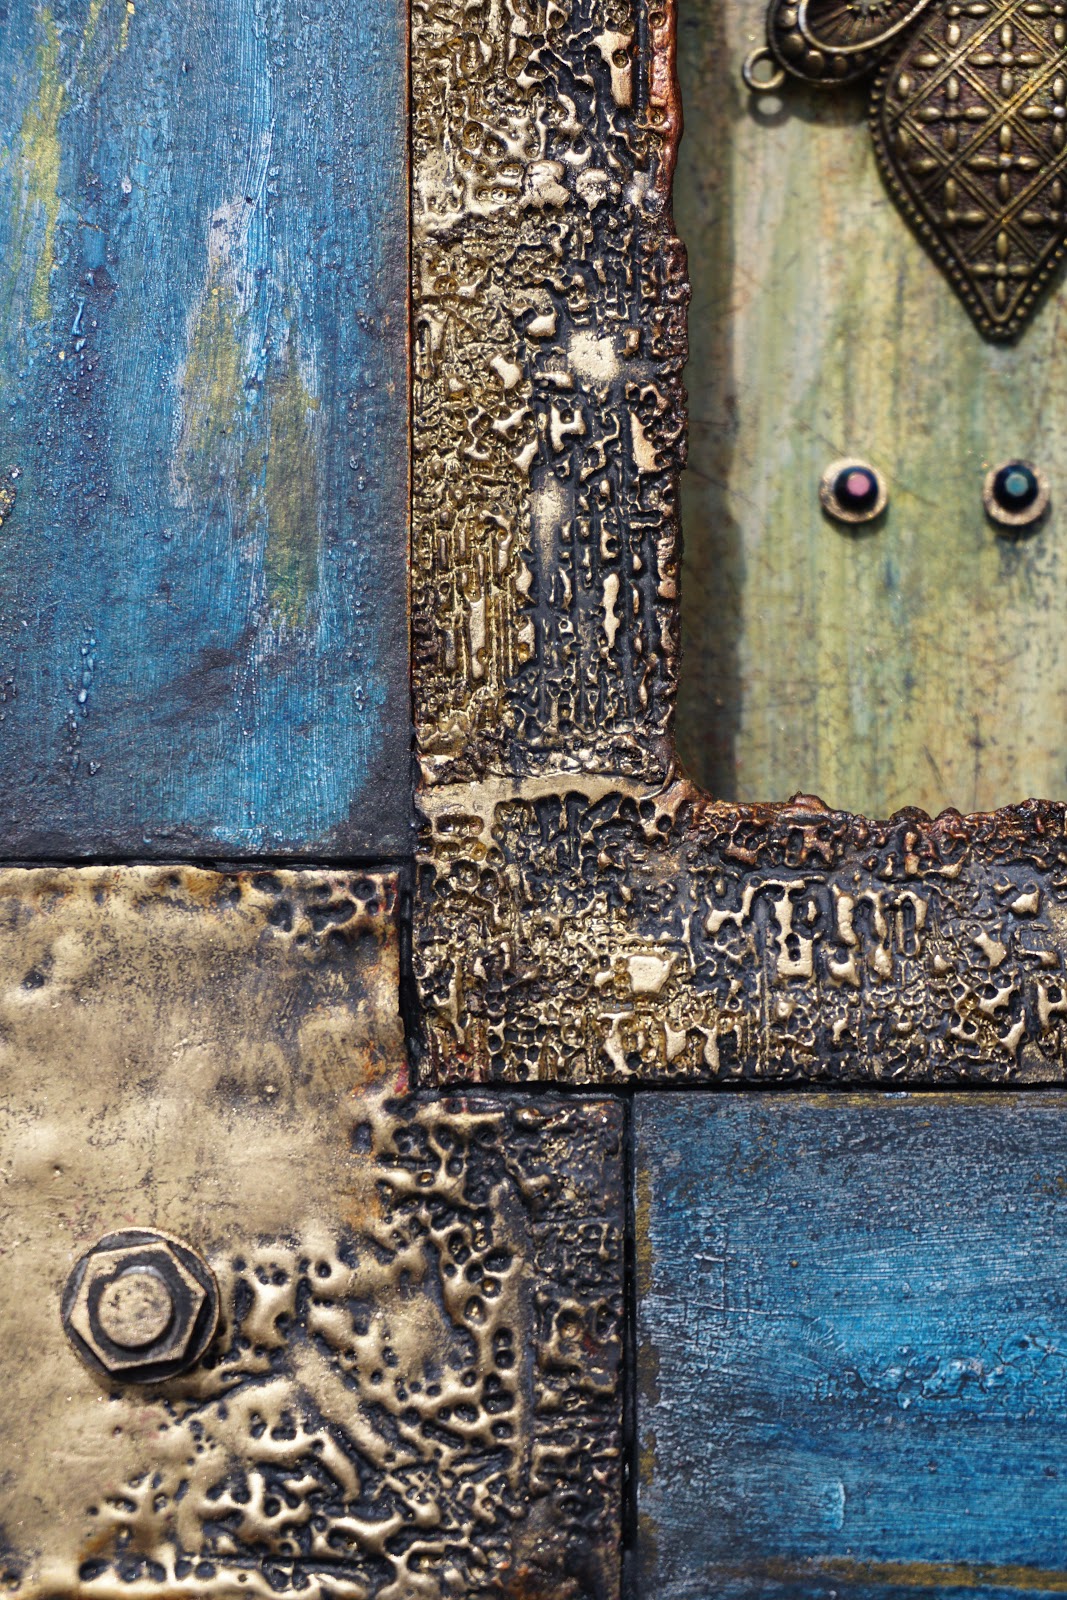

I coated the corners and centre piece with black Antiquing Cream and set aside to dry. I glued together the bolts and painted them with raw umber and black media fluid acrylics, and added a quick touch of Metallic Lustre to finish of. I knocked back the black Antiquing Cream with a damp cloth until I was happy with it.

The piece inside the niche started off as magenta then gradually I layered it up with transparent yellow Iron Oxide and Everlasting Chalky Finish paint, a very watery wash of Prussian Blue Hue followed by watery Transparent Yellow Iron Oxide.

Finally the scratch stamp was used with with Archival Potting Soil, followed with black.

The inside edge of the frame was given a couple of coats of Quinacridone Gold. The centre piece was a charity shop find which I gave a coat of gold paint.

Three little bolts have gems glued on and were attached under the main metal embellishment.
I hope you have all enjoyed my post today and I look forward to hearing what you think.
Dee x
Products used:
Tando Creative: Ministry of Mixology Andy Skinner Frame
Stampendous: Andy Skinner Stamps Industrial and Toxic; Stampendous embossing powders - Chunky Metallic Seasonings, Chunky Clear Deep Impression Embossing Enamel, Chunky Gold.
DecoArt Media: Black/White Gesso; Ultra Matte Varnish; Crackle Paint; Antiquing Cream - Black; Media Fluid Acrylics - Prussian Blue Hue, Quinacridone Gold, Transparent Yellow Iron Oxide, Raw Umber, Gold, Carbon Black, Quinacridone Magenta.
DecoArt Chalky Finish: Everlasting
DecoArt Weathered Wood
DecoArt Weathered Wood
Inkpads: Versafine Onyx Black, Versamark, Archival Potting Soil and Black
About Dee:
"Hi everyone my
name is Dee, and I am a mixed media artist who enjoys working with all
kinds of media. Texture is my passion
along with embossing. I am very fortunate to be on the design
teams for some amazing companies and challenge blogs which gives me the
opportunity to play with some fabulous products."
My personal blog: www.deeadamsart.blogspot.co.uk
Pinterest: uk.pinterest.com/grungyart/
Your project is fabulous Dee, beautiful colours, wonderful textures... and thanks for sharing such a great tutorial too! Anne xx
ReplyDeleteTruly SUBLIME. Xj.
ReplyDeleteWow magnificent Dee, you created an amazing work of art here xxx
ReplyDeleteStunning work from Dee, with all that amazing embossed texture.
ReplyDeleteAlison x
Stunning piece, really wonderful technique and texture!! x
ReplyDeleteLove it!!
ReplyDeleteAwesome, as usual, Dee. Your gift to the textural element is fabulous!
ReplyDeleteYeah for you Andy and the rest of us. I think Dee is fabulous.
Dee-Can't wait until you cut loose with the cool colors, paint, washes, stencils, paste, embossing, metal components and the female side with instructions. A video maybe?