
Hello again! It's time for my February post using Andy's amazing DecoArt Media Line products coupled with Tando Creative's Arches Frames set and Bag of Screws.
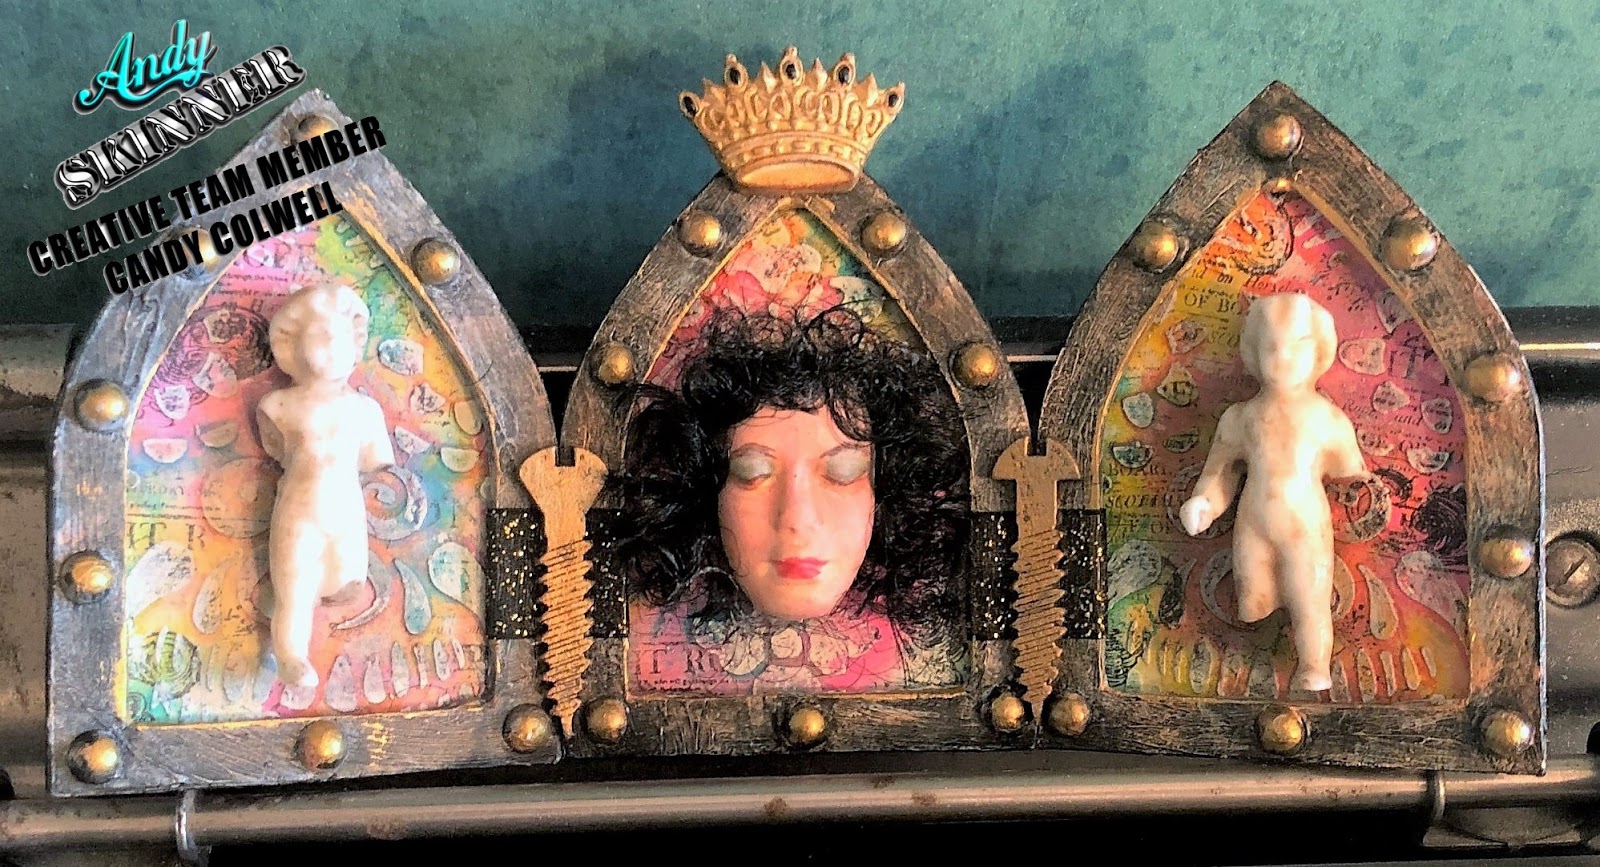
This is a small but very powerful piece; measuring 6 1/2" x 3". You can pack a lot of detail into this little triptych. It is also maneuverable so that you can set it straight or move the sides forward or backwards to give a more dramatic 3D effect.

Begin by covering two of the arches with Andy's Day of the Dead Stencil. Use the part of the face with the nose and eyes. Pull DecoArt Media White Modeling Paste through the stencil with a palette knife and let dry or heat set. On the third arch, position Andy's corner from his Baroque Stencil and apply the DecoArt Media Modeling Passte in the same manner.
After the Modeling Paste is dry, brush over the front of the arches with DecoArt Media Fluid Acrylics Titan Buff and let dry or heat set.

Bright, vivid color is the name of the game for the arch insets! I first used a mix of DecoArt Media Fluid Acrylics Primary Magenta and Titanium White and a little water to make afluid bright pink. Using my finger, I tapped the fluid paint onto the arch, sprayed it with water and maneuvered the arch to allow the paint to freely flow. Then I heat set it. Next I added DecoArt Media Fluid Acrylics Diarylide Yellow with water and repeated the process. Finally, I added DecoArt Media Fluid Acrylics Cobalt Teal Hue with a bit of water. Be sure to heat set between each color to avoid them running together and changing the colors. Do this for all of the arches.

To add some interest and contrast to the arches, I randomly stamped them with Andy's stamps from his Curiosity and Nature stamp sets using Black Permanent Ink. What a difference the black stamping makes! Heat set.

Now for the arch frames ... I began using my finger and applying DecoArt Media White Gesso over the frames and heat setting them.

To add dimension, I popped half pearls around the frames which will soon look like "rivets". I left open areas at the centers of the frames to allow for the frames being joined together in the end.
After I added all of the half pearls, I painted over all of the arches with DecoArt Media Fluid Acrylics Carbon Black and heat set.

To give the arch frames more of a medieval look, I DRY BRUSHED over them using DecoArt Media Fluid Acyrlics Titanium White. See all of the detail of the Gesso that emerges when dry brushing over the black with the white? Next I added a touch of DecoArt Media Fluid Acrylics Quinacridone Gold to add "warmth" to the frames with its bit of a rusty appearance. I topped the "rivets" with DecoArt Media Fluid Acrylics Metallic Gold to make them pop and tie them in with the crown I painted to sit at the top of the center triptych and the screws you see below that will sit between the arch frames.

The first coat of the screws was DecoArt Media Fluid Acrylics Carbon Black followed by Decoart Media Fluid Acrylics Metallic Silver. Finally I added touches of DecoArt Media Fluid Acrylics Metallic Gold to really make the screws pop against the grey-ish background of the arch frames. All of this was done using my fingers.

I purchased these little porcelain Charlotte dolls that came from Germany on Ebay a long time ago. They are a shiny bone color and I wanted to grunge them up a bit. So, using my finger, I added some DecoArt Media Raw Umber Antiquing Cream and wiped off the excess with a dry paper towel. When I got the look I was going for, I heat set the dolls. Antiquing Cream is water reactive until you heat set it; so you can always add or remove the cream until you get the look you want.


Back to the arches and finishing them off! Using my finger, I lightly rubbed some DecoArt Media Fluid Acrylics Titan Buff over the raised areas so pop the stenciled images. I like the way the images are highlighted but don't compete with the background colors.


Join the frames together using a small piece of ribbon that compliments your medieval looking frames. I wrapped the frames with the ribbon and secured them using Double Sided Tape on the back side and a bit of clear glue on the front side.

Paint the backsides of the arches with DecoArt Media Fluid Acrylics Carbon Black and heat set. Then add a layer of DecoArt Americana Weathered Wood and let it air dry. Then lightly brush on a layer of DecoArt Media Fluid Acrylics Titan Buff. You will immediately begin to see the arches crackle ... like magic! Finally, mix DecoArt Media Fluid Acrylics Transparent Yellow Iron Oxide and a bit of water and wipe it onto the back of the arches. I used my fingers and patted of the excess with a paper towel then heat set.

Put the frame and the arches together using a good clear drying glue. Add the crown at the top and the screws centered on the frames.

I pressed some air crying clay into a small mold that I have for faces and let it air dry. I painted the face using DecoArt Americana Flesh Tone followed by washes of DecoArt Media Fluid Acrylics Quinacridone Red for blush, and DecoArt Media Fluid Acrylics Cobalt Teal Hue on the eyelids. DecoArt Media Fluid Acrylics Raw Umber was used around the eyes and Quinacridone Red without water was used on the lips. Heat set. I then added some black doll hair and clipped it to fit the arch space in the center. I glued the porcelain Charlotte dolls centered on the two side arches.

And once again, here is the final piece.
Thank you for stopping by!
Here is a list of all of the supplies needed for this project:

- Andy Skinner Curiousity Stamp Set
- Andy Skinner Nature Stamp Set


- DecoArt Media Fluid Acrylics Titanium White
- DecoArt Media Fluid Acrylics Titan Buff
- DecoArt Media Fluid Acrylics Carbon Black
- DecoArt Media Fluid Acrylics Cobalt Teal Hue
- DecoArt Media Fluid Acrylics Transparent Yellow Iron Oxide
- DecoArt Media Fluid Acrylics Quincridone Red
- DecoArt Media Fluid Acrylics Quincridone Gold
- DecoArt Media Fluid Acrylics Diarylide Yellow
- Decoart Media Fluid Acrylics Metallic Silver
- DecoArt Media Fluid Acrylics Metallic Gold
- DecoArt Media Raw Umber Antiquing Cream
- DecoArt Americana Weathered Wood
- DecoArt Americana Flesh Tone Acrylics
- DecoArt Media White Gesso
- DecoArt Media Modeling Paste
- DecoArt Andy Skinner Baroque Stencil
- DecoArt Andy Skinner Day Of The Dead Stencil
Miscellaneous Supplies
- Porcelain Charlotte Doll (or some type of small dolls)
- Doll Hair
- Air Dry Clay and Small Face Mold
- Clear Drying Glue
- Paint Brushes
- Small Crown (for top of center triptych frame)
- Scrap of Ribbon
- Double Sided 1/4" Tape
- Half Pearls
About the Artist: Candy Colwell
Instagram www.instagram.com/candy.colwell
Twitter www.twitter.com/rindacelly
Pinterest www.pinterest.com/mimicandy
Love how these triptych pieces came together Candy xxx
ReplyDeleteThank you so much Brenda!
DeleteWow, wow, wow! Girl, those painted backgrounds are scrumptious! I love the contrast of the medieval looking riveted arches with the bright, contemporary colors in the background. The details, as always, are fabulous. I always learn so much from you! Thank you for taking the time to prepare this inspiring art piece and instructional post! xo
ReplyDeleteKathy, you are so kind. Thank you for your always positive support!
DeleteThis is just amazing candy and I adore those fabulous frames and arches x Reminds me of Game of Thrones, which is my favourite series at this time.
ReplyDeleteI have been leaving lots of comments on your blog but dont think you are getting them..... very strange.
Best wishes
Annie x
Hi Anne!! Thank you so much for your comment here. I have no idea about the other blog comments. I need to check into that. You are such a dear lady and art talent.
Delete