
Hello All! Welcome back to Andy's Blog where you will find some really fun projects from his Creative Design Team.
Andy and Creative Expressions have teamed to create some really fabulous and fun new products! This canvas I'm sharing highlights just a few of the products from his new release.

This is an 8" x 10" mixed media canvas that literally came together in a couple of hours. Don't you love it when you're in the "flow" and things just work together like they were meant for each other?
I began with a blank 8" x 10" canvas, a 3" x 3" canvas, the three little silhouette figures I found online and sized to fit my design and a couple of boxes of crayons. They are black and printed on heavy cardstock that I cut out. I then painted over them with Black Acrylic Paint to make them even stronger, cut them out and set them to the side for later.
Now add Creative Expressions products to the mix ...
Now add Creative Expressions products to the mix ...

I started by brushing White Gesso over both canvases. Then I heat set those to speed up the process. Next I added just a little water to the Cosmic Shimmer Ocean Breeze Matt Chalk Paint and lightly brushed it over the surface of the large canvas. I first brushed up and down and then across to create a bit of a crosshatch pattern. Then I repeated the process using Cosmic Shimmer Olive Grove. These are such lovely soft colors. They brush on beautifully and leave such a soft, matte blended look. I truly LOVE THEM! And the colors are luscious!
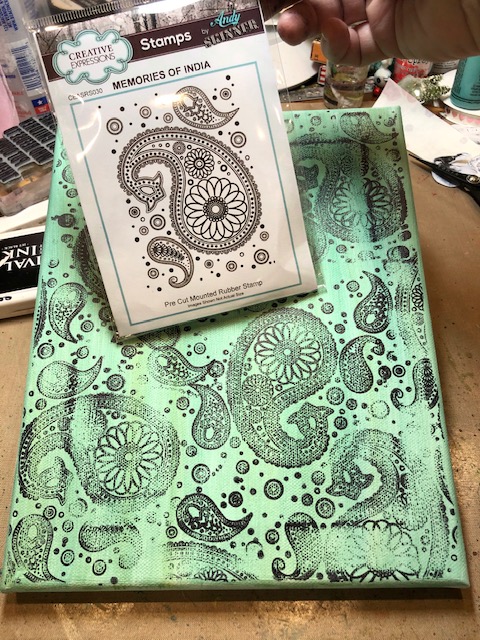
Using Black Permanent Ink, I stamped this fabulous image from Andy's New Creative Expressions Stamp; Memories of India. I mean, this stamp really has the WOW factor! I did not use an acrylic block; just the stamp so that I could stamp the background and bend the stamp to randomly fill in areas. Then heat set the ink to dry.

As you can see in the previous picture, the black ink and the background provide a stark contrast. To soften that look, I again went over the canvas with a touch of water added to each of the Cosmic Shimmer paints. Only this time I added a touch of a white Translucent White with the Chalk Paints to soften the colors and better meld the stamped images into the background.

I stamped this fabulous sentiment from Andy's new Artists stamp through Creative Expressions onto a piece of plain white tissue paper using Black Permanent Ink. Who among us can't relate to THIS???
It is the perfect size to fill in the area of the 3" x 3" canvas and also give some dimension to the canvas by adding an extra level. Heat set to dry. Then apply a generous amount of Matte Medium to the little canvas front and carefully lay the stamped tissue paper in place; centering it on the small canvas. Brush matte medium over the canvas top. Heat set to dry. Tear away the excess tissue and apply a light amount of Matte Medium around the edges to seal them in place. Heat set. Then apply Black Acrylic Paint around the sides of the smaller canvas and using your finger, rub the black paint along the top edges of the canvas; framing the sentiment. Next I brushed Black Acrylic Paint around the edges of the larger canvas and used my finger to create a frame of black across the top edge of the canvas. Heat set and set aside.
It is the perfect size to fill in the area of the 3" x 3" canvas and also give some dimension to the canvas by adding an extra level. Heat set to dry. Then apply a generous amount of Matte Medium to the little canvas front and carefully lay the stamped tissue paper in place; centering it on the small canvas. Brush matte medium over the canvas top. Heat set to dry. Tear away the excess tissue and apply a light amount of Matte Medium around the edges to seal them in place. Heat set. Then apply Black Acrylic Paint around the sides of the smaller canvas and using your finger, rub the black paint along the top edges of the canvas; framing the sentiment. Next I brushed Black Acrylic Paint around the edges of the larger canvas and used my finger to create a frame of black across the top edge of the canvas. Heat set and set aside.

Choose the crayons you want to use and in the succession you want them to be glued in place. Measure 2" from the top of the canvas and draw a line across the canvas. Using hot glue; line the crayons in place along the line you're drawn and glue them in place making sure the the "Crayon" label is centered on the crayon. I glued my crayons in place along the line by lining up the actual line on the crayon where the round part of the crayon starts to slender down to the pointed area.

Next I glued the 3" x 3" canvas in place and the three silhouette images in place using Matte Medium. (I hot glued the canvas in place to speed up the process). Put the silhouettes in place the same way you added the tissue paper to the 3" x 3" canvas. Brush a generous amount of Matte Medium over the area you want to add the three figures. Work one at a time. Set it in place and gently press it down with your fingers to remove any air bubbles or wrinkles. Then brush over the figure with Matte Medium and heat set to dry. This glues and seals the image. Do this for the little girl on the left and the woman on the right. The little boy next to the canvas will be glued on using adhesive pop dots stacked on top of each other and pressed into place. Then lightly brush over the larger canvas with the Matte Medium to seal it. Do not brush Matte Medium over the crayons. Gently heat set to dry the canvas but don't get the heat tool too close to the crayons ... yet!

NOW you want to get the heat tool close to the crayons! You will gently place the heat tool close to the crayons so that the crayons will begin to melt and run down the canvas. Hold the canvas in an upright position so that the wax will run down the canvas. Hold the heat tool at an angle so that the wax will run down the canvas, not blow across it. Do this a section at a time and when the wax has run as much as you want it to, lay the canvas flat and allow the wax to dry just a little before you move on to the next section. You can always make the wax run more by applying more heat to the crayons.

Here is a view from the the side of the canvas so you can see the dimension of the little boy and the smaller canvas in comparison to the 8" x 10" canvas. It really makes a difference that the little boy and the smaller canvas stick up from the larger canvas! Very dimensional and really grabs your attention!
I hope you've maybe learned something new with this fun mixed media piece. It want together so quickly! So if you're looking for something new and different to try that won't take a lot of time; this is your project!

- Cosmic Shimmer Matt Chalk Paint Ocean Breeze
- Cosmic Shimmer Matt Chalk Paint Olive Grove
- Andy Skinner Memories of India Stamp
- Andy Skinner Artists Stamp
Miscellaneous Supplies
- 8" x 10" Canvas
- 3" x 3" Canvas
- Plain Tissue Paper
- Permanent Black Ink
- White Gesso
- Matte Medium
- Paint Brushes
- Silhouette Images - 3 3/4" little girl, 4" little boy, 5" woman
- Small Scissors (to cut silhouette images)
- Heavy Cardstock
- Two Boxes of Crayons
- Heat Tool
- Hot Glue Gun and Sticks
- Adhesive Pop Dots
- Acrylic White Translucent Paint
- Acrylic Black Paint
About the Artist: Candy Colwell
Instagram www.instagram.com/candy.colwell
Twitter www.twitter.com/rindacelly
Pinterest www.pinterest.com/mimicandy
Another triumph Candy, what a fabulous way to show off Andy's new stamps too. The background stamp is beautiful and the colours of the crayons must also remind Andy of his trip to India. You are just so creative, I love this! Anne xx
ReplyDelete