Showing posts with label Americana Acrylic. Show all posts

Tuesday, 10 September 2013

Tales from the Weekend

Had a busy busy weekend but before I get onto that I wanted to share a couple of pieces decorated in a shabby style, first up are these wooden wall candle holders I got from Country Love Crafts.


Once decorated they look look great on the wall in the dining room!


Carrying on with the shabby theme, I picked up this box with handle from The Stamp Attic on Saturday.


This is the transformation and it now holds flavoured olive oils!
PS It also holds wine bottles perfectly ;)


On sunday I taught a private crop and we made shabby book boxes like the one below, unfortunately the french on this is wrong but it was corrected for the day :)


I will post some pictures of their finished boxes soon as they all looked amazing!

Ok onto Saturday, Here are all the altered Ikea mirrors produced on the scrapyard challenge workshop I held  at The Stamp Attic, same technique but all so very different! It was good to catch up with everyone again.


Thanks for reading,

Andy

Wednesday, 4 September 2013

Anaglypta Frame

Here is a great way to up-cycle that old plain frame and give it a shabby vintage look using anaglypta wallpaper.


Glue the wallpaper to the frame, I used Decoart Decoupage.
After a few layers of paint and a final antiquing with Raw Umber this old frame looked so much better.
I am going to be putting a tutorial together on this soon before anyone asks :).

Ok, I have been quiet on here because of soooo much work but will post some recent stuff... I know many of you already follow my Facebook page but for those of you who do not but want to keep updated more regular here is the link, My Facebook Page

Clean and Simple Canvas

Traditions Acrylic on Canvas.
I wanted to paint a canvas but keep it simple for a change without the use of any mediums, here is the result, lots of fun doing this.


Moving on from Clean and simple here is another using lots of Decoart Mediums, specially loving the crackle on this.

Young Einstein.


Hopefully that's brought you all up to date, sorry this is a bit brief, need to get back to it.

Thanks for reading.

Andy


Monday, 12 August 2013

You know when you've been Tando'd!

Some of you may know that the last online Book of Secrets workshop this year has just started and bookings will stop as of 12pm tonight.
Putting this workshop together is where my love affair with Tando Creative chipboard first started, I loved the thickness and the way it held up to everything I chucked at it... and I mean everything!
My next discovery was the fantastic durability of their stencils and as they are manufactured from 350 micron plastic, I have never had one tear yet and they are used by so many in workshops around the country each week that they certainly get put through their paces, hence when I decided to design my own stencils Tando Creative was the first and only place I headed.

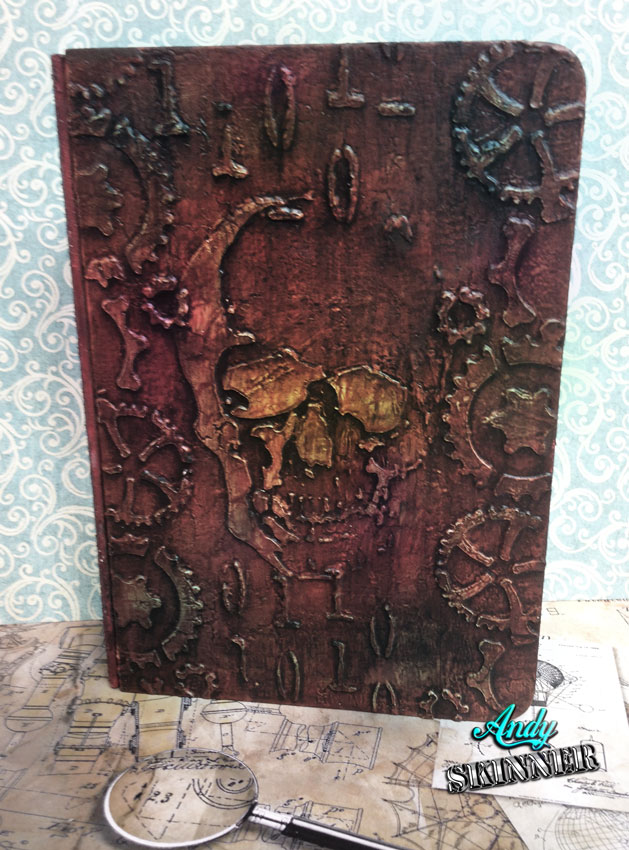
So today is the start of my week over at the Tando Creative Blog be sure to check out the design team projects over there this week. I decided to make a special Book of Secrets but with a difference to start this week off, lets call it a book of parts.... Tando parts!

I wanted the book box to to look as if it had been discovered laying on the sea bed or in a shipwreck for hundreds of years,  this was achieved by applying many layers of Decoart Americana and Traditions acrylic paint.
Steampunk Background paper from Rob Kleeman http://www.flickr.com/photos/robkleeman/


In this close up you should be able to see the many textures and layers going on giving a decayed appearance.


For the reverse of the book I decided to apply Decoart Modeling paste through some of my stencils, you get a lovely smooth surface with great detail,  also great depth can be achieved because of the amazing thickness of the stencils.


After applying some crackle and a few washes of acrylic paint it was antiqued by painting with Raw Umber and wiping it back before the paint was dry.


Here are a few recent projects posted to my Facebook just to keep you up to date.

Made this on my demonstration at the Craftbarn... I think its close enough to Halloween to be acceptable?!?


Finally here is page three of my Altered peter Rabbit book.


Thanks for reading,

Andy


Friday, 26 July 2013

Sorry Peter Rabbit... but It had to be done!

I went out on the hunt yesterday for alterable items, after the 5th charity shop I was about to give up when I remembered a lady on a recent workshop showed me a children's book that she had altered using various card-stocks and embellishments... Bingo! the charity shop was full of these thick card books so I picked three, two of which were finger puppet books.


First job was the decapitation of Peter.... Sorry Peter.

This picture was taken moments before it all happened,  I will spare you the awful gory details :)


After a little work...


An eye now resides where Peter once did,  surrounded by a housing from a divers watch, rusted up of coarse...


This was great fun to do and the book held up fantastically to all the Decoart mediums and paint washes, there are still 7 more pages to go!
This is definitely going to be my kind of journalling at 50p per book.

Page 1 can be found here Time waits for no one

Thanks for reading,

Andy

Sunday, 21 July 2013

Shock Horror Flowers were used in the making!

Before I start apologies to everyone booked on the stacking crates workshop yesterday,  I did everything in my power to try and get to you but alas the car had to be towed to a garage only to find out it was a simple loose connection and the breakdown guy should have been able to fix it on the road!

Ok I am working on a whole heap of stuff at the moment but wanted to share this picture frame with a beach theme, skeleton leaves have been stuck to the surface with Decoart Faux Finishing medium, then modeling paste was applied to the corners,  shells and yes... flowers were pushed into the modelling paste and allowed to dry.

Everything was then painted with titanium white before numerous colour washes, dry brushing and finally stencilling.


I love the way the Skeleton leaves have worked for texture.


All in all happy with this for a £1.50 second hand wooden frame.


A quick share of this Ikea mirror for those who did not see it on Facebook, I have simply printed out vintage signs on heavy cardstock and made a patchwork before distressing with acrylic paint, it's quite effective and very simple.


Thanks for reading,

Andy

Sunday, 14 July 2013

Scrapyard Challenge

One of the first Altered workshops I ran was called Scrapyard Challenge,  an Ikea mirror was altered to give the effect of scrap metal, here is a picture.


Yesterday I held a new Scrapyard Challenge workshop at It's crafting Time in Cambridgeshire.
This was a hybrid of the original workshop with elements added from many other workshops, it gave a totally different look to the finished mirrors and although most of the 12 delegates used the same Decoart Americana colours,  each one turned out very individual.

Here is the wonderful work everyone produced.


I thought I had taken a picture of all 12 but one seems to be missing?

You can click on the picture for a larger view.


Finally I want to share this wonderful altered cigar box from Claudia, she has made a full tutorial on her blog, well worth checking out http://vonpappe2.blogspot.co.at/2013/07/altered-cigar-box-nr3-tutorial.html


Thanks for reading,

Andy


Friday, 14 June 2013

A day at the beach

This mixed media work was completed on artist paper and features two children playing on a beach, I printed onto tissue paper the text and numbers in the background,  The tissue was then applied to the artist paper using Decoart Faux finishing medium with a little bit of Titanium white mixed in to dull the text slightly, its a really nice way to start the layering process.
Here is a youtube link with instructions on how to print onto tissue paper.

The rest of the painting is built up with collage, stencilling, image transfer and Decoart Traditions Acrylic paints.


I have been spending a little of my time designing masks,  this one contains famous street names from around the world.


I decided to test it on this Ikea mirror and was so very happy with the way it came out.
The frame was base-coated with two coats ofAmericana White Wash, when dry Americana Charcoal Grey was dabbed through the mask.
Finally It was distressed with various grades of graphite pencil and sealed with Americana Matte spray sealer.... Simple!


Thanks for reading,

Andy


Monday, 13 May 2013

Weekend Workshops!

Still trying to catch up since returning from Decoart but it has been proving impossible, I returned on Thursday 2nd and this is my suitcase, still mostly unpacked!!


The first weekend back I was at the Craft Barn, here is one of the projects we were working on, these are book boxes.

andy skinner class


While I remember I did promise a more detailed picture of the Canvas I painted while at Decoart so here goes, lots of Modelling Paste, Traditions, Americana, stencilling and a lush new Dazzling Metallic colour called Peacock pearl.

decoart peacock blue metallic


andy skinner decoart peacock blue dazzling matallics


Not only have I been running more Decoart workshops but have been busy in the background and all I can say at the moment is that there is some very exciting news coming so keep tuned!!

Ok this weekend I was at The Craft Den on Friday holding a Gelli plate workshop and then on Saturday it was time for the Tando Clock, this is a new revised version using som new colours.... here are some of the brilliant finished clocks, a big hello to Lynne and everyone attending, I had a great time.


Finally on Sunday I was at The Stamp Pad, Thanks Gwen for your wonderful hospitality and again a big hello to everyone attending, you made some amazing boxes!


Thanks for reading,

Andy