Showing posts with label DecoArt Vintage Effect Wash. Show all posts

Wednesday, 18 April 2018

CHATEAU De SKINNER

Spring has finally arrived! 
I'm celebrating this by completely altering a dingy black birdhouse into something of a shabby chic "Chateau De Skinner".  Using DecoArt Products and a combination of Andy's wonderful new Illusionary Artist and Stampendous stamp sets, I was able to imagine and create this beautiful little home decor piece.


Here is the finished piece ... certainly a lot different style from most of the artistic adventures done using Andy's wonderful products.  But, I love finding ways to mix different genres.  Join me on this adventure to see how you too can use your imagination to completely alter anything!


In the upper right corner, you can see the original birdhouse.  Pretty plain, dark and dingy.   DecoArt's lovely Americana Decor Everlasting Chalky Finish paint is the perfect base color to completely transform this rather drab house.  Adding first DecoArt's Vintage Effect Wash in Patina followed with Tan gives the perfect shabby, aged look in a matter of seconds.  I simply applied the Vintage Effect Wash using a damp lint free cloth and wiped away the excess.  Continue to add layers until you achieve the desired effect.  So simple! 


To create a lovely "tile-ish roof", I painted a piece of regular cardboard packing material using DecoArt's Media Fluid Acrylics Burnt Sienna followed by DecoArt's White Vintage Effect Wash that I lightly brushed over the top using a wide brush.  It was heat set and then using Black Permanent Ink, I repeatedly stamped the Ouija Board image from Andy's Spook Illusionary Artists stamp set.  I heat set again and then cut the cardboard into 3/4' strips by 1 1/4" blocks. These were used to lay the "tile" on the roof of the house in rows.  I kept the extra pieces to use as "bricks" to surround the arched windows on either side of the house. (You will see the results in an upcoming picture). 


Using Black Permament Ink, I stamped these wonderful Gothic windows onto a piece of Specialty Stamping Paper.  I layered the windows onto three layers of chipboard to give them dimension.  I painted the edges of the cardboard with the Everlasting Chalky Paint as well as the Vintage Effect Wash colors used on the birdhouse.  The panes of the windows were filled in brushing a wash of DecoArt Media Fluid Acrylics Cobalt Teal Hue and water.


To really accentuate the windows, I added the "brick" edging.  You can still see some of the random Ouija Board images on the brick.  Just one more thing I loved about this embellishment!


Using a Dark Brown Permanent Ink, I randomly stamped areas of the house mixing three of Andy's stamp sets.  Ilusionary Artists Tech Trama provided much of the back design. I love the diagrams and how they blend with the much softer images from Andy's Stampendous Shabby Chic and Textures stamp sets.  I also stamped some of these images using a Yellow Ochre ink on the sides and front of the house.


Here is a closeup of one of the sides of the house.  You can also see the tiled roof above.  Here you can see the combination of the yellow and dark brown stamped images.  LOVE the subtle detail that they add!


I created a "Cafe" hanging sign using Andy's Shabby Chic stamp set.  This little sign gives such extra character to the Chateau.  Speaking of the Chateau, I used a partial image of the "Chateau" stamp (from this same stamp set) on white tissue paper and then applied it on the front of the bird house using DecoArt's Media Matte Medium.  It works wonderfully as a glue and a sealer.  You can see "Chateau" on the photograph of the entire birdhouse.

In this picture, you will also notice the greenery on top and around the grounds of the bird house.  This was added using DecoArt Media Matte Medium that was generously brushed onto the surface of the areas.  I sprinkled the greenery and petals (Flowersoft product) and gently pressed the greenery in place to air dry.  Then I lightly sprayed a coating of DecoArt's Americana Sealer over it to secure it in place.


The little clay pots were filled with tiny flowers and glued onto the front side of the birdhouse; welcoming all of it's feathered visitors.  Rhinestones were added to the centers of the flower like stamps on either side of the "doors".  A white wire was covered with the Flower Soft pieces, wrapped with ribbon and I made a little garland across the front of the Chateau with bows on either side. The little pegs in front of the round "doors" were covered with DecoArt Media Fluid Acrylics Metallic Gold paint. I used my fingers to wipe the gold on; leaving a little of the black showing underneath.  I also used my fingertip to lightly add the Metallic Gold color over the raised design on the three metal squares in the center of the birdhouse.
Quite a "chic" little Chateau, don't you think?

Thanks so much for stopping by and I hope this shabby "Chateau De Skinner" tutorial has inspired you to not be afraid to blend different genres to create your next masterpiece!


  • DecoArt Americana Decor Chalky Finish-Everlasting
  • DecoArt Vintage Effect Wash-Patina
  • DecoArt Vintage Effect Wash-Tan
  • Decoart Vintage Effect Wash-White
  • DecoArt Media Fluid Acrylics Burnt Sienna
  • DecoArt Media Fluid Acrylics Metallic Gold
  • DecoArt Media Fluid Acrylics Cobalt Teal Hue
  • DecoArt Americana Spray Sealer
  • DecoArt Media Matte Medium

  • Andy Skinner's Gothic 
  • Andy Skinner's Spook
  • Andy Skinner's Tech Trauma


  • Shabby Chic
  • Textures
Miscellaneous  Supplies

  • Permanent Black Ink
  • Permanent Yellow Ochre Ink
  • Specialty Stamping Paper
  • Packing Cardboard
  • Wooden Birdhouse
  • Paint Brushes and lint free cloth
  • Ribbon
  • Small flowers and clay pots
  • White tissue paper
  • Rhinestones (for centers of stamped design on front of house)
  • Flower Soft of Sweet Pea and Shamrock Green
  • Small metal chain and hook (for Cafe sign)
  • Chipboard pieces


Tuesday, 11 July 2017

GEARS AREN'T JUST FOR STEAMPUNK! THINK OUTSIDE THE BOX...

Greetings Andy Skinner buddies!

Won't you join me in wishing Andy Skinner a very HAPPY BIRTHDAY!!  
I think he turns 29 today.  (smile)

Do you look at your Tando Creative pieces and just stare because you don't know what to do with them?  Well, here's a solution!  Think outside the box and imagine them as something other than what they are!  For example ...


I picked out a simple journal that I had lying around.  It's interior pages feel like home made paper with roughly torn edges and I just love it!  The cover is pretty but plain and I wanted to really "Skinner" it up.  So I picked out the above Tando Creative products and laid them out to create a little "floral garden" front using left over gears, nuts and bolts, cogs, some hinges and a more random design on the back using part of a clock face (on the back side of the book) and a piece of lace border.  Simple little elements but they really worked up into something fun and different than what they were created to represent.
**BE SURE TO SAVE ALL OF YOUR TANDO SCRAPS!  See the circle rectangle on the far left?  That actually is a piece of greyboard left over after I punched out some washers.  I trimmed it up using an exacto knife and it makes a great accent piece for this book cover!


Here is the finished book cover!  Cute, huh?  Want to know how I did it?  Well, let's discover the items you'll need and then let's get started!

Items needed for this project:
  • Some sort of journal or hard cover book
  • DecoArt Media White Gesso
  • DecoArt Media Matte Medium
  • DecoArt Media Crackle Paint
  • DecoArt Media Fluid Acrylics Carbon Black
  • DecoArt Media Fluid Acrylics Diarylide Yellow
  • DecoArt Media Fluid Acrylics Vermillon
  • DecoArt Media Fluid Acrylics Titanium White
  • DecoArt Media Fluid Acrylics Metallic Silver
  • Americana Chalky Finish Smitten 
  • Americana Chalky Finish Escape
  • Americana Chalky Finish Keepsake
  • Decoart Vintage Effect Wash White
  • DecoArt Liquid Glass
  • DecoArt Decoupage Paper Vintage

  • Tando Creative Lace Borders
  • Tando Creative Hinges
  • Tando Creative Gears, Nuts and Bolts
  • Tando Creative Cogs
  • Tando Creative Clock Face
  • Stampendous Andy Skinner Toxic 
  • Stampendous Andy Skinner Shabby Chic

  • DecoArt Andy Skinner Stencils Toxic
  • DecoArt Andy Skinner Stencils Bubbles
Miscellaneous Items
  • Paint Brushes
  • Hot Glue Gun
  • Craft Mat
  • Drying Gun
  • Brayer
  • Antique Buttons
  • Paper Towels or sponge
  • Rhinestones
  • Permanent Black Pen
Let's put it all together!


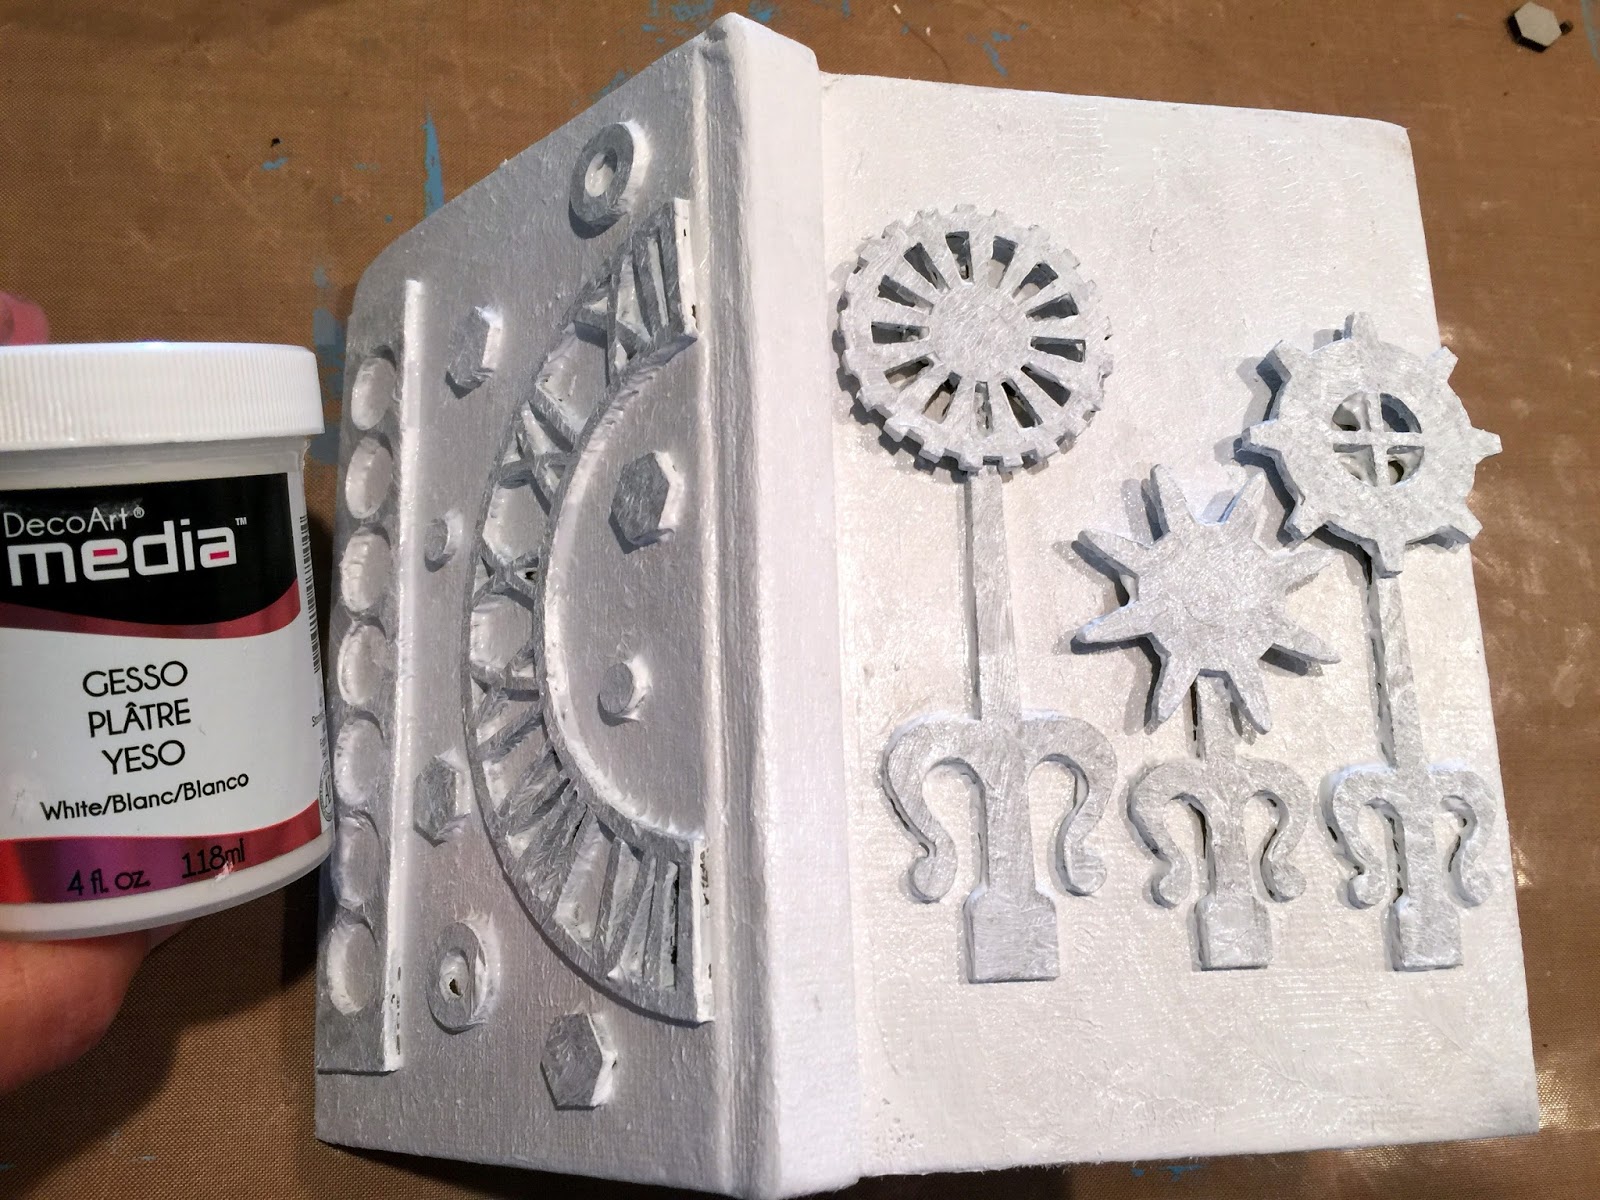
Begin by painting a generous coat of DecoArt White Gesso over the cover of the book.  This provides an even white basecoat and also gives all of the mediums to be added some "tooth" to stick to the book cover.  Let dry or heat set.  Then layout your Tando Creative pieces to create your design.


Glue the pieces in place using DecoArt Media Matte Medium.  Brush onto the cover of the book.  Brush onto the back side of the pieces and press them in place.  Then brush DecoArt Media Matte Medium over the entire cover to seal.  Let dry or gently heat set.  Then brush another coat of DecoArt Media White Gesso over the entire cover.  Let dry or heat set.


Brush a basecoat of DecoArt Americana Chalky Finish Smitten paint over the entire surface of the book cover and about 3/4" on the inside the interior covers.  Be sure to get into all of the cracks and crevasses to cover all of the white base.


 Squeeze a little DecoArt Media Fluid Acrylics Carbon Black onto a craft mat and thin it out with a brayer. Roll the brayer over the surface of your stamps and randomly stamp images on the surface of the book covers.  Let dry or gently heat set.  Immediately wash off your stamps!


To soften all of the colors and pull the raised images together, use a cloth, a brush or a sponge to add DecoArt Vintage Effect Wash (white) over the entire surface of the book cover and on the interior painted edges.  Add or wipe away the Effect Wash until you are happy with the results.


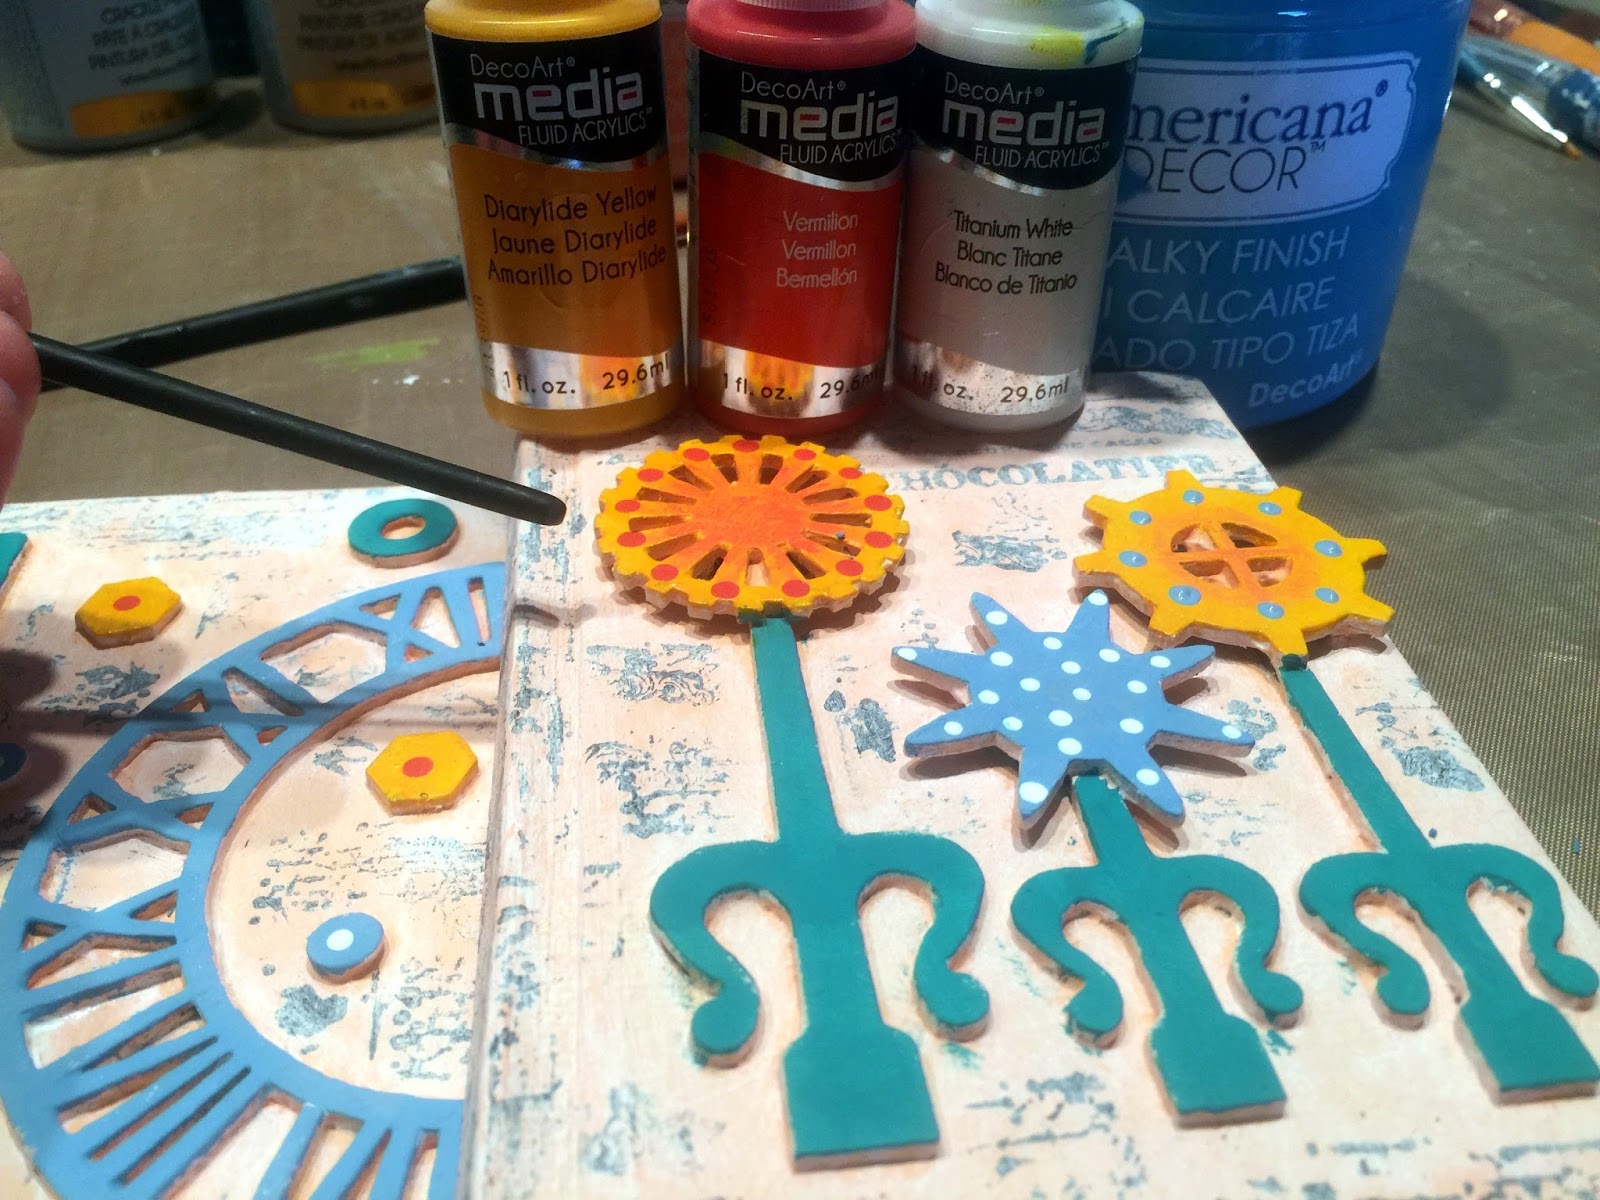
Add some color to your raised images using a brush and various colors of DecoArt Media Fluid Acrylics paint.  I used:  Diarylide Yellow for some of the nuts on the back of the book and a couple of the gear/cog flowers on the front of the book.  I used American Chalky Finish Keepsake for the hinge stems of the flowers and some of the circles on the back.  Titanium White provided the polka dots that were made by using the wooden end of a paint brush dipped in paint and then pressed onto the flowers or circles.  Americana Chalky Paint in Escape was used on the clock ace and center gear/cog flower. I also used it to create some polka dots.


Apply another layer of the DecoArt Vintage Effect Wash in white over the surface of the painted images.  This blends them into the background and creates that beautiful vintage washed look.  Then hot glue antique buttons onto the centers of the flowers.


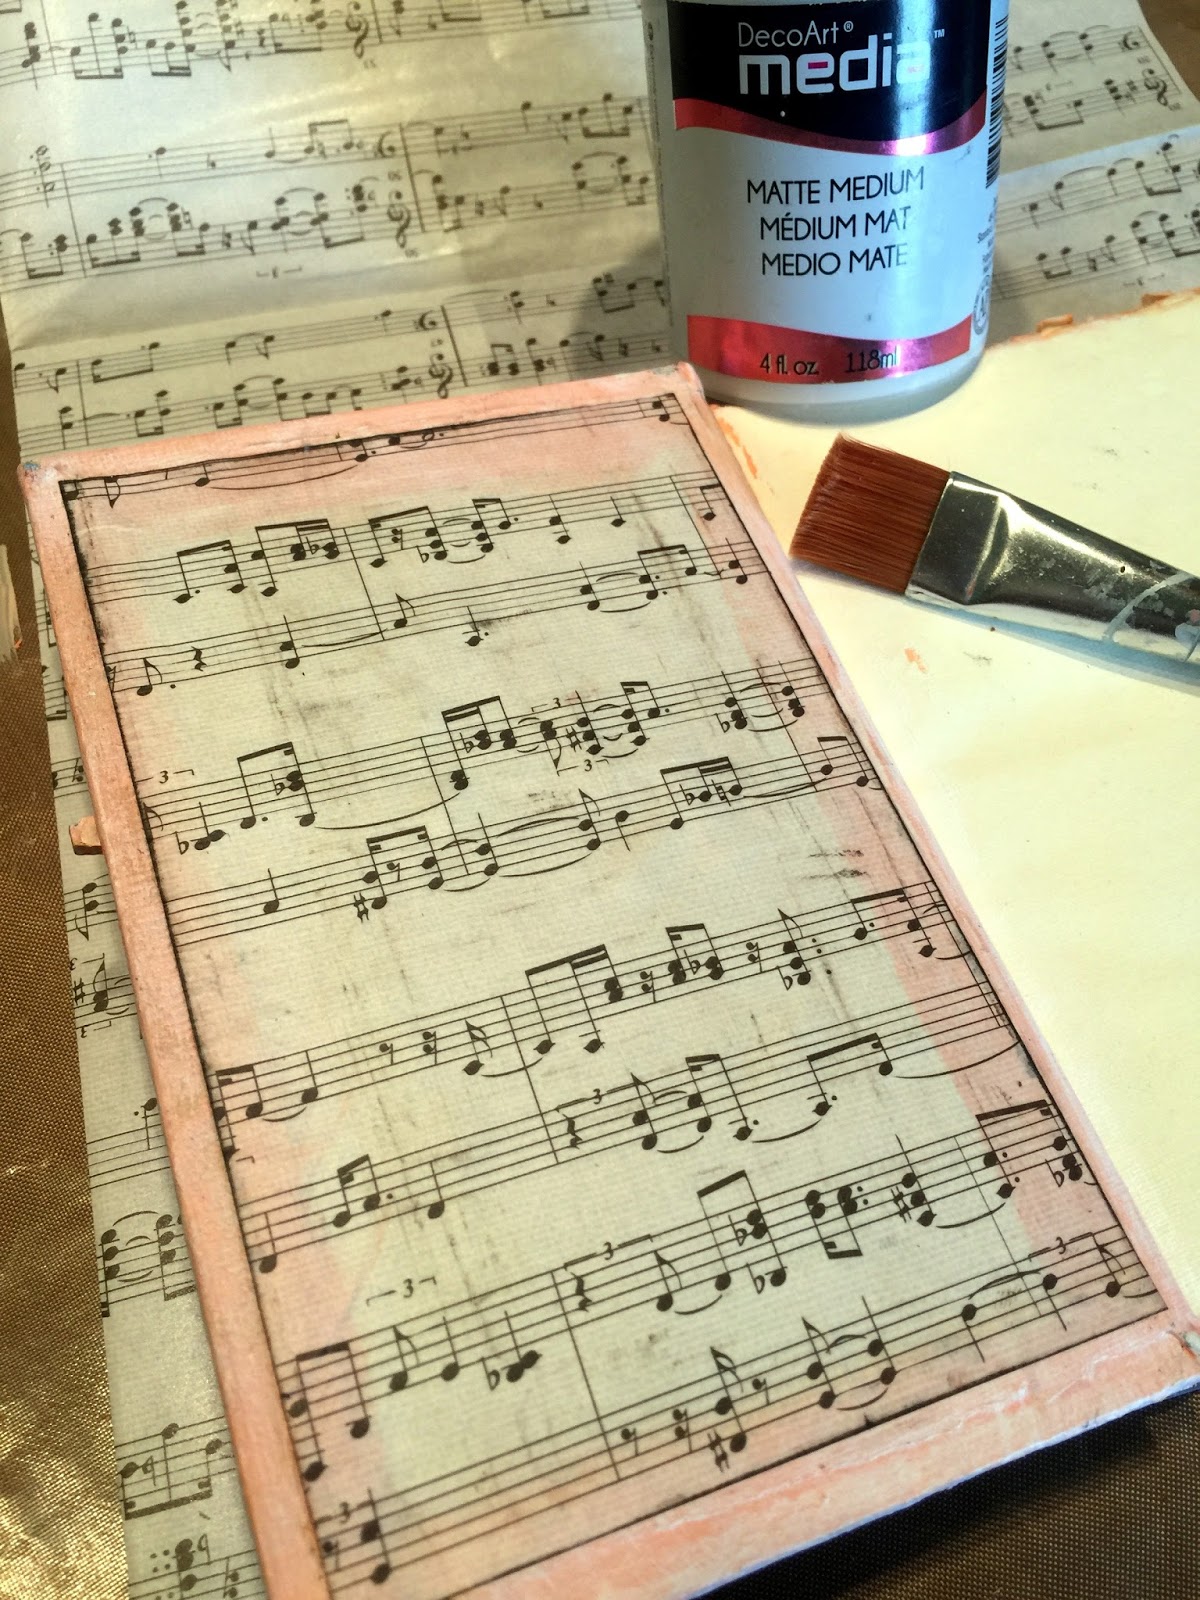
Measure the interior covers of the book and cut two pieces of DecoArt Vintage Decoupage Paper.  Brush DecoArt Matte Medium over the surface of the interior book covers and press the papers into place.  Brayer over them to remove any air bubbles or wrinkles.  Let air dry or gently heat set.


Mix American Chalky Finish Smitten with a bit of DecoArt Media Crackle Paint and a little DecoArt Vintage Effect Wash (white).  Brush over the surface of the interior pages and let air dry.


Create interesting interior covers by layering some of Andy Skinner's DecoArt Stencils.  First I used his DecoArt Bubbles Stencil and DecoArt Chalky Finish Smitten Paint.  I applied the paint by dabbing it with a paper towel.  


Next I added Andy's DecoArt Whirlpool Stencil by lightly brushing and dabbing DecoArt Media Fluid Acrylics Metallic Silver.  I love the layers, contrast and design these stencils and paint gives to the interior pages and covers.


Here is what the interior cover and first page of the journal looks like.  Pretty cool!


Now for the Tando Creative Lace Border layer that will go on top of the hinge stems on the front of the cover...
I painted the Tando Creative piece with DecoArt Media Fluid Acrylics Metallic Silver to accent the antique buttons and the whirlpool interior pages.  After the paint dried, I randomly stamped the Lace Border using Andy Skinner's peeled paint stamp from his Stampendous Toxic set.  I love this versatile stamp! 


Next I added rhinestones to the Lace Border using DecoArt Media Liquid Glass.  It is a wonderful clear glue as well as having the capability to create a faux glass look.  I also glued all of the rhinestones on the back of the cover with Liquid Glass.  


To accentuate the details on the "flowers" and some of the shapes on the back cover, I edged them with a Black Permanent Marker.  


Here is a closeup look at the front cover.  As a final step, I lightly ran my finger with a bit of first Silver and then Black paint over the edges of the cover of the book to sort of frame it and distinguish the edges a bit more.  


And here is another look at the completed covers.  

Thanks so much for stopping by!  I hope you enjoyed this tutorial and you learned a few things about a product or about how to stretch your imagination to see an object for possibly something other than it was intended to be.


About the Artist:  Candy Colwell


Blog: http://candycreates.blogspot.com
Facebook:  https://www.facebook.com/candy.colwell.9
Twitter:  https://twitter.com/rindacelly
Instrgram:  https://www.instagram.com/candy.colwell/