
Here is the finished book.
Stamps used by Lindsay Mason & Andy Skinner
Click On Images For A Larger View


Here we go, time to get messy!

Step 7 Pour some Americana Burnt Sienna and Tuscan Red on to the surface and rub it into all of the detail using your hands.

Step 8 Wipe back some of the colour using a cloth.

Step 9 Apply another coat of Decoart Duraclear Gloss Varnish and allow to dry.

Step 10 Repeat step7 but this time with a different colour. I have used Burnt Umber, Evergreen and True Blue.

Step 11 Wipe back colour leaving some of it remaining.
You can just keep repeating these steps until happy with the effect.

Step 12 Add a little distress ink with a blending tool. I have used aged mahogany, rusty hinge and wild honey, dry with a heat tool.

Step 13 Spray a very light coat of Americana Matte spray sealer, almost a mist.
This will seal and set the distress ink and you can apply a final coat after a couple of minutes.
You can build up layers of distress ink by inking between light layers of the sealer.

I finished off by adding a new ribbon book mark with a small bird cage tied to the end, and Tim Holts metal corner protectors.
I also added a little vintage photo distress ink to the edge of the pages..
You can find part 1 of the tutorial here
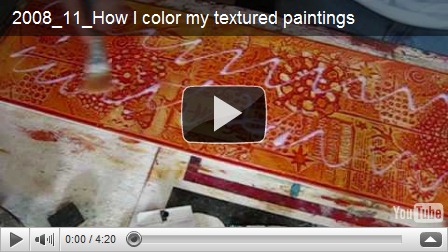
The video below by BozzoArt is amazing and where I got the idea from for this painting method, its kind of antiquing but using your hands.
He is using joint sealer where I have used modeling paste, and I have also included distress ink as an extra.
Bellissimo, Andy!
ReplyDeleteLucia
Brilliant!
ReplyDeleteFab technique and great to 'set' the water based Distress with a sealer between coats !
ReplyDeleteAwesome video, and love your project!
ReplyDeletewonderful *_*
ReplyDeleteThis is so great, Andy! Love it! I follow BozzoArt on Youtube and love his big textured panels. Have tried this on a small scale and it's awesome. Texture is definitely The Thing!
ReplyDeleteThis is a fab technique. Have been having lots of fun altering photo frames and boxes using it since I saw your tutorial. Cheers :-)
ReplyDeletewonderful,wonderful. Thanks so much for sharing.
ReplyDeleteHoly cow! I am super super excited to try this technique. Where have you been and how come I didn't know about your art till today?!!!! I found you via http://madebysannie.blogspot.com where she referred to your dry brush technique. I am super impressed with your art/techniques and your tuts are so easy to follow. Makes me feel like I can do this. Thanks so much for the inspiration and generosity of sharing your techniques.
ReplyDeleteThanks Andy! I've been looking for a way to seal distress ink, obviously water based finishes don't work (even glue/gel medium wipes it off), but spray varnishes didn't seem to do it either.. will try this one :)
ReplyDelete