Showing posts with label Natassa Blazaki. Show all posts

Friday, 25 March 2022

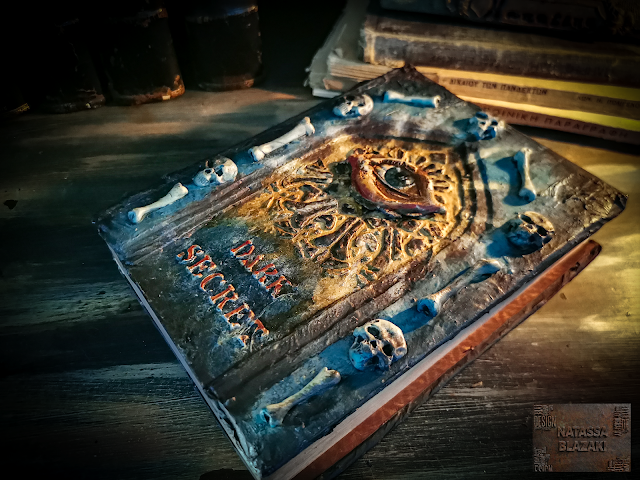
Dark Secret - Altered Book Cover for March Challenge

 Hi guys and welcome back to Andy's Blog

It's been a looong time, but I'm so happy to be here again, to share with you my take on the Altered Book Cover challenge for March. 

You still have a couple of days to play along, since the challenge closes on Sunday. For more details, click on the link https://www.facebook.com/photo/?fbid=10161385546559008&set=gm.4992078744209215

πŸ’€πŸ’€πŸ’€Join us on Facebook Group The Darker SideπŸ’€πŸ’€πŸ’€

So, I decided to alter the cover of a book, that I had in my library forever. It's a story collection by Stephen King, called "The Bazaar of Bad Dreams". That was dark enough to inspire me :)))

I was so thrilled to start creating again, so I thought of making a process video, to show you some ideas on how to create dimension and texture on your projects. In the video, you'll see that I use very simple and easy-to-find materials, that we all have in our houses.

What is more, I wanted to share with you some tips on how to use stamps and stencils,  in a not so common way.


I really hope you enjoy this. Below, you can enjoy some photos and find a full list of materials.                    


Paints - Cosmic Shimmer by Andy Skinner

Artist Pigment Paint

Paynes Grey, Prussian Blue, Cobalt Teal Hue, Transparent Yellow Iron Oxide, Quinacridone Gold, Raw Umber


Chalk Paint
- Midnight, Warm White

Tools and Supplies

Old brushes for glue and varnish
Fan brushes
Flat brushes for painting
Spatula

Polymer clay (any clay is fine, you can also use airdry clay)

E6000 glue
Decoupage glue


Matte varnish - Cosmic Shimmer "Super Matt Varnish" by Andy Skinner
Structure Paste (Cosmic Shimmer by Andy Skinner)

Stencil - Creative Expressions "Mandala" by Andy Skinner
Stamp - Creative Expressions "Eye Spy" by Andy Skinner


Available in every home 😁
White tissue paper
Cardboard (pizza box)
Paper tube (from cling film)
Paper tape
Natural jute twine cord

Monday, 8 February 2021

Love You To Pieces - Grunge Valentine's Day Cards, by Natassa Blazaki

Hi all! Natassa here.

Hope you're doing well and keeping safe. We've lost touch for quite some time, but 2021 started with so much going on. I really wish the whole situation cools down soon, cause I'm sure we all need a break!

Anyways, today I'm here to share with you a project quite unusual for my standards, since I'm not a card maker and also I never make Valentine themed projects.😁 However, Andy's stamp designs are always so inspiring to me and I decided to use them in order to create some grunge style Valentine's cards. I kept them simple and what I focused on was the combination of different stamps, in order to alter the style and look of every card, keeping the CE Heart Rubber Stamp as my focal point. All of my cards measure 4 1/4 x 6 inches and I used precut black cardstock bases. Of course, you can use any cardstock you may have available.


So for the first card, I wanted to create a background full of hearts and then have one of them stand out. I took a piece of thin white wrapping paper and stamped a few rows of hearts. Because the paper was semi-transparent, I stamped every other row on the backside, so that it looked like I did mirror stamping.


Then, I took a piece of light cream cardstock and collaged a page from an old book on it. On top of that, I glued the piece with the stamped hearts, and this way the text from the book page picked through. I stamped with red ink a heart, which I fussy cut and glued on top of the middle heart on my card. I handwrote the sentiment on a piece of black cardstock.


For the second card, I used the CE Circuitree Rubber Stamp and stamped around the heart. I also used the CE Enigma Rubber Stamp to fill the empty space on the top, bottom, and sides of the design. Then, I stamped with teal ink and fussy cut a heart that I glued in the middle of the design. Also, I used some Cobalt Teal and Yellow Iron Oxide  CS Artist Pigment Paint, to tone down the brightness of the paper.


Lastly, for the third card, I went for a dark chic look. First, I stamped the card base with white pigment ink and used the CE Vintage Background Rubber Stamp. This gave me a very subtle background effect. On another piece of black cardstock, I stamped with gold pigment ink and used the CE Winter Trees Rubber Stamp. I wanted to make it as if the trees grew from the heart. I fussy cut the whole design and matted it with craft cardstock. Then, I glued it on my card.


These are really quick and simple cards to make and I'm sure you'll find they are much different than the classic Valentine's cards. Also, I think the designs are suitable for masculine cards, so you can make them and give them to your boyfriends, hubbies, or just your loving guys!

I truly hope you like this project and get inspired
Sending big hugs from Greece
Natassa
πŸ’–πŸ’–πŸ’–

Monday, 26 October 2020

The Witch Behind the Mask


Morning all and happy week, this is Natassa Blazaki, with a new project for Spooktober. That challenge inspired me so much!

The Witch Behind the Mask

So, it’s the last week of October and the theme now is “The Witching Hour”. As I was google searching for witches and witchcrafts to get some inspiration, I saw a poster from Disney’s
Snow White that shows the face of magic mirror and the reflection of the Witch’s face. I got the idea of creating this canvas with a mask, that behind it hides the wicked witch.

Of course it had to be rough, with lots of texture and rust. Rust goes with everything!

I used shades of yellow, orange and purple, which is a classic color palette for the Halloween.

To create that rough, uneven texture on the canvas, I used a lot of Structure Paste, which I thickly applied with a pallet knife in a stippling motion. To color the background I used a combination of Artist Pigments and Matt Chalk Paints.


To create the “hood” around the mask, I used a piece of denim, cut from an old pair of jeans. I glued the mask on the canvas and then I cut the fabric in smaller manageable pieces and built the “hood”. I glued the fabric with gel medium.


Then, I decided that my composition needed an industrial touch, so I used some of the gears from Andy’s greyboard cutouts by Tando Creative.


The tricky part was to do the stamping on that surface. I just couldn’t get a nice crisp impression until it hit me! I took a piece of rice paper from Andy’s “Abstraction” collection, and stamped on it. Then, I cut it to size and glued it on the canvas with matte medium. This way, the stamp was beautifully embedded on the rough surface and had a gorgeous cloudy faux encaustic look.


I also used lots of Mixed Media Transfers on the canvas the mask and the fabric. To make them look distressed, I sanded them with a piece of 240 grit sandpaper.


I truly hope you enjoy the project and get some inspiration.

Remember to play along at Creative Expressions Spooktober Challenge and use the #cespooktober tag, so we can find your projects.

You all have a great week

Natassa

πŸ‘»πŸŽƒπŸ’€


Mustard, Chestnut

Primary Blue, Primary Magenta, Primary Yellow, 
Raw Umber, Quinacridone Gold, 
Transparent Yellow Iron Oxide


Skull of Spades, Pray, Circle of Thorns

Abstraction

Other Supplies

Ranger Archival Ink 

Matte Medium

1/2" , 1", and 2" Flat brushes

Pallet knife

240 grit sandpaper

deep edge canvas

white blank face mask

fabric

Thursday, 22 October 2020

There is a Skull in my Plate!


Hello dears, it’s Natassa here with a fun project for Spooktober Week 3 “Day of the Dead”. And what could be more iconic symbol for DΓ­a de los Muertos that sugar skulls.

So, I tried to think of a cheerful project, that you could easily do together with your kids and create the cutest creepy dΓ©cor for a Halloween party.

Sugar Skull Party Plates

Below, I have got a video tutorial for you, where I’m showing exactly how I created my sugar skull plates. What is clever about this project, is that since you use clear plastic plates and do all the decorating on the back side, they are perfectly safe to put food in them! 

https://youtu.be/CVTYe4AhpVQ


For this project, I used first of all Andy Skinner’s “Sugar Skull” rubber stamp by Creative Expressions. I stamped many skulls on regular printers paper and colored them with alcohol markers. I fussy cut the skulls and glued them on the center of the back side of the plates with matte medium. Let them dry very well. If you are ipmatient like me, you can use a hair drier, set to cold air, so that the plastic plates do not warp from the heat.

Then, I chose to paint the plates with Andy Skinner’s CS Matt Chalk Paints, because I needed opaque colors with a good grip on a non-porous surface such as plastic.

For the decoration of the plates’ bases, I also used Andy Skinner’s Stencils and a couple of acrylic permanent markers in black, white, and gold.

What you have to keep in mind is the order you put the skull and the colors. First you want to glue the skull cutout , then make the background design either with a stencil or do some doodling, then the background color and lastly a layer of black chalk paint or black gesso to seal everything. That black color makes the other layers pop up.

Lastly, a couple of layers of Andy Skinner’s CS Super Matt Varnish, will protect the paint from chipping off. And if you want to give your plates a more luxurious look, you can dry brush some golden acrylic paint on the black paint, just before the varnish.

I really hope you find this project fun and try it yourselves. Remember the Spooktober Challenge by Creative Expressions is still open. You can visit the group’s FB page, upload your spooky projects and tag them #cespooktober, so we can find them. 

Thanks for stopping by. You all keep safe 

Hugs from Greece

Natassa

πŸ‘»πŸŽƒπŸ’€


Kaleidoscope, In a While Crocodile, Flying Coins, Let it Rain


Other Supplies

Ranger Archival Ink 
Black gesso
Matte Medium
Golden Acrylic paint
Acrylic markers
Alcohol markers
1/2" and 1" Flat brushes
Soft sponge
Clear plastic party plates
Regular 80gsm printers paper

Saturday, 10 October 2020

Gears Turning in My Head


Hello lovelies, this is Natassa Blazaki and today I am sharing one of my projects for the Spooktober Challenge run by Creative Expressions UK. If there is one team that’s always inspired by Skulls, Apothecary elements, Spells, Witchcraft and all sort of Dead Man Themes, that’s definitely Andy Skinner’s Creative Team. All the members will be sharing amazing spooky projects here in the blog but also over at Creative Expressions Facebook page. So, stay tuned for the whole month October and head over to Creative Expressions’ page to play along at the Spooktober Challenge.

For the “Skull Week”, I chose to alter a plastic skull, that I had bought from a toy store.


I wanted to give a grunge, industrial look to the skull, so I chose to embellish it with gears from Andy Skinner’s Industrial Elements greyboard kit by Tando Creative.


I started by applying a first coat of black gesso. I glued the cutouts on the skull with Quick Grab Glue. The tricky part was to fit the gears onto the skull’s rounded surface, because the greyboard is thick and does not bend. So, I spritzed the pieces with water and let them relax for a few minutes. Then, I split them in half and glued them on the skull while still damp and flexible. I added some crackle paste to create more texture.
Next, I mixed Andy’s Chalk Paints with Artist Pigments, creating a dark reddish-brown color and applied a coat. I did not mix the paints completely, to achieve a variation in tones and left some of the black to peek through. I let dry and then I continued only with Quinacridone Gold in random areas, but mostly around the gears. I let that layer dry well and then with a piece of natural sponge I dabbed a very thinned layer of white acrylic paint. I let it dry naturally and then I with an old brush I applied a wash of Cobalt Teal and Transparent Yellow Iron Oxide.


I did some dry brushing with white acrylic paint and continued with one more layer of Cobalt Teal and Quinacridone Gold, this time concentrating on the gears. I also used some  Cosmic Shimmer Mixed Media Embossing Powder Crystal Glaze to add to the gears’ texture. 

As finishing touches, I added one of my favorite rub on designs, the one with the pile of skulls from Andy’s Mixed Media Transfers “Curiosities” and did some partial stamping with one of the new stamps, the “Circuitree”.


I really hope you enjoy this project and get some inspiration for your Halloween projects. Enter your projects to the Spooktober Challenge and use the #CEspooktober tag. You may be a lucky winner!

I will soon be back with another spooky project.


Hope you have fun!

Natassa

πŸ‘»πŸŽƒπŸ’€


Andy Skinner Creative Expressions


Transparent Yellow Iron Oxide, Cobalt Teal Hue, Quinacridone Gold, Raw Umber

London Brick, Mustard Seed, Chestnut

Rubber Stamps - "Circuitree"


Mixed Media Transfers - "Curiosities"