Showing posts with label wood. Show all posts

Friday, 27 July 2012

Drift….. Faux Wood Tag

I managed to spend an hour yesterday doing a bit of blog hopping which is rare these days, on my travels I saw a few tags made using the Tim Holtz Texture Fades Wood grain Embossing Folder.
I have had this folder for a while but never felt inspired to use it until now so I combined a few techniques together on Personal Impressions 300 gsm plain white card to produce my take on it!
andy skinner stamps tag

Paints and mediums used are from Decoart.
Before I go, here is My Grungeboard heart that I shared on Facebook yesterday.
Andy-skinner-stamps-altered-art-rusty-heart1

Have a great weekend everyone,
Andy

Tuesday, 24 April 2012

Bonus Video

Just a very quick share today, I have been filming videos for the new Book Of Secrets Workshop and decided to include a bonus video in the workshop showing  how to produce this steampunk finish, very similar to the altered Heat Buddy!

Click Picture for Larger View
andy skinner book of secrets (Large)


Right back to video editing….joy!!!
Andy

Wednesday, 28 December 2011

Shabby

Hi everyone,

Hope you all had a great Christmas and are now looking forward to the new year.
We had a very relaxing couple of days including my Granddaughter Faith pictured here relaxing in her new ball pit!

S1010005

On Christmas day we decided to video a few Christmas messages by way of chin puppets and I just had to share these two with you.
Check out Oliver who is second up in the video and in the middle of loosing his baby teeth….hilarious!


I have been asked to come up with a new workshop next year at Country Love Crafts covering handmade gifts Shabby Chic style.
We were asked many times last year if we would do this so the dates are now set and the first one will be on the 26th March and will be a full day workshop.
Alternatively it can be booked on a bespoke basis and taught one to one.

Hear are a few of the items I have been working on showing some of the techniques being taught.


Here is a present for my daughter…although at the moment with Faith having a cold and teething, I doubt it will be used much!


A simple hinged wedding ring box.


Something for Valentines day??


A christening box, very much with an East of India style.


Finally a little wooden chest of draws.


I bet your shocked that there's not a spot of rust in sight!

Have a great day,


Andy

Saturday, 20 August 2011

Faux Weathered Wood

Hi all,

It's soooo quiet out there in internet land at the moment, so many of you are on holiday… Hmmm holiday…. maybe next year!… are you all still out there?? lol
Anyway, last week I posted a scrapyard challenge mirror on here, this unfortunately failed to go out via my feedburner email subscription, but you can always view it here if you missed it.
Using the same basic pine mirror I have distressed and weathered it using Americana acrylic paint.

Click Image For Larger View
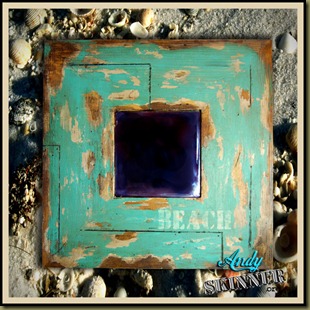
Beach Frames

The basic technique for this can be found HERE, in a video I made a few months back.
I have been busy experimenting with this technique over the past couple of days and it is really starting to come together.

There are approximately seven stages to get to this result on wood, all fairly quick but I wanted to give it a go on cardstock!
Now the only cardstock that I have found to withstand this sort of abuse is the one recommended to me by the wonderful Lindsay Mason, I absolutely love it!
It's 300 gsm and is the only cardstock I have used which can hold up to what I chuck at it :)

Here is a small tag i have made to resemble old painted floorboards, this is using just the 300 gsm cardstock and acrylic paint.

Click Image For Larger View
weathered wood tag1v

(Dream stamp by Lindsay mason  Fly Soar Soul Dream)

Next are a couple of book markers using my Antiques stamp set.
Click Image For Larger View
weathered wood bm1
weathered wood bm

And finally I attempted a faux wooden clock. 
Again this is just a circle cut from the 300 gsm cardstock, absolutely nothing else has been added other than paint.
Next I will glue it to some thick cardboard and fit a clock mechanism.

Click Image For Larger View
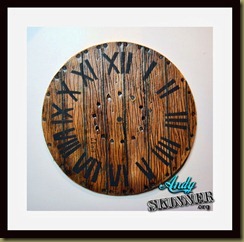
faux wood clocks


Clock numerals were stencilled on using a Tando Mask which is available from the Craft Barn
To find your nearest stockist of this fantastic cardstock visit the stockist locater at the link below. code number is PIP 300 CWH
http://www.personalimpressions.com/

Andy

Thursday, 19 May 2011

inCOGnito

Here is the latest box, Calico Crafts sent me a pack of watch parts a while back now and I have finaly put them to use on this wooden box!

andy-skinner-steampunk-box 3b

I applied gesso to the lid of the box thickly and sprinkled the small cogs and watch parts into it and allowed it to dry before decorating with Americana Acrylic paints and Distress inks.

andy-skinner-steampunk-box 3a

I used an old typewriter key for the handle which was kindly sent to me from Louise over at Alter it Monthly.

andy-skinner-steampunk-box 3

Think I will use it to keep all my small watch parts in……….Hold on…errrr….ummmm.. I've just used them all!

Andy

Saturday, 7 May 2011

It’s a Date!

Whilst at the Craft Barn last week, they were kind enough to let me choose a few wooden items to have a play with. I just had to have this wooden calendar!
Click on pictures for a larger view
DESK CALENDAR
The Calendar measures approx. 13x5.5x19cm & only costs £4.99!
First of all I aged the number and date blocks with Brushed Corduroy Distress ink followed by a coat of Decoart perfect crackle.

Andy-Skinner-Steampunk-Calendar-closeup
I then went to town with a steampunk style using Americana acrylic paint and a few odds & ends lying in the bottom of my scrap box!.

Andy-Skinner-Steampunk-Calendar
This will be the last steampunk piece for a little while as I am sure you're all getting very bored by me & also I have some new media that I really want to play with this week.

Bye for now,
Andy

Wednesday, 6 April 2011

The da Vinci Project

I wanted to share with you this birch wooden box from the Craft Barn I made yesterday using the Americana spray image transfer technique shown in my earlier video.
In the video I was using it on bisque and cardstock so yesterday I had a go onto wood.
I printed a few copies of Leonardo da Vinci's study of a woman's head on a laser printer and transferred the larger copy onto the box lid and the smaller onto a tag to match.
Andy-Skinner-Image-Transfer-1
I used distress inks with my blending tool to create a background and age it. I then used a crackled background stamp with Frayed Burlap Distress ink and stamped Object d’ Art from my Antiques set with Black Archival. I finished the top with a few coats of Americana Matte spray which gives a slightly satin finish and added a pendant from Calico Crafts Steampunk metal range.

For the base I have used Decoart Americana acrylics with there weathered wood medium for an aged and worn cracked effect. These products are also available from Calico Crafts.

Andy-Skinner-image-transfer-tag1
A quick note on using this process on wood;
I so far have only tried this on birch and have found the smoother the wood the better the transfer, although I want the image to be slightly imperfect I would recommend sanding the wood first.

Andy

Thursday, 31 March 2011

Steampunked


Just a quick post tonight as it’s nearly time to go home.
It has been a very busy week writing projects for magazine articles but I did manage to escape for a couple of hours this evening and have a play with this  birch ply door hanger from Calico Crafts. I decided to give it a steampunk theme.
Can you spot the party popper, plastic paintbrush handle, Perfect Pearls lid, cotton bud, lolly stick and googly eyes?
The good new this week is that my stamps are finally here and should be with retailers within the next couple of days! So to celebrate I will be launching a brand new competition with lots of sponsors!  There really are some fantastic prizes!!
Watch this space over the next couple of days!

CLICK ON PICTURE FOR LARGER VIEW
Andy-Skinner-SteampunkAndy-Skinner-Steampunk1Andy-Skinner-Steampunk-2
Andy

Thursday, 17 March 2011

Time to concentrate


Hello,
I have been promising to do some tutorials over the past couple of weeks but have been busy painting samples and running workshops so apologies for that.  I have slapped myself firmly on the wrist and am going to concentrate all my efforts over the next 3 days in producing some tutorials and maybe even a video! The ones that come to mind are Acrylic Blistering and Faux Salt Glaze.
If anyone has another suggestion then please let me know as the 3 day tutorial marathon starts at 3pm tomorrow!

I will leave you with this wooden shelf from country love crafts which I painted this morning for display.

Andy skinner decoart wooden shelf blank
Have a great day,
Andy

Wednesday, 16 March 2011

Wooden it be lovely!

Hi everyone,
I have made a start on a couple of the wooden pieces and also a new chipboard item.
Below is a small key Chest from the Craft Barn which has been painted with Americana acrylic, a little bit of alcohol sprayed on and some Distress Ink. It was then finished with Decoart’s two part Perfect Crackle medium, I love this stuff as it is so controllable and you get great results every time.
Click on pictures for a larger view.

chest-Andy-Skinnerchest-ow
Next is a tin roof bird house, this again has been painted with Americana acrylic which is waterproof, a little Distress ink, Alcohol Ink for the tin roof and finally sprayed with some Perfect Pearls Mists.

bird house
And finally I just received this today, its a chipboard suitcase! It comes in two sizes, the smallest being 25cm x 20cm x 8cm and the next size up is 27.5cm x 22.5cm x 9.5cm.
It would make a lovely memory box. I have decorated this one Vagabond style to keep old postcards in!

Travel-case
Andy